
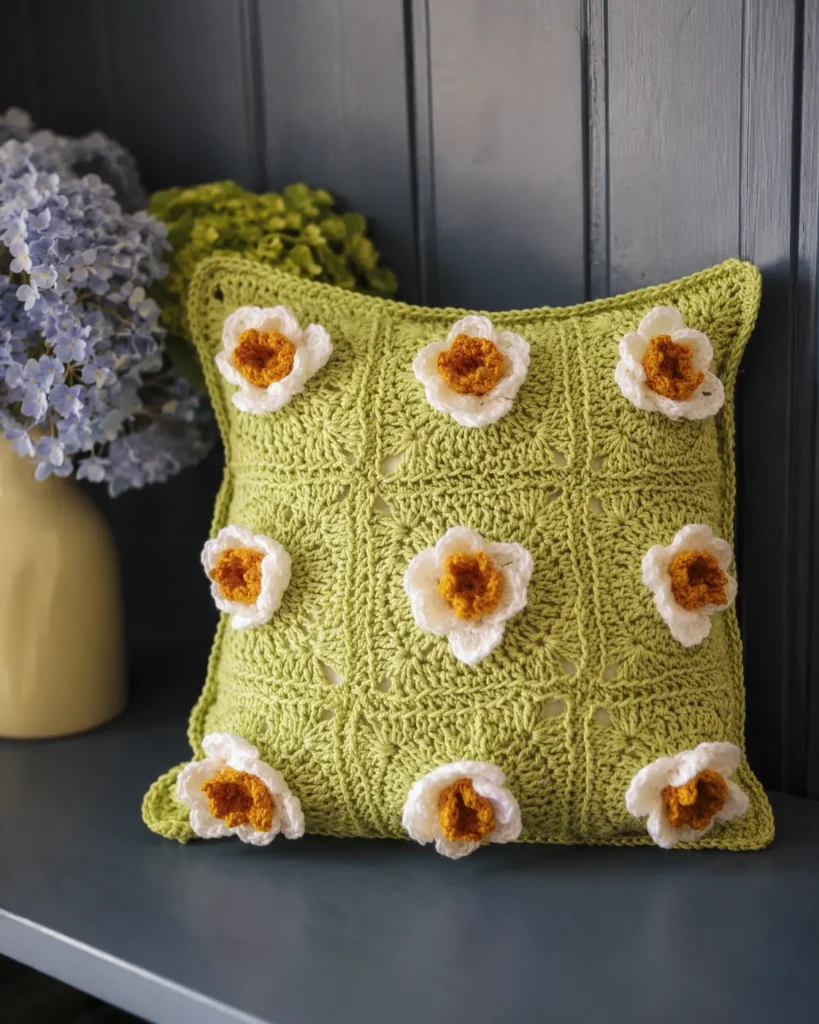
Spring has a way of inspiring us to pick up our hooks, and nothing captures that sunny seasonal energy quite like a cheerful daffodil motif. This free Crochet Daffodil Granny Square pattern is a wonderful intermediate project that combines a 3D flower with a classic granny square base — the result is a textured, eye-catching motif that works beautifully as a pocket patch, appliqué, or repeated across a full cushion cover.
What makes this granny square special is that the daffodil pops out in 3D, giving your finished piece real dimension and depth. The trumpet centre, iconic to real daffodils, is built up using front post double crochet stitches so it stands proud from the flat petals below. The whole motif sits on a tidy granny square background, making it easy to join multiples together for bigger projects.
Whether you’re making one as a gift tag, several for a spring wreath, or dozens for a cosy home décor piece, this pattern is a joy to work up. Let’s dive in!
What You’ll Need
Materials
| Item | Detail |
|---|---|
| White DK yarn | 4 metres |
| Yellow DK yarn | 3 metres |
| Contrasting DK yarn (background) | 16.5 metres |
| Crochet hook | 3mm (or size to match your yarn) |
| Yarn needle | For weaving in ends |
| Scissors | — |
Yarn tip: Cotton DK works especially well for this pattern — it holds the 3D shape of the petals and trumpet beautifully without flopping. Acrylic DK is a great budget-friendly alternative if you prefer.
Gauge
19 stitches × 10 rows = 10 × 10 cm (4 × 4 in) over double crochet stitches with a 3mm hook.
Gauge matters here, especially if you plan to join multiple squares. Take a few minutes to work a tension swatch first and adjust your hook size if needed.
Finished Size
Approximately 10 × 10 cm (4 × 4 in) using DK cotton yarn and a 3mm hook.
Crochet Abbreviations Used
This pattern uses UK crochet terminology.
| Abbreviation | Stitch Name |
|---|---|
| ch | Chain |
| sl st | Slip stitch |
| dc | Double crochet |
| hdc | Half double crochet |
| tr | Treble crochet |
| dtr | Double treble crochet |
| fpdc | Front post double crochet |
| inc | Increase (2 stitches in same stitch) |
Stitch Notes & Tips Before You Begin
A few things to keep in mind before you start crocheting:
- The flower is worked in the round. You’ll begin at the centre and work outward.
- Front loops and back loops are key to this pattern. Row 2 (the petals) is worked entirely in the front loops of Row 1. The granny square section is built from the back loops of that same Row 1. This technique keeps both the flower and the square neatly separated.
- The yellow trumpet is crocheted around the front post of Row 1 — this is what gives the daffodil its signature raised centre.
- Fasten off and weave in ends carefully between each section to keep your work tidy.
- The stem positioning matters. When you attach your background yarn to begin the granny square, attach it 4 stitches from the central point of the petal you’d like at the bottom of your square — this centres the flower properly.
If you’re new to treble crochet, double treble crochet, or front post double crochet, don’t let that put you off! These stitches are used in all crochet clothing and textured projects — learning them here is great practice. You’ll find plenty of free stitch tutorials on YouTube before you begin.
How to Crochet the Daffodil Granny Square
Part 1 — The Flower Centre (Yellow)
Row 1: Using yellow yarn, make a magic ring. Chain 3 (this counts as your first dc). Work 11 dc into the centre of the magic ring. Slip stitch into the top of the ch-3 to close the round. Total: 12 dc. Fasten off and weave in ends.
Magic ring tip: If you struggle with magic rings, you can chain 4 and slip stitch into the first chain to form a small ring instead. Just be sure to pull the tail tight after Row 1 to close the hole.
Part 2 — The Petals (White)
Row 2: Attach white yarn to the front loop of any stitch from Row 1.
⚠️ Important: All stitches in this row are worked in the front loop only.
Work the following petal sequence 6 times to complete all 6 petals:
Single petal: (ch 2, dc, tr, dtr) all in the same stitch — (tr, dc, ch 2, sl st) in the same stitch — sl st in each of the next 2 stitches.
Between petals: Chain 2 around the back of the petal, skip 2 stitches, sl st into the next stitch to reposition for the next petal.
Slip stitch into the first stitch to close the round. Total: 6 petals. Fasten off and weave in ends.
Petal shape tip: The combination of dc, tr, and dtr creates a natural pointed petal shape. Make sure you’re working each stitch to its full height for the best effect. If your petals curl inward, try going up half a hook size.
Part 3 — The Trumpet Centre (Yellow)
This is the part that makes your daffodil look truly realistic — the raised, fluted trumpet at the flower’s centre.
Trumpet Row 1: Attach yellow yarn to any front post from Row 1 of the flower. Chain 3 (counts as first dc). Work fpdc (front post double crochet) around each stitch of Row 1. Slip stitch into the top of the ch-3. Total: 12 fpdc.
Trumpet Row 2: Work the picot edging — [picot: ch 2, sl st into the 2nd chain from hook, sl st, sl st] — repeat 6 times around. Slip stitch to join. Total: 6 picots. Fasten off and weave in ends.
What are picots? A picot is a tiny decorative loop — chain 2, then slip stitch back into the 2nd chain from your hook. They create the ruffled, wavy edge of a real daffodil trumpet. If yours look too small, try chaining 3 instead of 2 for a slightly more pronounced ruffle.
Part 4 — The Granny Square Background
Now you’ll build the granny square frame around your finished flower, working into the back loops of Row 1 that you left free earlier.
Important positioning note: Attach your contrasting yarn 4 stitches from the central point of the petal you want at the bottom of the square. This ensures the stem/flower sits centrally. If you’re unsure, work slowly through this section and count carefully.
Row 1 (Back loops of original Row 1): You’re now working from the back loops only. This is already set up from your flower work — attach your contrasting yarn as described above.
Row 2: Chain 3 (counts as dc). Dc in the same stitch. Dc increase (2 dc in same stitch) — work 11 increases around. Slip stitch into the top of ch-3. Total: 24 dc.
Row 3: Chain 3 (counts as dc). Dc increase in next stitch. [dc, dc increase] — repeat once more, then continue: dc, then in the final stitch, before finishing the final 2 loops, pick up your green yarn — dc in the same stitch — before finishing the final 2 loops of that stitch, pick up your cream yarn. Continue: [dc, dc increase] — repeat 7 more times. Slip stitch to join. Total: 36 dc.
Colour change note: This row includes a subtle colour change to add a stem detail at the base of the flower. If you prefer a simpler single-colour square, you can skip the colour change and simply continue in your contrasting yarn throughout.
Row 4 (Corners): Chain 1 (counts as heightening stitch). Work: 4 sc, hdc, dc, (3 dc, ch 3, 3 dc) in the corner stitch — this creates your first corner. Continue: [dc, hdc, 4 sc, hdc, dc, (3 dc, ch 3, 3 dc) in corner stitch] — repeat 2 more times. Finish: dc, hdc. Slip stitch into the first stitch. Total: 68 stitches. Fasten off and weave in all ends.
Corner tip: The (3 dc, ch 3, 3 dc) worked into a single stitch is the classic granny square corner. The ch-3 space is what creates that neat squared-off corner shape. Make sure you’re working all 7 stitches into the same stitch — it will feel tight, but it fans out beautifully once you remove it from the hook.

Finishing Your Granny Square
Once all your ends are woven in, give your granny square a light block. Lay it flat on a foam mat or towel, dampen with water or steam gently, and pin it to shape. Leave to dry completely. Blocking:
- Evens out the stitches
- Opens up the granny square corners
- Helps the 3D flower sit nicely centred
- Makes joining multiple squares much easier
Project Ideas for Your Daffodil Granny Square
The beauty of granny squares is their versatility. Here are some ways to use your finished motif:
Single square uses:
- Iron-on or sewn pocket patch on a tote bag or denim jacket
- Greeting card embellishment
- Brooch or hair clip (add a brooch back or hair clip to the reverse)
- Bookmark (back with felt for a sturdy finish)
Multi-square projects:
- Cushion cover — make 9 or 16 squares and join with slip stitch or join-as-you-go for a gorgeous spring cushion
- Table runner — a row of 6–8 squares makes a charming spring table decoration
- Baby blanket — work in softer pastel yellows and whites for a sweet seasonal baby gift
- Wall hanging — join 3–4 squares and hang on a wooden dowel for boho spring décor
If you love making granny squares, you might also enjoy these patterns on the blog:
- Classic Granny Square Pattern with Diagram
- Mastering the Basic Granny Square
- Daisy Granny Square Free Crochet Pattern
- Strawberry Granny Square Free Crochet Pattern
- Cluster Crochet Granny Square Pattern
Troubleshooting Common Issues
My petals are too flat / not standing up: Make sure you’re working into the front loops only in Row 2. Also check that your dtr (double treble) is worked to its full height — it’s this tallest stitch in the petal that creates the lift.
My granny square isn’t square: This is almost always a tension issue. Try blocking first — it solves most wonkiness. If the square is consistently off, adjust your hook size.
The trumpet doesn’t stand out: Check that you’re working fpdc (around the post of the stitch) rather than into the top of the stitch. If it still lays flat, try tightening your tension slightly on this row.
My magic ring won’t stay closed: After Row 1, pull the yarn tail firmly before fastening off. You can also put a small dab of fabric glue on the tail after weaving it in for extra security.
Yarn & Hook Recommendations
Best yarn choices for this pattern:
- Cotton DK — Top choice. Holds structure well, great for 3D elements, machine washable, and available in vivid spring colours.
- Cotton-acrylic blend DK — Slightly softer than 100% cotton, with good stitch definition.
- Acrylic DK — Budget-friendly and widely available. Choose a brand with good stitch definition rather than a very fluffy or hairy yarn.
Avoid: Fluffy, textured, or variegated yarn for this pattern — the stitch details will get lost.
For home décor projects like cushion covers, cotton is especially recommended as it’s washable and durable.
Make It Your Own — Pattern Variations
Change the colours: Traditional yellow daffodil on a green background for maximum spring impact. Or try white petals with a peach trumpet for a narcissus effect. Purple petals on a cream background makes a stunning fantasy flower.
Adjust the size: Use chunky yarn and a 5–6mm hook for a larger square (great for cushions and blankets). Use fingering weight and a 2mm hook for a miniature version perfect for jewellery or cards.
Add a stem: When working Row 3 of the granny square, extend the green yarn section for a longer, more visible stem detail running down the square.
More Free Crochet Patterns You Might Love
If you enjoyed this floral granny square, here are some other free patterns from the blog that crochet lovers tend to adore:
- Looking for more home décor inspiration? Try these charming crochet décor patterns or cosy crochet home décor ideas
- Love amigurumi? The cute Leggy Frog pattern and Crochet Fairy are both great makes
- New to crochet clothing? The Simple Crochet Top for Women and Summer Boho Top are fantastic beginner wearable patterns
Quick Reference — Pattern Summary
| Section | Yarn | Key Stitches | Total |
|---|---|---|---|
| Flower Centre | Yellow | dc, magic ring | 12 dc |
| Petals | White | dc, tr, dtr (front loops) | 6 petals |
| Trumpet Row 1 | Yellow | fpdc | 12 fpdc |
| Trumpet Row 2 | Yellow | picots | 6 picots |
| Granny Row 2 | Contrasting | dc inc | 24 dc |
| Granny Row 3 | Contrasting | dc, inc | 36 dc |
| Granny Row 4 | Contrasting | sc, hdc, dc, corners | 68 sts |
I hope you love making this Crochet Daffodil Granny Square as much as I do — it’s one of those patterns that looks impressive but is so satisfying to work up once you understand the structure. The combination of the 3D flower and the classic square base makes it a really versatile motif to have in your pattern library.
If you make one (or a whole cushion full of them!), I’d love to see your finished squares. Happy crocheting! 🌼
