
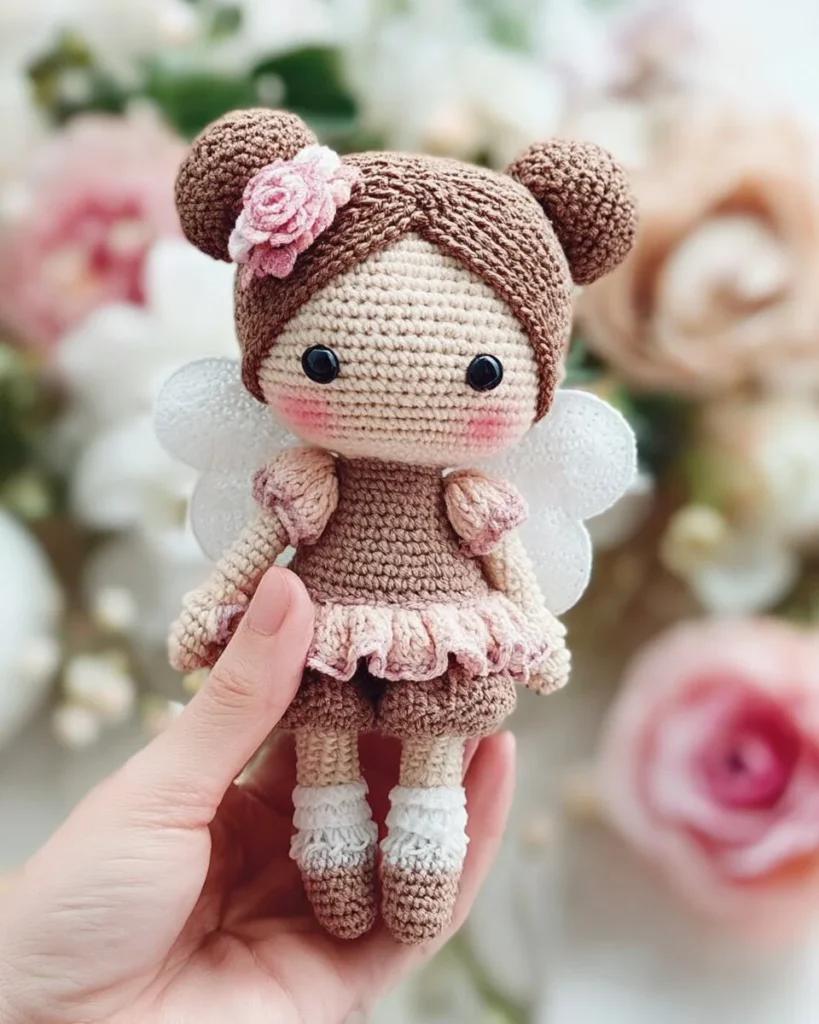
Free Crochet Fairy Pattern: Enchanting Crafts for Your Home
Crochet lovers, rejoice! Today, we bring you a magical opportunity to enhance your crafting repertoire. This free crochet fairy pattern is not only a delightful project for all skill levels but also a charming addition to your home decor, making it the perfect gift for a loved one or a unique piece for your own collection. So, grab your crochet hook, yarn, and let’s bring this whimsical creation to life!
Why Crochet a Fairy?
Fairies have long been associated with magic and wonder, making them a favorite subject for both children and adults. Crocheting a fairy can inspire your creativity, provide a relaxing crafting experience, and give you a lovely handmade decoration to cherish. Plus, it’s a great way to use up yarn scraps!
In this article, we will share a detailed pattern that guides you step by step through the process of creating your very own crochet fairy, and tips on how you can customize your fairy to reflect your unique style.
Materials Needed
Before diving into our crochet fairy pattern, let’s gather all the materials you’ll need:
-
Yarn: Choose your favorite colors of worsted weight yarn. You’ll need skin tones for the body, various colors for the dress, and shades for the hair.
-
Crochet Hooks: Use a size G/6 (4.0 mm) hook, or adjust according to your yarn weight.
-
Scissors: For trimming your yarn.
-
Yarn Needle: For weaving in ends.
-
Polyester Fiberfill: To stuff your fairy.
-
Safety Eyes (optional): If you prefer your fairy to have a more animated look.
Crochet Fairy Pattern: Step-by-Step Instructions
Body
Round 1: With your skin-tone yarn, make a magic ring. Insert hook and chain 2. This will count as your first double crochet (dc). Work 11 dc into the ring. Pull the ring tight to close. (Total of 12 dc)
Round 2: Chain 2 (counts as first dc), then dc in the same stitch. In each stitch around, work 2 dc. Join with a slip stitch to the top of the chain. (Total of 24 dc)
Round 3: Chain 2, dc in the next stitch, 2 dc in the next stitch; repeat from * to * around. (Total of 36 dc)
Round 4: Chain 2, dc in the next 2 stitches, 2 dc in the next stitch; repeat from * to * around. (Total of 48 dc)
Round 5-7: Chain 2, dc in each stitch around. (Total of 48 dc)
Round 8: Chain 2, dc in the next 2 stitches, decrease (dc2tog) in the next stitch; repeat from * to * around. (Total of 36 dc)
Round 9: Repeat Round 8. (Total of 24 dc)
Round 10: Begin to stuff the body with polyester fiberfill. Chain 2, dc in the next stitch, decrease in the next stitch; repeat from * to * around. (Total of 18 dc)
Round 11: dc in the next stitch, decrease; repeat from * to * around. (Total of 12 dc)
Round 12: Decrease in every stitch around. (Total of 6 dc) Fasten off, leaving a long tail to sew closed.
Arms
For Each Arm:
Using skin-tone yarn, chain 4.
Row 1: Dc in the second chain from the hook and dc in the following 2 chains. (Total of 3 dc)
Row 2-4: Chain 2, turn, dc in each stitch. (Total of 3 dc)
Fasten off and leave a long tail for sewing. Repeat for the second arm.
Dress
Choose your favorite color for the dress.
Round 1: With dress yarn, create a magic ring, chain 2 and make 12 dc into the ring. Pull ring tight. (Total of 12 dc)
Round 2: Chain 2, then make 2 dc in each stitch around. (Total of 24 dc)
Round 3: Chain 2, dc in the next stitch, 2 dc in the next stitch. Repeat around. (Total of 36 dc)
Round 4: Chain 2, dc in the next 2 stitches, 2 dc in the next stitch. Repeat around. (Total of 48 dc)
Round 5-7: Chain 2, dc in each stitch around to form the length of the dress. (Total of 48 dc)
Round 8-9: Chain 2, dc in the next 3 stitches, decrease in the next stitch. Repeat to form the waist. (Total of 36 dc)
Fasten off and leave using this to attach the dress to the body.
Hair
For the hair, use your preferred hair color.
- Cut strands of yarn about 8 inches long.
- Gather 3-4 strands and fold them in half.
- Insert your hook into the top of the head and pull the folded yarn through.
- Pull the ends of the yarn strands through the loop to secure.
- Repeat until the head is full, styling as desired.
Assembly
- Attach the arms to the sides of the body using the yarn threaded needle.
- Sew the dress onto the body, aligning it with the bottom.
- Optionally, add safety eyes or embroidery for the face.
- Style the hair and secure it in place with a clasp or tie at the back if desired.

Customization Ideas
This crochet fairy pattern is a fantastic base that you can easily customize. Here are some ideas to add your personal touch:
- Color Palette: Experiment with different yarn colors for the dress, hair, and body.
- Accessories: Create tiny wings using lace or craft wings from felt or foam for added enchantment.
- Expressions: Use embroidery techniques to create various facial expressions or add blush to highlight the cheeks.
- Outfit Changes: Make multiple dresses in varying styles for a wardrobe of fairies!
Caring for Your Crochet Fairy
To ensure that your crochet fairy remains a cherished part of your decor, consider these care tips:
- Washing: Hand wash only with mild soap and allow to air dry. Machine washing may distort the shape.
- Storage: Keep your crochet fairy away from direct sunlight to prevent fading and to maintain the colors vibrant.
- Display: Showcase your fairy with other crocheted items or craftworks to create a whimsical corner of your home.
Conclusion
With this free crochet fairy pattern, you’ve embarked on a delightful crafting journey. Not only have you created a charming piece to showcase or gift, but you’ve also exercised your creativity and crochet skills. Whether you’re a beginner or an experienced crocheter, this fairy is sure to bring joy and magic into your life.
Feel free to share your finished projects on social media and join crochet communities for inspiration and support. And don’t forget to check back regularly for more free patterns and tips!
We hope you enjoyed this enchanting crochet fairy pattern. Happy crafting!

