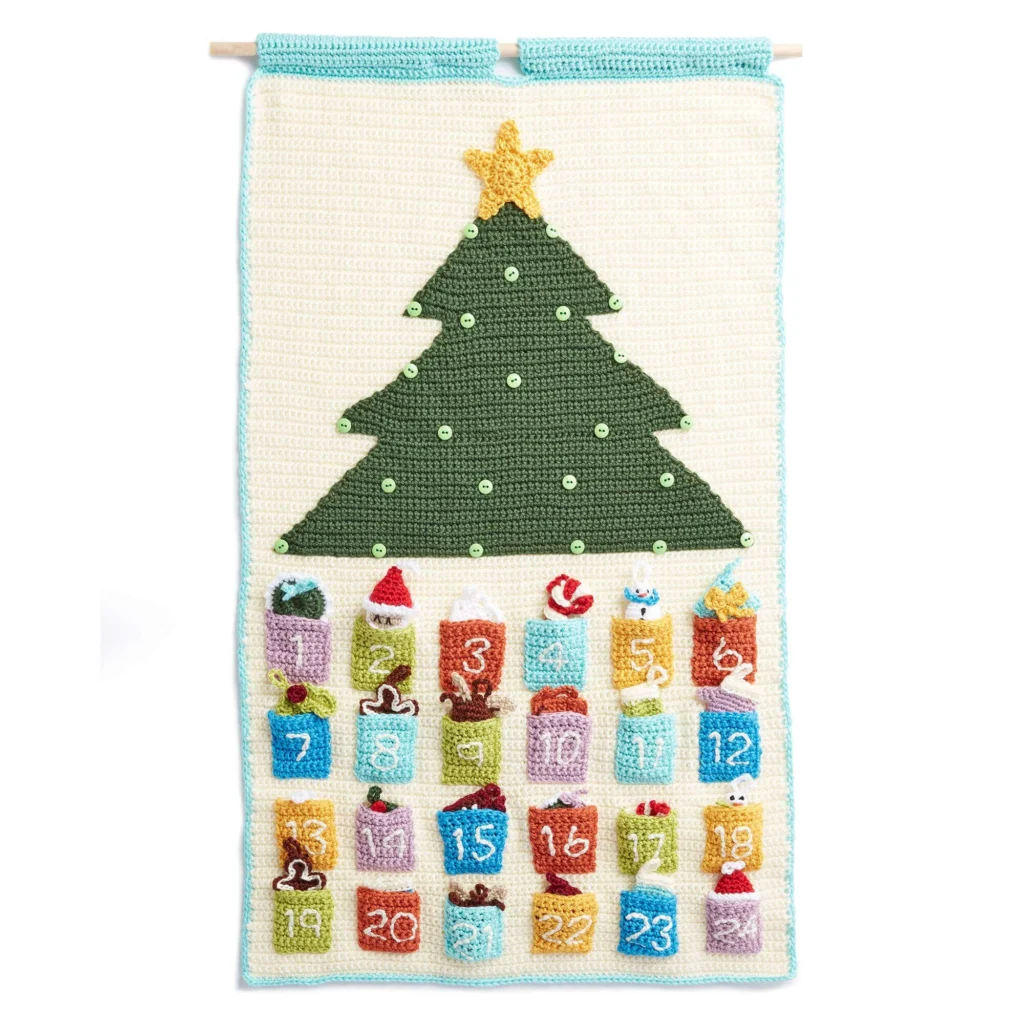
Countdown to Christmas Crochet Advent Calendar Pattern
Celebrate the festive spirit with the Countdown to Christmas Crochet Advent Calendar Pattern! This project is perfect for crafting a unique advent calendar that not only counts down the days to Christmas but also showcases beautifully crocheted ornaments. Each pocket holds a small surprise, bringing joy and excitement throughout the holiday season. In this article, you’ll find all the essential information and instructions to create your very own crochet advent calendar.
About This Crochet Project
This crochet advent calendar features a delightful tree design, complete with various ornaments that can be made to showcase different holiday themes. The project includes the creation of a background, edging, tabs, a layered tree structure, and multiple ornaments, making it a comprehensive and engaging crochet endeavor. Each piece is uniquely designed to not only serve as decoration but also to enhance your Christmas celebrations.
The overall structure of the pattern allows crafters to work on individual components, which can be put together later for the final assembly.
Materials

Before you begin, gather your materials to ensure a smooth crocheting experience.
Yarn
- Contrast A Off White (39702): 3 balls
- Contrast B Robin’s Egg (39780): 1 ball
- Contrast C Dark Sage (39707): 1 ball
- Contrast D White (39701): 1 ball
- Contrast E Black (39727): 1 ball
- Contrast F Chocolate (39750): 1 ball
- Contrast G Burgundy (39762): 1 ball
- Contrast H Harvest Red (39763): 1 ball
- Contrast I Pumpkin (39765): 1 ball
- Contrast J Gold (39782): 1 ball
- Contrast K Chartreuse (39771): 1 ball
- Contrast L Cobalt Blue (39784): 1 ball
- Contrast M Bone (39703): 1 ball
- Contrast N Blackberry (COL0005): 1 ball
Crochet Hook
- Size: U.S. H/8 (5 mm) crochet hook or size needed to obtain gauge.
Stuffing
- 24 – 5/8″ [16 mm] buttons for ornament hanging.
Crochet Abbreviations
Understanding crochet terminology is key to successfully following this pattern. Here are some common abbreviations used throughout the pattern:
- ch: chain
- sc: single crochet
- hdc: half double crochet
- dc: double crochet
- st(s): stitch(es)
- sl st: slip stitch
- tog: together
- RS: right side
- WS: wrong side
Pattern Notes
The pattern is divided into distinct sections, making it easy to follow along. Each component can be completed individually and assembled once they are finished. The combination of colors adds to the festive feel, providing the opportunity to customize your advent calendar according to your holiday decor.
Overall Structure
- Make Background and its Edging and Tabs
- Make tree structure: Tree sections (Section One/Two/Three) and Star
- Make Pockets (make 4 each in B, I, J, K, L, and N); embroider numbers 1–24 on pockets
- Make all Ornaments and sew loops/ornaments as stated
Background, Edging, and Tabs
Background
Create the base of your advent calendar by following these steps:
With A, ch 83.
- 1st row: 1 sc in 2nd ch from hook. 1 sc in each ch to end of ch. Turn. (82 sc)
- 2nd row: Ch 1. 1 sc in first sc. 1 sc in each sc to end of row. Turn.
- Repeat the 2nd row until work from beginning measures 37″ [94 cm].
- Fasten off.
Edging (1st rnd)
- (RS). Join B with sl st in any corner. Ch 1. Work 1 rnd sc evenly around Background, working 3 sc in each corner. Join with sl st to first sc.
- Fasten off.
Tabs (make 2)
- With B, ch 39.
- 1st row: 1 sc in 2nd ch from hook. 1 sc in each ch to end of ch. Turn. (38 sc)
- 2nd row: Ch 1. 1 sc in first sc. 1 sc in each sc to end of row. Turn.
- Repeat 2nd row until work from beginning measures 2½” [6 cm].
- Fasten off.
- Fold Tabs in half. Begin 1″ [2.5 cm] in from corner on top edge of Background, sew Tabs evenly across as shown in the picture.
Tree + Star + Pockets
Tree — Section One
- With C, ch 2.
- 1st row: 1 sc in 2nd ch from hook. Turn. (1 sc)
- 2nd row: Ch 1. 2 sc in first sc. Turn. (2 sc)
- 3rd row: Ch 1. 2 sc in each sc to end of row. Turn. (4 sc)
- 4th row: Ch 1. 2 sc in first sc. 1 sc in each sc to last sc. 2 sc in last sc. Turn.
- Repeat 4th row until there are 34 sts in the row.
- Fasten off.
Tree — Section Two
- 1st row: (RS). Skip first 7 sc in last row. Join C with sl st to next sc. Ch 1. 1 sc in same st as last sl st. 1 sc in each of the next 19 sc. Turn. (20 sc)
- 2nd row: Ch 1. 2 sc in first sc. 1 sc in each st to last sc. 2 sc in last sc. Turn.
- Repeat 2nd row until there are 54 sts in the row.
- Fasten off.
Tree — Section Three
- 1st row: (RS). Skip first 7 sc in last row. Join C with sl st to next sc. Ch 1. 1 sc in same st as last sl st. 1 sc in each of the next 39 sc. Turn. (40 sc)
- 2nd row: Ch 1. 2 sc in first sc. 1 sc in each st to last sc. 2 sc in last sc. Turn.
- Repeat 2nd row until there are 74 sts in the row.
- Fasten off. Sew Tree to Background 2½” [6 cm] from the top.
Button Hanging for Tree
Sew 24 buttons to hang ornaments onto the Tree through all thicknesses, evenly spaced, as shown in the photo.
Star
Star (Base)
- With J, ch 3.
- 1st rnd: 10 hdc in 3rd ch from hook. Join with sl st to first hdc.
- 2nd rnd: Ch 2. 2 hdc in first hdc. 2 hdc in each hdc around. Join with sl st to first hdc. (20 hdc)
- Fasten off.
Star Points (make as written)
- Each point is worked over 4 sts. Five points total. Join with sl st to next hdc of last rnd.
- 1st row: Ch 2. Begin in the same hdc as last sl st, hdc2tog twice. Turn.
- 2nd row: Ch 2. 1 hdc in first hdc. 1 hdc in last hdc. Turn.
- 3rd row: Ch 2. Hdc2tog. Fasten off.
- Repeat Star Points 4 more times.
- Sew Star to the top of the Tree as shown in the picture.
Pockets (Make 4 each in B, I, J, K, L, and N)
- Ch 9.
- 1st row: 1 sc in 2nd ch from hook. 1 sc in each ch to end of ch. Turn. (8 sc)
- 2nd row: Ch 1. 1 sc in first sc. 1 sc in each sc to end of row. Turn.
- Repeat 2nd row until work from the beginning measures 3″ [7.5 cm].
- Fasten off.
With A, embroider numbers 1–24 on Pockets according to the diagram. Begin 1¼” [3 cm] up from bottom and 1″ [2.5 cm] from the side, sew 3 edges of Pockets onto Background in order according to the diagram, leaving 1″ [2.5 cm] between Pockets.
Diagram layout for numbers:
1 2 3 4 5 6
7 8 9 10 11 12
13 14 15 16 17 18
19 20 21 22 23 24
Ornaments
Wreath (make 2)
Front and Back (make alike)
- With C, ch 8. Join with sl st to first ch, making sure not to twist ch.
- 1st rnd: Ch 2 (does not count as hdc). 2 hdc in first ch. 2 hdc in each ch around. Join with sl st to first hdc. (16 hdc)
- 2nd rnd: Ch 1. 2 sc in first hdc. 2 sc in each hdc around. Join with sl st to first sc. (32 sc)
- Fasten off.
Assembly of Wreath Pieces + Ornaments Placement
- With WS facing each other, sew the center of Wreath together.
- Join D with sl st to any sc through both thicknesses. Work the 1st rnd through both thicknesses, lightly stuffing as you go.
- 1st rnd: Ch 1. 1 sc in each of the first 2 sc. Ch 2. *1 sc in each of the next 2 sc. Ch 2. Repeat from * around. Join with sl st to first sc. Do not fasten off.
- Loop: Ch 6. Join with sl st to first sl st in last rnd. Fasten off.
- Bow: With B, ch 30. Fasten off. Tie the chain into a bow and fasten to the bottom of the Wreath.
Snowman (make 2)
Head
- With D, ch 2.
- 1st rnd: 8 sc in 2nd ch from hook. Join with sl st to first sc. (8 sc)
- 2nd rnd: Ch 1. 1 sc in first sc. 1 sc in each sc around. Join with sl st to first sc.
- Repeat 2nd round twice more.
Body
- 1st rnd: Ch 1. 2 sc in first sc. 2 sc in each sc around. Join with sl st to first sc. (16 sc)
- 2nd rnd: Ch 1. 1 sc in first sc. 1 sc in each sc around. Join with sl st to first sc.
- Repeat 2nd round 3 more times.
- Next rnd: Ch 1. (Sc2tog) 8 times. 8 sc. Fasten off, leaving a tail.
- Lightly stuff the Snowman. Using the tail, gather the bottom of the Snowman and fasten securely.
Embroidery + Scarf + Loop
- With E, embroider buttons and eyes as shown in the picture.
- With I, embroider a carrot nose as shown in the picture.
- Scarf: With K, ch 20. Fasten off. Tie Scarf around the Snowman’s neck as shown in the picture.
- Loop: With D, ch 8. Fasten off. Secure onto the top of the Snowman’s head.
Santa (make 2)
Beard and Face
- With D, ch 2.
- 1st rnd: 6 sc in 2nd ch from hook. Join with sl st to first sc.
- 2nd rnd: Ch 1. 1 sc in first sc. 1 sc in each sc around. Join with sl st to first sc.
- 3rd rnd: Ch 1. 2 sc in first sc. 2 sc in each sc around. Join with sl st to first sc. (12 sc)
- 4th rnd: Ch 1. 1 sc in first sc. 1 sc in each sc around. Join with sl st to first sc.
- 5th rnd: Ch 1. 1 sc in first sc. 2 sc in next sc. *1 sc in next sc. 2 sc in next sc. Repeat from * around. Join with sl st to first sc. (18 sc)
- 6th rnd: Ch 1. 1 sc in first sc. 1 sc in each sc around. Join with sl st to first sc.
- 7th rnd: Ch 1. 1 sc in first sc. 1 sc in each of the next 5 sc. Join M. With M, 1 sc in each of the next 6 sc. Break M. With D, 1 sc in each of the last 6 sc. Join with sl st to first sc.
- Repeat the 7th rnd twice more.
Hat
- 1st rnd: Ch 1. In front loops only, 1 sc in first sc. Ch 2. *1 sc in next sc. Ch 2. Repeat from * around. Join H with sl st to first sc.
- 2nd rnd: With H, ch 1. In the remaining back loops only 2 rows below, 1 sc in first sc. 1 sc in each sc around. Join with sl st to first sc. (18 sc)
- 3rd rnd: Ch 1. 1 sc in first sc. 1 sc in each sc around. Join with sl st to first sc.
- 4th rnd: Ch 1. 1 sc in first sc. Sc2tog. *1 sc in next sc. Sc2tog. Repeat from * around. Join with sl st to first sc. (12 sc)
- Lightlystuff Santa.
- 5th rnd: Ch 1. 1 sc in first sc. 1 sc in each sc around. Join with sl st to first sc.
- 6th rnd: Ch 1. (Sc2tog) 6 times. Join with sl st to first sc. (6 sc)
- 7th rnd: Ch 1. 1 sc in first sc. 1 sc in each sc around. Join with sl st to first sc.
- 8th rnd: Ch 1. (Sc2tog) 3 times. Join with sl st to first sc.
- Fasten off.
Loop + Mustache
- Loop: With D, ch 9. Fasten off. Sew loop to the top of Santa’s Hat.
- Mustache: Cut a 3″ [7.5 cm] length of D. Tie a knot in the center of the strand. Trim to ¾” [2 cm] with the knot at the center. Sew into place as shown in the picture.
- Finishing: With one ply of E, embroider eyes as shown in the picture.
Hot Cocoa (make 1 each with G as Color 1 and I as Color 1)
Front
- Front: With Color 1, ch 9.
- 1st row: 1 sc in 2nd ch from hook. 1 sc in each ch to end of ch. Turn. (8 sc)
- 2nd row: Ch 1. 1 sc in first sc. 1 sc in each sc to end of row. Turn.
- Repeat the 2nd row until work from the beginning measures 2″ [5 cm].
Handle
- Next row: Ch 1. 1 sc in first sc. Join F. With F, 1 sc in next sc. 1 hdc in next sc. 1 dc in each of the next 2 sc. 1 hdc in next sc. 1 sc in next sc. Break F. With Color 1, 1 sc in last sc. Turn.
- Next row: 1 sl st in back loop only in each st to end of row. Fasten off.
Back
- Back: With Color 1, ch 9.
- 1st row: 1 sc in 2nd ch from hook. 1 sc in each ch to end of ch. Turn. (8 sc)
- 2nd row: Ch 1. 1 sc in first sc. 1 sc in each sc to end of row. Turn.
- Repeat the 2nd row until work from the beginning measures 2″ [5 cm].
Finishing
- Next row: Ch 1. 1 sc in each of the first 2 sc. 1 hdc in next sc. 1 dc in each of the next 2 sc. 1 hdc in next sc. 1 sc in each of the last 2 sc. Turn.
- Final row: 1 sl st in back loop only in each st to end of row. Fasten off.
Snowflake (make 2)
- With D, ch 2.
- 1st rnd: 6 sc in 2nd ch from hook. Join with sl st to first sc. (6 sc)
- 2nd rnd: Ch 2 (does not count as hdc). 2 hdc in first sc. 2 hdc in each sc around. Join with sl st to first hdc. (12 hdc)
- 3rd rnd: Ch 1. 1 sc in each of the first 2 hdc. Ch 3. *1 sc in each of next 2 hdc. Ch 3. Repeat from * around. Join with sl st to first sc.
- 4th rnd: 1 sl st in each of the first 2 sc. (Sl st, Ch 2, Sl st) all in next ch 3 sp. *1 sl st in each of the next 2 sc. (Sl st, Ch 2, Sl st) all in next ch-3 sp. Repeat from * around. Join with sl st to first sl st.
- Loop: Ch 8. Join with sl st to last sl st. Fasten off.
Mitten (make 1 each with L as Color 1 and N as Color 1)
- With A, ch 14. Join with sl st to first ch, making sure not to twist.
- 1st rnd: Ch 2. 1 hdc in each ch around. Join with sl st to first hdc. (14 hdc)
- Join Color 1. Break A.
- 2nd rnd: With Color 1, ch 1. Working in back loops only, 1 sc in first hdc. 1 sc in each hdc around. Join with sl st to first sc.
Thumb Gusset
- 1st rnd: Ch 1. 1 sc in each of the first 2 sc. 2 sc in each of the next 2 sc. 1 sc in each rem sc around. Join with sl st to first sc. (16 sc)
- 2nd rnd: Ch 1. 1 sc in each of the first 2 sc. 2 sc in next sc. 1 sc in each of the next 2 sc. 2 sc in next sc. 1 sc in each rem sc around. Join with sl st to first sc. (18 sc)
Hand Shaping
- 1st rnd: Ch 1. 1 sc in each of the first 2 sc. Skip the next 4 sc. 1 sc in each rem sc around. Join with sl st to first sc.
- 2nd rnd: Ch 1. 1 sc in first sc. 1 sc in each sc around. Join with sl st to first sc.
- Repeat the 2nd rnd once more.
- Next rnd: Ch 1. 1 sc in first sc. Sc2tog. *1 sc in next sc. Sc2tog. Repeat from * twice more. 1 sc in each of the next 2 sc. Join with sl st to first sc. (10 sc)
- Next rnd: Ch 1. (Sc2tog) 5 times. Join with sl st to first sc. (5 sc)
- Fasten off, leaving tail. Draw tail through rem sc and fasten securely.
Thumb
-
Thumb: Join Color 1 with sl st in first skipped st of thumb gusset.
- 1st rnd: Ch 1. 1 sc in same st as sl st. 1 sc in each of the next 3 sc. Join with sl st to first sc. (4 sc)
- 2nd rnd: Ch 1. 1 sc in first sc. 1 sc in each sc around. Join with sl st to first sc.
- Fasten off, leaving tail. Draw tail through rem sc and fasten securely.
-
Loop: With A, ch 9. Fasten off. Sew the loop to the Mitten as shown in the picture.
Holly (make 1 with K as Color 1 and G as Color 2 and 1 with C as Color 1 and H as Color 2)
Leaf (make 2)
- With Color 1, ch 8.
- 1st rnd: Working in top loops only, 1 sc in 2nd ch from hook. 1 hdc in next ch. (1 hdc. 1 dc. 1 hdc) all in next ch. 1 sc in next ch. (1 hdc. 1 dc. 1 hdc) all in next ch. 3 sc in last ch.
- Do not turn. Work in rem loops of foundation ch, 1 hdc in next ch. (1 hdc. 1 dc. 1 hdc) all in next ch. 1 sc in next ch. (1 hdc. 1 dc. 1 hdc) all in next ch. 2 sc in first ch. Join with sl st to first sc. Fasten off.
Berry
- Berry: With Color 2, ch 2.
- 1st rnd: 6 sc in 2nd ch from hook. Join with sl st to first sc. Fasten off.
Finishing for Holly
- Finishing: Sew 2 Leaves and Berry together as shown in the picture.
- Loop: With Color 1, ch 9. Fasten off. Sew onto the top of Holly.
Gift (make 1 with G as Color 1 and H as Color 2 and 1 with B as Color 1 and J as Color 2)
Front and Back (make alike)
- With Color 1, ch 9.
- 1st row: 1 sc in 2nd ch from hook. 1 sc in each ch to end of ch. Turn. (8 sc)
- 2nd row: Ch 1. 1 sc in first sc. 1 sc in each sc to end of row. Turn.
- Repeat the 2nd row until work from the beginning measures 2¼” [5.5 cm]. Fasten off.
Ribbon
- Ribbon: With Color 2, ch 9.
- 1st row: 1 sc in 2nd ch from hook. 1 sc in each ch to end of hook.
- Fasten off. Sew Ribbon to the Front as shown in the picture.
Bow
- Bow: With Color 2, ch 7.
- 1st row: 1 hdc in 3rd ch from hook. 1 hdc in each ch to end of ch. Turn. (5 hdc)
- 2nd row: Ch 2 (does not count as hdc). 1 hdc in first hdc. 1 hdc in each hdc to end of row. Fasten off.
- With Color 2, wrap yarn around the middle of Bow to cinch in the middle. Sew onto the Front as shown in the picture.
- With the Bow facing out, sew around edges of Front and Back, lightly stuffing as you go.
Loop
- Loop: With Color 1, ch 9. Fasten off. Sew onto the corner of Gift as shown in the picture.
Candy Cane (make 2)
- Coil (make 1 each in A and H):
- Ch 20. 2 hdc in 3rd ch from hook. 3 hdc in each ch to end of chain. Fasten off.
- Twist Coils around each other to form Candy Cane. Bend slightly approximately 1″ [2.5 cm] from the top.
- Using H, tack loosely to form a curve.
- Loop: With H, ch 9. Fasten off. Sew to the top of the Candy Cane as shown in the picture.
Stocking (make 1 each with B as Color 1 and K as Color 1)
Main
- Main: With A, ch 14.
- 1st row: (RS) 1 hdc in 3rd ch from hook. 1 hdc in each ch to end of row. Join Color 1. Turn. (12 hdc)
- 2nd row: With Color 1, ch 1. Working in front loops only, 1 sc in first hdc. 1 sc in each hdc to end of row. Turn.
Leg
- Leg: 1st row: Ch 1. 1 sc in first sc. 1 sc in each sc to end of row. Turn.
- Rep 1st row until work measures approximately 2″ [5 cm] ending with RS facing. Fasten off.
Heel
- Heel: With RS facing, skip first 9 sc. Join A with sl st in next sc. Ch 1. 1 sc in same sc. 1 sc in each of the last 2 sc. Bring the other side of the leg around. 1 sc in each of the first 3 sc. Turn.
- Next row: Ch 1. 1 sc in each of the first 4 sc. Turn.
- Next row: Ch 1. 1 sc in each of the first 2 sc. Turn.
- Next row: Ch 1. 1 sc in each of the next 2 sc. 1 sc in the next sc of the long row below. Turn. (3 sts)
- Next row: Ch 1. 1 sc in each of the next 3 sc. 1 sc in the next sc of the long row below. Turn. (4 sts)
- Next row: Ch 1. 1 sc in each of the next 4 sc. 1 sc in the next sc of the long row below. Turn. (5 sts)
- Next row: Ch 1. 1 sc in each of the next 5 sc. 1 sc in the next sc of the long row below. Turn. (6 sts)
- Next row: Ch 1. 1 sc in each of the next 6 sc. 1 sc in the next sc of the long row below. Turn. (7 sts)
- Next row: Ch 1. 1 sc in each of the next 7 sc. 1 sc in the next sc of the long row below. Turn. (8 sts)
- Fasten off.
Foot
- Foot: With RS of work facing, skip the first 3 sc of Heel. Join Color 1 with sl st in next sc. Ch 1. 1 sc in same sc. 1 sc in each of the next 2 sc of Heel. Skip the next sc of Leg. 1 sc in each of the next 4 sc. Skip the next sc of Leg. 1 sc in each of the next 3 sc of Heel. Ch 1. Turn. (10 sts)
- Next row: Ch 1. 1 sc in each sc to end of row. Turn.
- Next row: Ch 1. 1 sc in each sc to end of row. Join A. Turn.
Toe
- Toe: Next 2 rows: With A, ch 1. 1 sc in each sc to end of row. Turn.
- Next row: Ch 1. (Sc2tog) 5 times. Fasten off.
Finishing
- Finishing: Sew Cuff and Leg back seams. Sew Foot and Toe seams. Sew corners of Heel closed.
Loop
- Loop: With A, ch 9. Fasten off. Sew to top corner of Stocking as shown in the picture.
Reindeer (make 2)
Snout
- Snout: With F, ch 2.
- 1st rnd: 8 sc in 2nd ch from hook. Join with sl st to first sc. (8 sc)
- 2nd rnd: Ch 1. 1 sc in first sc. 1 sc in each sc around. Join with sl st to first sc.
- Repeat 2nd rnd 2 times more.
Head
- Head: 1st rnd: Ch 1. 2 sc in first sc. 2 sc in each sc around. Join with sl st to first sc. (16 sc)
- 2nd rnd: Ch 1. 1 sc in first sc. 1 sc in each sc around. Join with sl st to first sc.
- Repeat 2nd rnd 3 more times.
- Next rnd: Ch 1. (Sc2tog) 8 times. 8 sc. Fasten off, leaving a tail. Lightly stuff Head. Using the tail, gather the top of Head and fasten securely.
Nose
- Nose: With H, ch 2.
- 1st rnd: 6 sc in 2nd ch from hook. Join with sl st to first sc. Fasten off.
Ears (make 2)
- Ears (make 2): With F, ch 4.
- 1st row: Sl st into 2nd ch from hook. 1 sc in next ch. Sl st in last ch. Fasten off.
Antlers (make 2)
- Antlers (make 2): With M, ch 5.
- 1st row: 1 sc in 2nd ch from hook. 1 sc in each ch to end of row. Turn. (4 sc)
- 2nd row: Sl st in each of the first 3 sc. Ch 2. Sl st in same sc as last sl st. Sl st in last sc. Fasten off.
Embroidery + Sewing
- With E, embroider eyes as shown in the picture.
- Sew Antlers, Ears, and Nose onto Head and Snout as shown in the picture.
Loop
- Loop: With F, ch 9. Fasten off. Sew to top of Reindeer as shown in the picture.
Gingerbread Man (make 2)
Head
- Head: With F, ch 3.
- 1st rnd: 10 hdc in 3rd ch from hook. Join with sl st to first hdc. Fasten off.
Arms
- Arms: 1st row: Ch 4. Join with sl st to any 2 hdc in Head. Ch 5. Turn.
- 2nd row: 1 sc in 2nd ch from hook. 1 sc in each of the next 3 ch. 1 sc in each of the next 2 sl st. 1 sc in each ch to end of the ch. Turn. (10 sc)
- 3rd row: Ch 1. 1 sc in first sc. 1 sc in each sc to end of row. Fasten off.
Torso
- Torso: 1st row: Skip the first 3 sc. Join with sl st in next sc. Ch 1. 1 sc in same st as sl st. 1 sc in each of the next 3 sc. Turn. (4 sc)
- 2nd row: Ch 1. 1 sc in first sc. 1 sc in each of the next 3 sc. Turn.
- Repeat the 2nd row once more. Do not fasten off.
Legs
-
Legs: 1st row: Ch 1. 1 sc in first sc. 1 sc in next sc. Turn. (2 sc).
- Leave remaining stitches unworked.
-
2nd row: Ch 1. 1 sc in each of the next 2 sc. Turn.
- Repeat last row twice more. Fasten off.
- Repeat last row twice more. Fasten off.
- Join with sl st to first unworked st on Torso.
- 1st row: Ch 1. 1 sc in first sc. 1 sc in next sc. Turn. (2 sc)
- Repeat last row 3 more times. Fasten off.
Icing + Loop
- Icing: With A, sl st into any edge st of Gingerbread Man. Sl st evenly around Gingerbread Man. Fasten off.
- Loop: With F, ch 9. Fasten off. Sew to top of Gingerbread Man as shown in the picture.
Assembly/Finishing (Overall)
-
Sew Tree to Background 2½” [6 cm] from top.
-
Sew 24 buttons onto Tree through all thicknesses, evenly spaced as shown in the photo.
-
Sew Star to the top of the Tree as shown in the picture.
-
Sew Pockets onto Background in order according to the diagram; placement rules as listed.
-
Tabs sewn across the top edge as stated.
-
Each ornament uses its loop/finishing as stated above; where loops are explicitly “Secure onto/top/ Sew to …” follow those placements exactly:
- Snowman: Loop secured onto top of Snowman’s Head.
- Santa: Loop sewn to top of Santa’s Hat.
- Hot Cocoa: Loop sewn to top right corner of Hot Cocoa.
- Holly: Loop sewn to top of Holly.
- Candy Cane: Loop sewn to top of Candy Cane.
- Mitten: Loop sewn to Mitten.
- Stocking: Loop sewn to top corner of Stocking.
- Reindeer: Loop sewn to top of Reindeer.
- Gingerbread man: Loop sewn to top of Gingerbread Man.
-
Wreath: Wreath center pieces sewn together; wreath trim worked through both thicknesses lightly stuffing; Loop ch 6 attached; Bow tied and fastened to the bottom of Wreath.
Frequently Asked Questions
What crochet hook is used for this pattern?
The pattern requires a U.S. size H/8 (5 mm) crochet hook or size needed to obtain gauge.
Is this project worked in rows or rounds?
This project is worked in both rows and rounds as specified in the instructions.
Does this crochet project require assembly?
Yes, once all components are created, they need to be assembled together to form the finished advent calendar.
In conclusion, the Countdown to Christmas Crochet Advent Calendar Pattern offers a fun and creative way to celebrate the holiday season with handcrafted decorations. By following the provided materials and instructions, you will create a lovely advent calendar that adds a personal touch to your home during the holidays. Enjoy your crochet journey as you make each component unique and festive! For more project ideas and inspiration, check out these 10 festive free Christmas crochet patterns or explore 10 free crochet Christmas ornament patterns to trim your holiday tree beautifully. Happy crocheting!