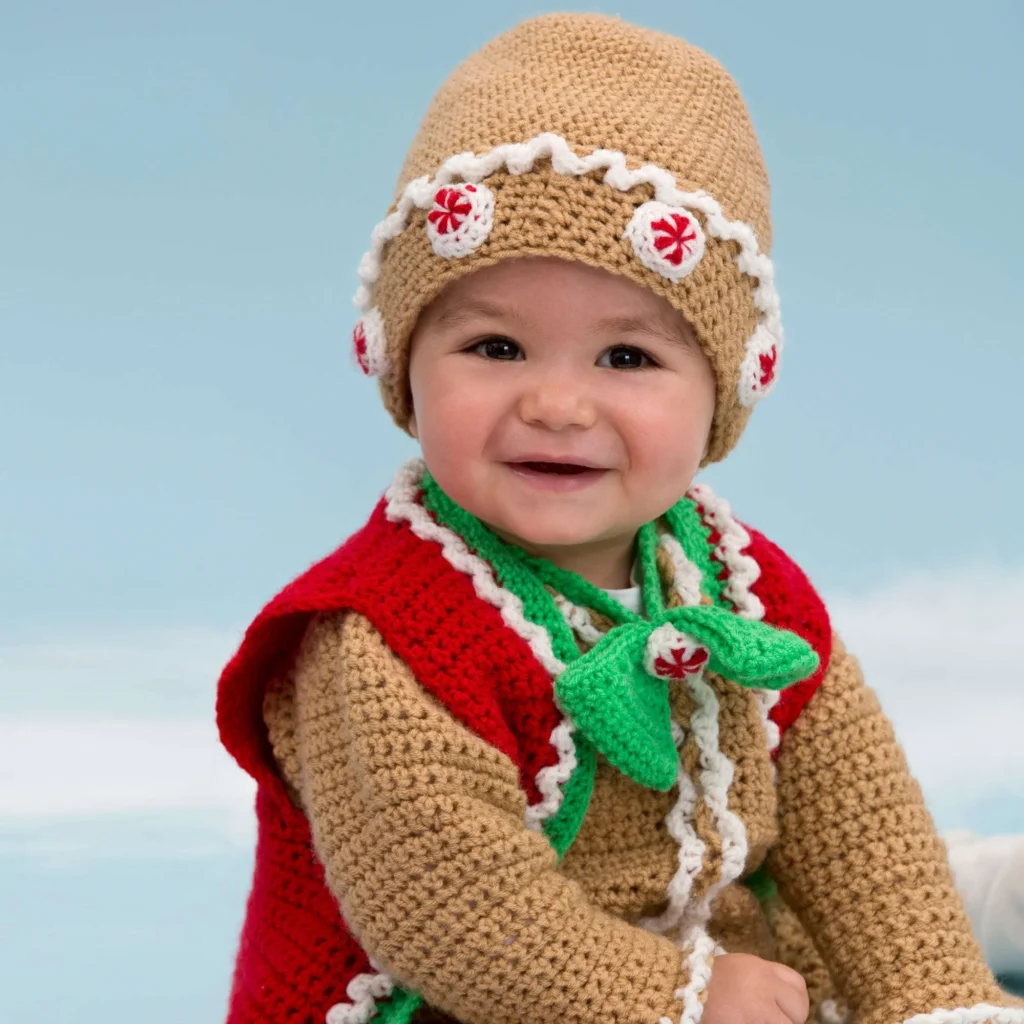
Crochet Gingerbread Baby Set Pattern
Crocheting is a delightful way to create unique and cozy items for the little ones in your life. In today’s article, we’ll explore the adorable Crochet Gingerbread Baby Set Pattern. This charming set includes a romper, vest, bow tie, and beanie, making it the perfect handmade gift for a baby. Let’s dive into the materials needed, the instructions, and a few tips to help you along the way.

About the Crochet Project
The Crochet Gingerbread Baby Set consists of several pieces designed to keep your little one warm and stylish. The set is made using RED HEART® Anne Geddes Baby™ yarn, which is known for its softness and warmth, making it ideal for babies. The pattern features delightful details, including button closures and decorative rick rack, perfect for a sweet gingerbread theme.
Size Information
The pattern offers sizes for a range of babies, accommodating various ages (commercially referred to as size 0-3 months, 3-6 months, and 6-12 months). The dimensions per size adjustment ensure a comfortable fit without being too tight.
Materials
To create the Crochet Gingerbread Baby Set, you will need the following materials:
Yarn
- RED HEART® Anne Geddes Baby™
- 3 (3, 4) balls of 301 Teddy A
- 1 ball each of 100 Lily B, 902 Ladybug C, and 691 Grass D
Tools
- Susan Bates® Crochet Hook: 4mm [US G-6]
- Stitch markers
- Yarn needle
- Sewing needle
- Thread to match
Buttons
- 24 (27, 30) ½” (12mm) buttons to match A
- 1½” (12mm) button to match D
Crochet Abbreviations
Here are the crochet abbreviations used throughout this pattern:
- ch = chain
- sc = single crochet
- st = stitch
- sl st = slip stitch
- sc2tog = single crochet two together
Romper Instructions
Colors
Use A for the romper instructions shown.
Romper Construction
Left Leg
- With A, ch 27 (29, 31).
- Row 1 (right side): Sc in 2nd ch from hook and each ch, turn—26 (28, 30) sc.
- Rows 2–10: Ch 1, sc in each st, turn.
- Row 11: Ch 1, 2 sc in first st, sc in each st to last st, 2 sc in last st, turn—28 (30, 32) sc.
- Rows 12–31: Repeat Rows 2–11 twice—32 (34, 36) sc.
- Rows 32–34 (38, 42): Repeat Row 2. Fasten off at end of Row 34 (38, 42).
Right Leg
Repeat Rows 1–34 (38, 42) of the left leg. Do not fasten off at the end of Row 34 (38, 42).
Body
- Row 1 (right side): Ch 1, sc in each st; with right side facing, sc in each st of left leg, turn—64 (68, 72) sc.
- Rows 2–42 (46, 50): Ch 1, sc in each st, turn.
Right Front
- Row 1 (right side): Ch 1, sc in first 16 (17, 18) sts, turn; leave remaining sts unworked—16 (17, 18) sc.
- Row 2: Ch 1, sc in each st, turn.
- Row 3: Ch 1, sc in each st to last 2 sts, sc2tog, turn—15 (16, 17) sc.
- Row 4: Ch 1, sc in each st, turn.
- Rows 5–10: Repeat Rows 3 and 4 three times—12 (13, 14) sc.
- Rows 11–13: Ch 1, sc2tog, sc in each st to last 2 sts, sc2tog, turn—6 (7, 8) sc.
- Rows 14–19: Ch 1, sc in each st, turn. Fasten off at the end of Row 19.
Back
- “With the right side of the body facing, skip the next st of Row 42 (46, 50) and join A with sc in the next st.”
- Row 1: Sc in the next 29 (31, 33) sts; leave remaining sts unworked, turn—30 (32, 34) sc.
- Rows 2–4: Ch 1, sc in each st, turn.
- Row 5: Ch 1, sc2tog, sc in each st to last 2 sts, sc2tog, turn—28 (30, 32) sc.
- Rows 6–13: Repeat Rows 2–5 twice—24 (26, 28) sc.
- Rows 14–16: Ch 1, sc in each st, turn.
Shoulder Construction
Right Shoulder
- Row 1 (right side): Ch 1, sc in first 6 (7, 8) sts; leave remaining sts unworked – 6 (7, 8) sc.
- Rows 2–3: Ch 1, sc in each st, turn. Fasten off at the end of Row 3.
Left Shoulder
- “With the right side of the back facing, skip the next 12 sts and join A with sc in the next st.”
- Row 1: Sc in the next 5 (6, 7) sts, turn—6 (7, 8).
- Rows 2–3: Ch 1, sc in each st, turn. Fasten off at the end of Row 3.
Left Front
- “With the right side of the body facing, skip the next st of Row 42 (46, 50) and join A with sc in the next st.”
- Row 1: Sc in each st, turn—16 (17, 18) sc.
- Row 2: Ch 1, sc in each st, turn.
- Row 3: Ch 1, sc2tog, sc in each st, turn—15 (16, 17) sc.
- Row 4: Ch 1, sc in each st, turn.
- Rows 5–10: Repeat Rows 3 and 4 three times—12 (13, 14) sc.
- Rows 11–13: Ch 1, sc2tog, sc in each st to last 2 sts, sc2tog, turn—6 (7, 8) sc.
- Rows 14–19: Ch 1, sc in each st, turn. Fasten off at the end of Row 19.
Front Buttonhole Band
- “With the right side and front of the right leg facing, join A with sc in the end of Row 1.”
- Row 1: Working across ends of rows, sc 97 (106, 112) sts evenly up front of right leg, body, front, and shoulder, 12 sts between shoulders, sc 98 (107, 113) sts evenly down front of left shoulder, front, body, and leg, turn—208 (226, 238) sc.
- Row 2 (buttonhole row): Ch 1, sc in the first 39 sts, *ch 1, skip the next st (buttonhole made), sc in the next 3 sts; repeat from * 11 (12, 13) times, sc in remaining sts, turn—196 (213, 224) sc and 12 (13, 14) buttonholes.
- Row 3: Ch 1, sc in each st and ch-1 space. Fasten off.
Front Button Band Rick Rack
- “With the right side facing, join B with sc around the post of the first st of Row 1 of the front button band.”
- Row 1: Skip the next 2 sts of the row previously made, 3 sc in the next st, skip the next 2 sts, *3 FPsc around the next st of Row 1 of front button band, skip the next 2 sts of the row previously made, 3 sc in the next st, skip the next 2 sts of Row 1 of the front button band; repeat from * to the last st, FPsc around the last st. Fasten off.
- Sew 12 (13, 14) buttons onto the left band under the buttonholes.
Back Buttonhole Band
- “With the right side and back of the left leg facing, join A with sc in the end of Row 1.”
- Row 1: Working across ends of rows, sc 33 (37, 41) sts evenly across the back of the left leg, sc 34 (38, 42) sts evenly across the back of the right leg, turn—68 (76, 84) sc.
- Row 2 (buttonhole row): Ch 1, sc in the first 2 sts, ch 1, skip the next st (buttonhole made), sc in the next 5 sts; repeat from * 5 (6, 7) times, sc in the next 8 (6, 4) sts; repeat from * to * once; sc in remaining sts, turn—56 (72, 68) sc and 12 (14, 16) buttonholes.
- Row 3: Ch 1, sc in each st and ch-1 space. Fasten off.
- Sew 6 (7, 8) buttons on each leg, centered on the front button band under the buttonholes. Fasten buttons through the back buttonhole band.
Sleeve Cap (make 2)
- “With the right side of the armhole facing, join A with sc in the 8th row below the shoulder seam.”
- Row 1: Working over the ends of rows, sc in the next 15 rows around the shoulder; leave remaining sts unworked, turn—16 sc.
- Rows 2–4: Ch 1, sc2tog, sc in each st to last 2 sts, sc2tog, turn—10 sc. Fasten off at the end of Row 4.
Sleeve (make 2)
- “With the right side of the armhole facing, join A with sc in the first unworked st at the underarm.”
- Round 1: Sc in the same st as join, working across ends of rows, sc in each row to sleeve cap, sc in each row of sleeve cap; working in the last row of sleeve cap, sc2tog, sc in each st to the last 2 sts, sc2tog; working across ends of rows, sc in each row of sleeve cap to the last row, 2 sc in the last row; join with slip st in the first sc—40 sc.
- Round 2: Ch 1, sc in each st around; join with slip st in the first sc.
- Round 3: Ch 1, sc2tog, sc in each st up to the last 2 sts, sc2tog; join with slip st in the first st—38 sc.
- Round 4: Repeat Round 2.
- Rounds 5 and 6: Repeat Rounds 3 and 4—36 sc.
- Round 7: Ch 1, sc2tog, sc in each st to shoulder, sc2tog, sc in each remaining st; join with slip st in the first st—34 sc.
- Round 8: Repeat Round 2.
- Rounds 9–16: Repeat Rounds 7 and 8 four times—26 sc.
- Round 17: Ch 1, sc2tog, sc in each st to shoulder, [sc2tog] twice, sc in each st to the last 2 sts, sc2tog; join with slip st in the first st—22 sc.
- Round 18: Repeat Round 2.
- Rounds 19 and 20: Repeat Rounds 7 and 8 once—20 sc.
- Rounds 21–29 (33, 37): Ch 1, sc in each st; join with slip st in the first st. Fasten off at the end of Round 29 (33, 37).
Sleeve Rick Rack
- “With the right side facing, join B with sc in any st of the round previously made.”
- Round 1: Work 2 sc in the same st, *skip the next st, working around post of st of Round 27 [31, 35] of sleeve, 3 FPsc around the next st, skip the next st in the round previously made, 3 sc in the next st; repeat from * around; join with slip st in the first sc. Fasten off.
Vest Instructions
Colors
Use C for vest base sections, B for vest rick rack, and D for vest border.
Vest Body Construction
- “With C, ch 47 (51, 55).”
- Row 1 (right side): Sc in 2nd ch from hook and in each ch, turn—46 (50, 54) sc.
- Rows 2–10 (14, 18): Ch 1, sc in each st, turn.
Left Front
- Row 1 (right side): Ch 1, sc in first 6 (7, 8) sts; leave remaining sts unworked, turn—6 (7, 8) sc.
- Rows 2–24: Repeat Row 1 twenty-three times. Fasten off at the end of Row 24.
Back
- “With the right side facing, skip the next st on the last row of the body and join C with sc in the next st.”
- Row 1: Sc in the next 31 (33, 35) sts; leave remaining sts unworked, turn—32 (34, 36) sc.
- Rows 2–24: Ch 1, sc in each st, turn. Fasten off at the end of Row 24.
Right Front
- “With the right side facing, skip the next st on the last row of the body and join C with sc in the next st.”
- Row 1: Sc in the next 5 (6, 7) sts—6 (7, 8) sc.
- Rows 2–24: Repeat Row 1 twenty-three times. Fasten off at the end of Row 24.
- Sew fronts to back.
Edging
- “Note Continue working in rounds. Place markers in indicated sts and move marker up as each round is completed.”
- “With the right side facing, join C with sc in the end of Row 1 on the right front.”
- Round 1: Working over ends of rows, 4 sc in the same space as join, place marker in the 3rd st of the 5-st group, sc in each row to the last row before the back, sc2tog over the last row and first st of back, sc in each st in back to the last st of back, sc2tog over the last st and first row of the left front, sc in each row of the left front to Row 1, 5 sc in Row 1, mark the 3rd st of the 5-st group, working across the opposite side of the foundation ch, sc in each ch; join with slip st in the first sc, turn—140 (152, 164) sc.
- Rounds 2 and 3: Ch 1, *sc in each st to the next marked st, 5 sc in marked st; repeat from * once, sc in remaining st; join with slip st in the first sc, turn—156 (168, 180) at end of Round 3. Fasten off at the end of Round 3.
Vest Rick Rack
- “With the right side facing, join B with sc in any st of the last round.”
- Round 1: Work 2 sc in the same st as join, skip the next st, working around post of the next st of Round 1 of edging, 3 FPsc around the next st, skip the next st in the round previously made, *3 sc in front loop only of the next st, skip the next st of Round 1 of edging, 3 FPsc around the next st, skip the next st in the round previously made; repeat from * around; join with slip st in the first sc. Fasten off.
Vest Border
- “Note Continue working in continuous, unturned rounds.”
- “With the right side facing, join D with sc in the marked st on the right front.”
- Round 1 (right side): Working in skipped sts and unworked back loops behind rick rack, 4 sc in the same st as join, sc in each st to the next marker, 5 sc in marked st, sc in each st to end; join with slip st in the first sc—164 (176, 188) sc. Remove markers.
- Rounds 2 and 3: Ch 1, sc in each st; join with slip st in the first sc.
- Round 4: Ch 1, sc in the first 45 st, [sc2tog] 10 times across back, sc in each remaining st; join with slip st in the first sc. Fasten off.
Armhole Edging (make 2)
- “With the right side of the right armhole facing, join C with sc in the skipped st between front and back.”
- Round 1: Working over ends of rows of armhole, sc in each row; join with slip st in the first sc. Fasten off.
- Repeat for the left armhole.
Bow Tie Instructions
Colors
Use D for the bow tie and button/sewing steps.
First Half
- “With D, ch 4.”
- Row 1 (right side): Sc in 2nd ch from the hook and each ch, turn—3 sc.
- Row 2: Ch 1, sc in each st, turn.
- Row 3: Ch 1, 2 sc in the first st, sc in each st to last st, 2 sc in the last st, turn—5 sc.
- Rows 4–7: Repeat Rows 2 and 3 twice—9 sc.
- Rows 8–11: Repeat Row 2 four times.
- Row 12: Ch 1, sc2tog, sc in each st to last 2 sts, sc2tog, turn—7 sc.
- Row 13: Repeat Row 2.
- Rows 14–17: Repeat Rows 12 and 13 twice—3 sc.
- Fold the first half in half, matching sts of Rows 1 and 17.
Joining Row
- “Joining Row: Ch 1, working through both thicknesses, sc in each st, turn.”
Second Half
- Row 1 (right side): Ch 1, sc in each st across, turn.
- Rows 2–17: Repeat Rows 2–17 of the first half. Do not fasten off.
Edging
- “Pivot the bowtie to work in ends of rows, ch 1, sc in each row of the first side. Fasten off.”
- “Join D to the first row of the opposite side, working in ends of rows, ch 1, sc in each row. Fasten off, leaving a long tail for sewing.”
- Fold the second half in half and sew Row 17 to the center of the bow.
Strap
- “With D, ch 4.”
- Row 1 (right side): Sc in 2nd ch from hook and in each ch, turn—3 sc.
- Row 2: Ch 1, sc in each st, turn.
- Repeat Row 2 until strap measures approximately 11” (28 cm).
- Buttonhole Row: Ch 1, sc in first st, ch 1, skip next st, sc in last st, turn—2 sc.
- Repeat Row 2 until strap measures approximately 12” (30.5 cm). Fasten off.
- Sew one button to the opposite end from the buttonhole.
- Center the strap on the back of the bow and sew with a yarn needle and tail.
Beanie Instructions
Base
- “With A, ch 3, join with slip st to form a ring.”
- Round 1 (right side): Ch 1, 10 sc in ring—10 sc.
- Round 2: 2 sc in the first st and in each remaining st—20 sc.
- Round 3: Sc in each st.
- Round 4: *2 sc in next st, sc in next st; repeat from * around—30 sc.
- Round 5: *2 sc in next st, sc in next 2 sts; repeat from * around—40 sc.
- Round 6: *2 sc in next st, sc in next 3 sts; repeat from * around—50 sc.
- Rounds 7 and 8: Repeat Round 3.
- Sizes 12 months and 18 months only: Round 9: *2 sc in next st, sc in next 4 sts; repeat from * around—60 sc.
- Size 18 months only: Round 10: *2 sc in next st, sc in next 5 sts; repeat from * around—70 sc.
- All Sizes: Rounds 9–28 (10-30, 11–32): Repeat Round 3 twenty (twenty-one, twenty-two) times.
- Round 29 (31, 33): *Sc in next 3 (4, 5) sts, sc2tog; repeat from * around; join with slip st in first sc – 40 (50, 60) sc.
Brim
- Round 1: Ch 1, working in front loops only, sc in each st; join with slip st in first sc.
- Rounds 2–9: Ch 1, sc in each st around, join with slip st in first sc. Fasten off at the end of Round 9.
Beanie Rick Rack
- “With the wrong side of the brim facing, join B with sc in any st.”
- Round 1: Work 2 sc in the same st as join, skip next st, working around post of the next st of Round 7 of brim, 3 FPsc around the next st, *skip the next st in the round previously made, 3 sc in the next st, skip the next st, working around the post of the next st of Round 7 of brim, 3 FPsc around the next st; repeat from * around; join with slip st in the first sc. Fasten off.
Peppermint Candy (Make 7)
- “With B, ch 4, join with slip st to form a ring.”
- Round 1 (right side): Ch 1, (sc in ring, ch 1) 6 times—6 sc and 6 ch-1 sps. Fasten off.
- Round 2: With the right side facing, join C with slip st in any sc, *hdc in next ch-1 space, slip st in next sc; repeat from * 5 times; join with slip st in the same sc as the first join—6 hdc and 6 slip sts.
- Round 3: Ch 1, sc in the first slip st, sc in back loop only of the next hdc, *sc in the next slip st, sc in back loop only of the next hdc; repeat from * around, join with slip st in the first sc. Fasten off, leaving a long tail for sewing.
Finishing
- Sew 1 peppermint candy to the center of the bow.
- “Using photograph as a guide, sew 6 candies evenly spaced under the rick rack to the wrong side of the brim.”
- Weave in ends. Block lightly, if necessary.
Frequently Asked Questions
What crochet hook is used for this pattern?
The Crochet Gingerbread Baby Set Pattern uses a Susan Bates® Crochet Hook: 4mm [US G-6].
Does this crochet project require assembly?
Yes, components of the Crochet GingerbreadBaby Set, such as the bow tie and beanie, require some assembly.
How many buttons are needed for the romper?
You will need 24 (27, 30) ½” (12mm) buttons for the romper, along with a 1½” (12mm) button to match the D color.
Is this project worked in rows or rounds?
The majority of the Crochet Gingerbread Baby Set is worked in rows, with specific components worked in rounds, such as the beanie.
Conclusion
The Crochet Gingerbread Baby Set is not only a fantastic project to showcase your crocheting skills but also a wonderful way to create something special for a precious little one in your life. With its charming details and cozy fit, this set is a delightful addition to any baby’s wardrobe. Enjoy crocheting this sweet pattern, and don’t forget to share your wonderful results with family and friends! Happy crocheting!