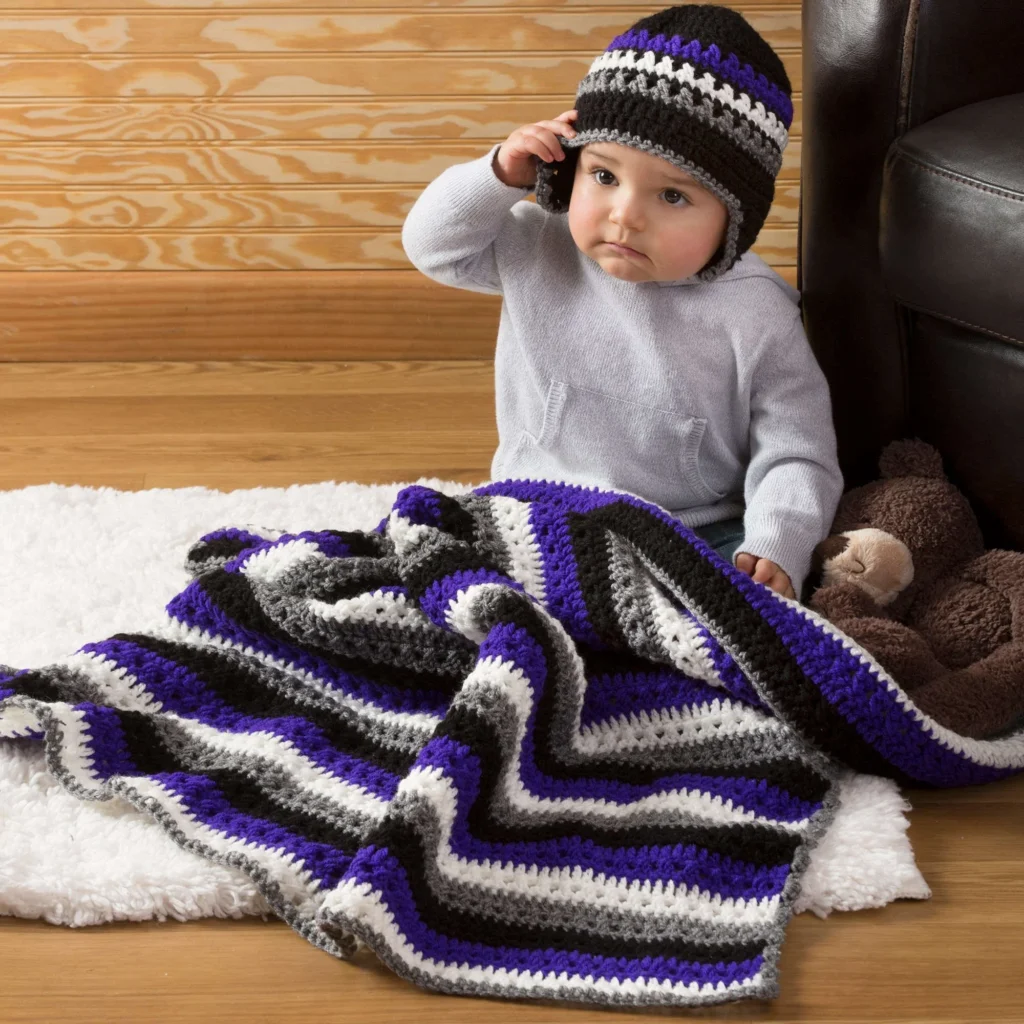
Crochet Baby Dude Blanket & Hat Pattern
Creating a cozy and stylish set for a little one is always a rewarding project, and the Crochet Baby Dude Blanket & Hat Pattern is just the perfect combination of comfort and charm. With clear-cut instructions and an appealing design, this project is great for anyone looking to add a handmade touch to their baby gifts. Let’s dive into the details of how to make this delightful crochet duo.
About This Crochet Project
The Crochet Baby Dude Blanket and Hat are designed to provide warmth and style. The blanket features a vibrant color pattern, while the hat has an adjustable ring design, making it snug and comfortable for babies. This project is worked in both rows for the blanket and rounds for the hat, catering to the varying techniques in crochet.
Materials

To complete the Crochet Baby Dude Blanket & Hat Pattern, you will need the following materials:
Yarn
- RED HEART® Super Saver®: 1 skein each
- 312 Black (Color A)
- 356 Amethyst (Color B)
- 316 Soft White (Color C)
- 400 Grey Heather (Color D)
Crochet Hook
- Susan Bates® Crochet Hook: 5.5mm [US I-9]
Notions
- Yarn needle
Crochet Abbreviations
To help you navigate the pattern smoothly, here are the common crochet abbreviations used:
- ch: chain
- dc: double crochet
- sc: single crochet
- sts: stitches
- st: stitch
- yrh: yarn over hook
- RS: right side
- WS: wrong side
Pattern Notes
- The blanket is worked in rows, while the hat is constructed in rounds.
- The pattern includes color changes and specific instructions to maintain the visual balance between colors.
- The use of the adjustable ring method is fundamental for starting the hat, ensuring a neat closure with no gaps.
Main Blanket Instructions
Color Sequence
From Rows 5-40, work in the following color sequence:
- 2 rows with Color C
- 2 rows with Color D
- *2 rows with Color A
- 2 rows with Color B
- 2 rows with Color C
- 2 rows with Color D; repeat from * three (4, 5) times.
- Change to Color A in the last stitch of Row 40 (48, 56).
Body (Rows)
- With Color A, ch 74 (92, 110).
- Row 1 (wrong side): Dc in 3rd ch from hook (beginning ch counts as first dc) and in each ch across, turn—72 (90, 108) sts.
- Row 2: Ch 2 (does not count as a st here and throughout), dc in first st, [skip next st, dc in next st, working in front of st just made, dc in skipped st] 35 (44, 53) times, dc in top of beginning ch; change to Color B, turn.
- Row 3: Ch 2, dc in each st across.
- Row 4: Ch 2, dc in first st, [skip next stitch, dc in next stitch, working in front of stitch just made, dc in skipped stitch] 35 (44, 53) times, dc in last st; change to Color C in last st, turn.
- Rows 5–40 (48, 56): Repeat Rows 3 and 4 twenty (twenty-four, twenty-eight) times and change color as in the color sequence mentioned above. Change to Color A in last st of Row 40 (48, 56).
Sizes Small and Medium Only
- Rows 41 (49) and 42 (50): Repeat Rows 3 and 4 once more. Fasten off.
Size Large Only
- Rows 57–62: Repeat Rows 3 and 4 three times more and change color as in the following color sequence:
- Work 2 rows with Color A, 2 rows with Color B, 2 rows with Color C.
- Fasten off.
Blanket Border
Round 1 (right side):
- With right side facing, join Color D with sc in the first st of the last row, 2 sc in same st, sc in each st across to last st, 3 sc in last st.
- Working in ends of rows of the first side, *4 sc in next even-numbered row, skip next odd-numbered row; repeat from * to first row.
- Working across opposite side of foundation ch, 3 sc in first ch, sc in each ch across to last ch, 3 sc in last ch.
- Working in ends of rows on the other side, **skip next odd-numbered row, 4 sc in next even-numbered row; repeat from ** to first sc.
- Join with a slip st in the first sc. Fasten off.
Crochet Hat Instructions
Adjustable Ring Method
- With Color A, make an adjustable ring, ch 1.
Round-by-Round Instructions
- Round 1 (right side): Ch 2 (counts as first dc here and throughout), work 11 dc in ring; join with slip st in the top of beginning ch—12 sts. Pull gently on tail to tighten the ring.
- Round 2: Ch 2, dc in the same st as join, 2 dc in each st; join with slip st in top of beginning ch—24 sts.
- Round 3: Ch 2, dc in same st as join, dc in next st, [2 dc in next st, dc in next st] 11 times; join with slip st in top of beginning ch—36 sts.
- Round 4: Ch 2, dc in same st as join, dc in next 2 sts, [2 dc in next st, dc in next 2 sts] 11 times; join with slip st in top of beginning ch—48 sts.
Sizes Medium, Large, and Extra Large Only
- Round 5: Ch 2, same st as join, dc in next 7 (3, 3) sts, [2 dc in next st, dc in next 7 (3, 3) sts] 5 (11, 11) times; join with slip st in top of beginning ch—54 (60, 60) sts.
Size Extra Large Only
- Round 6: Ch 2, same st as join, dc in next 9 sts, [2 dc in next st, dc in next 9 sts] 9 times; join with slip st in top of beginning ch—66 sts.
All Sizes (Color Changes Start Here)
- Round 5 (6, 6, 7): Ch 1, sc in each st around; change to Color B; join with slip st in first sc—48 (54, 60, 66) sts.
- Round 6 (7, 7, 8): Ch 2, dc in the last st of previous round, [skip next stitch, dc in next stitch, working in front of stitch just made, dc in skipped stitch] 23 (26, 29, 32) times; change to Color A; join with slip st in the top of beginning ch.
- Round 7 (8, 8, 9): Repeat Round 5 (6, 6, 7); change to Color C.
- Round 8 (9, 9, 10): Repeat Round 6 (7, 7, 8).
- Round 9 (10, 10, 11): Repeat Round 5 (6, 6, 7); change to Color D.
- Round 10 (11, 11, 12): Repeat Round 6 (7, 7, 8).
- Round 11 (12, 12, 13): Repeat Round 5 (6, 6, 7).
- Round 12 (13, 13, 14): Ch 2, dc in each st around; join with slip st in top of beginning ch. Do not fasten off.
Sizes Large and Extra Large Only
- Round 14 (15): Repeat Round 13 (14). Do not fasten off.
Earflaps
Note: Continue in rows.
Right Earflap
- Row 1: Ch 2, skip next st, dc in next 7 (9, 9) sts, skip next st, dc in next st; leave remaining sts unworked, turn—9 (11, 11) sts.
- Row 2: Ch 2, skip next st, dc in next 5 (7, 7) sts, skip next st, dc in the last st—7 (9, 9) sts.
- Row 3: Ch 2, skip next st, dc in next 3 (5, 5) sts, skip next st, dc in the last st—5 (7, 7) sts.
- Row 4: Ch 2, skip next st, dc in next 1 (3, 3) st(s), skip next st, dc in the last st—3 (5, 5) sts.
Size Small only:
- Fasten off.
Sizes Medium, Large, and Extra Large only:
- Row 5: Ch 2, skip next st, dc in next st, skip next st, dc in the last st—3 (3, 3) dc.
- Fasten off.
Left Earflap
With right side facing, join Color A with slip st in 18th (20th, 22nd, 24th) st to the left of the last st of the right earflap. Work the same as the right earflap.
Hat Border
Round 1 (right side):
- With right side facing, join Color D with sc in any st at the center back of the hat, sc in each st around, working 2 sc in ends of each row of ear flaps; join with slip st in the first sc.
- Fasten off.
Frequently Asked Questions
What crochet hook is used for this pattern?
You will need a Susan Bates® Crochet Hook in size 5.5mm [US I-9].
Is this project worked in rows or rounds?
The blanket is worked in rows, while the hat is constructed in rounds.
What colors are used in this pattern?
The pattern uses four colors: Black (Color A), Amethyst (Color B), Soft White (Color C), and Grey Heather (Color D).
Does this crochet project require assembly?
Yes, the hat includes earflaps that need to be worked separately and then attached.
What are the finished dimensions of the blanket?
The blanket dimensions vary based on size: Small (72 sts), Medium (90 sts), or Large (108 sts).
Conclusion
The Crochet Baby Dude Blanket & Hat Pattern is a rewarding project that creates both a beautiful blanket and a stylish hat. Combining comfort and personality, this set is perfect as a gift for a baby or even for your little one. The use of vibrant colors and diverse stitches adds character while ensuring that the items remain practical for everyday use. Happy crocheting!