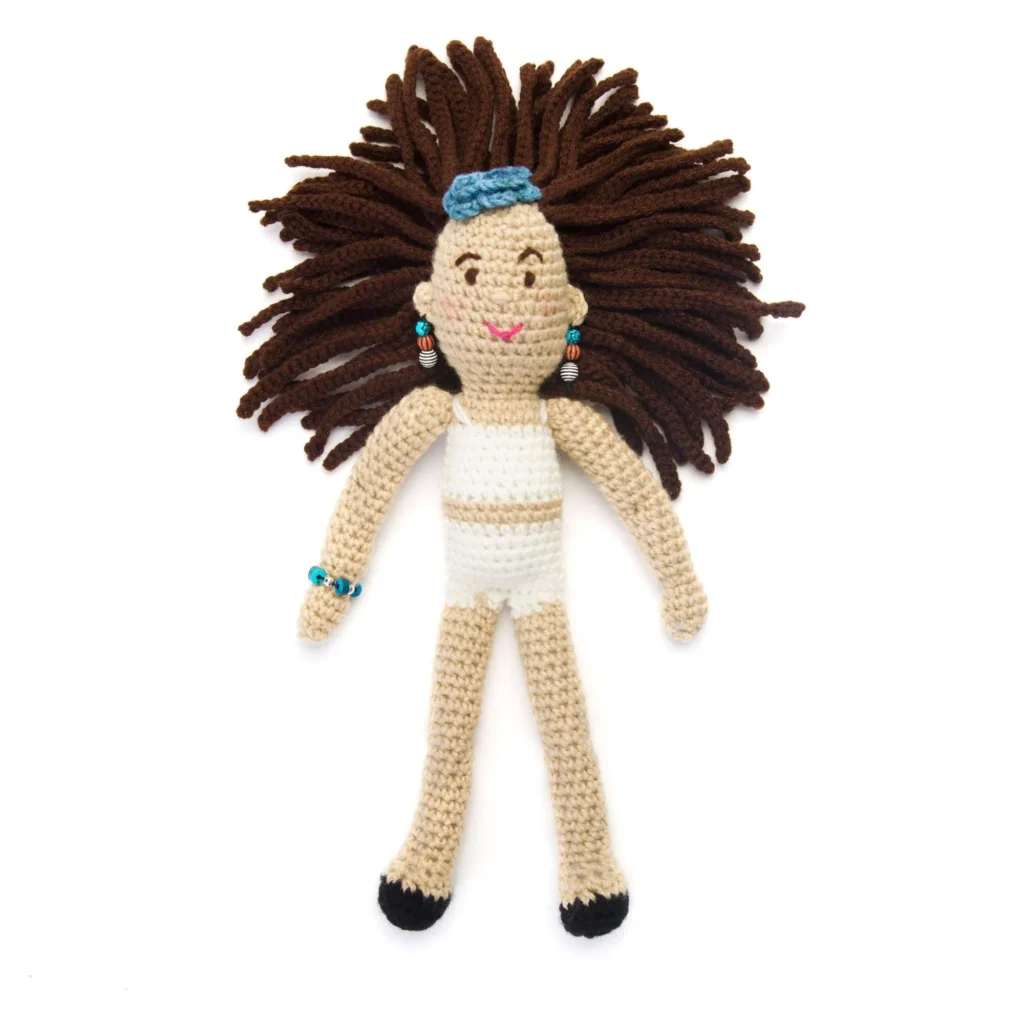
Crochet Fashionista Farrah Doll Pattern
Creating your very own Crochet Fashionista Farrah Doll is a delightful project that highlights your crochet skills while providing a charming and stylish addition to any crochet collection. This pattern features a detailed design comprising multiple components, from the doll’s head to her fashionable clothing and accessories. Get ready to dive into the world of doll-making with this comprehensive crochet guide!
Materials

To get started on your Crochet Fashionista Farrah Doll, you’ll need the following materials:
Yarn
- RED HEART® “Super Saver®” yarn, 1 skein each of:
- 334 Buff (A)
- 316 Soft White (B)
- 718 Shocking Pink (C)
- 847 Blue Tones (D)
- 312 Black (E)
- 365 Coffee (F)
- 972 Pink Camo (G)
Crochet Hook
- 4 mm [US G-6] crochet hook
Notions
- Yarn needle
- Heavy-duty sewing thread
- Button (for pocketbook)
- Red crayon (to shade cheeks)
- Assorted small beads (for earrings and bracelet)
- Stuffing
Crochet Abbreviations
Here are the abbreviations used in this pattern:
- sc: single crochet
- sc2tog: single crochet two together
- ch: chain
- sl st: slip stitch
Special Stitch
sc2tog: [Draw up a loop in next st] twice, yarn over, and draw through all 3 loops on hook.
About This Crochet Project
This pattern encompasses not only the doll itself but also several accessories and clothing items, providing a complete look for your doll. The construction involves various crochet skills, primarily focusing on working in continuous rounds, which creates a smooth and polished finish for the amigurumi-style doll.
Head and Body
The head and body of the doll are worked as one continuous piece. Follow the instructions below to create this central component of the Crochet Fashionista Farrah Doll:
HEAD AND BODY (from top of head)
Beginning at the top of the head, with A, ch 2.
Round 1: Work 6 sc in 2nd ch from hook—6 sc.
Do not join; work in continuous rounds (spirals). Place a marker for the beginning of the round. Move marker up as each round is completed.
Round 2: Work 2 sc in each sc around—12 sc.
Round 3: [Sc in next sc, 2 sc in next sc] 6 times—18 sc.
Round 4: Sc in each sc around.
Round 5: [Sc in next 2 sc, 2 sc in next sc] 6 times—24 sc.
Round 6: Sc in each sc around.
Round 7: [Sc in next 3 sc, 2 sc in next sc] 6 times—30 sc.
Rounds 8–15: Sc in each sc around.
Round 16: [Sc2tog] 15 times—15 sts.
Rounds 17–19: Sc in each sc around.
Round 20: [Sc in next sc, 2 sc in next sc] 7 times, sc in last sc—22 sc.
Round 21: [Sc in next 10 sc, 2 sc in next sc] 2 times; change to B in last sc—24 sc.
Undershirt
Rounds 22–27: With B, sc in each sc around; change to A in last sc of Round 27.
Waist
Rounds 28 and 29: With A, sc in each sc around; change to B in last sc of Round 29.
Begin Knickers
Rounds 30–35: With B, sc in each sc around. Do not fasten off. Stuff body firmly.
Joining Row: Flatten lower edging, matching stitches. Working through both thicknesses, sc across to close lower edge. Fasten off B.
Hair
The doll’s hair is created using long, medium, and small strips, each adding volume and style to the look.
Long Strip (make 7)
Row 1: With F, *ch 23, slip st in 2nd ch from hook and each remaining ch across; repeat from * 6 more times.
Fasten off, leaving a long tail. Sew first strip, centered on back of head, across Round 13 (each side should end at hairline).
[Sew next strip, centered on back of head, across next row above previous strip] 6 times.
Medium Strip (make 3)
Row 1: With F, *ch 23, slip st in 2nd ch from hook and each remaining ch across; repeat from * 7 more times.
Fasten off, leaving a long tail. Sew first strip, centered on back of head, across next row above last long strip.
[Sew next strip, centered on back of head, across next row above previous strip] 2 times.
Small Strip (make 3)
Row 1: With F, *ch 23, slip st in 2nd ch from hook and each remaining ch across; repeat from * 5 more times.
Fasten off, leaving a long tail. Sew first strip, centered on back of head, across next row above last medium strip.
[Sew next strip, centered on back of head, across next row above previous strip] 2 times.
Note: The last strip should be at the center top of the head.
Ears
To add further character to your doll, create the ears as follows:
EAR (make 2)
With A, ch 2.
Row 1: Work 5 sc in 2nd ch from hook.
Fasten off, leaving a long tail. Sew ears in place.
Earrings
For that extra touch of glamour, complete the earrings:
Earrings (make 2)
Thread three beads onto heavy-duty sewing thread and sew to ear. Repeat for 2nd earring.
Legs
Next, construct the legs, which will allow your doll to stand with style.
LEG (make 2)
Beginning at the foot, with E, ch 6.
Round 1: Sc in 2nd ch from hook, sc in next 3 ch, 3 sc in last ch; working across the opposite side of the foundation ch, sc in next 3 ch, 2 sc in last ch—12 sc.
Do not join; work in continuous rounds (spirals). Place a marker for beginning of the round. Move the marker up as each round is completed.
Round 2: Work 2 sc in next sc, sc in next 3 sc, 2 sc in each of next 3 sc, sc in next 3 sc, 2 sc in each of next 2 sc—18 sc.
Round 3: Working in back loops only, sc in each sc around; change to A in last sc.
Round 4: With A, sc in next 6 sc, [sc2tog] 3 times, sc in last 6 sc—15 sc.
Round 5: Sc in next 3 sc, [sc2tog] 3 times, sc in last 6 sc—12 sc.
Round 6: Sc in next 3 sc, [sc2tog] 3 times, sc in last 3 sc—9 sc.
Rounds 7 and 8: Sc in each sc around.
Round 9: Work 2 sc in first sc, sc in each remaining sc around—10 sc.
Rounds 10–27: Sc in each sc around, stuffing leg as you go; change to B in last sc.
Round 28: With B, sc in each sc around.
Arms
The arms add mobility to your crochet doll, enhancing its playability.
ARM (make 2)
Beginning at the top of the arm, with A, ch 2.
Round 1: Work 6 sc in 2nd ch from hook—6 sc.
Do not join; work in continuous rounds (spirals). Place a marker for beginning of the round. Move marker up as each round is completed.
Round 2: [Sc in next sc, 2 sc in next sc] 3 times—9 sc.
Rounds 3–19: Sc in each sc, stuffing arm as you go.
Round 20: [Sc2tog] 3 times, sc in last 3 sc—6 sc.
Round 21: Work 2 sc in next 3 sc, sc in last 3 sc—9 sc.
Rounds 22–24: Sc in each sc around.
Round 25: [Sc2tog] 4 times, sc in last sc—5 sc.
Fasten off, leaving a long tail. Stuff arm. Thread the tail through stitches of the last round and pull gently to close the opening. Draw a strand of A through the arm at the elbow and pull to form an elbow dimple. Sew arms to sides of the body. With B, embroider a strap over each shoulder, from the top front of the undershirt to the top back of the undershirt.
Jeans
Dress your doll in a fashionable pair of jeans to complete the look.
JEANS (make 2)
Beginning at the waist, with D, ch 14.
Row 1: Sc in 2nd ch from hook and in each remaining ch across, turn—13 sc.
Rows 2–6: Ch 1, sc in each sc across, turn.
Row 7: Ch 1, sc in first 6 sc, 2 sc in next sc, sc in last 6 sc, turn—14 sc.
First Leg
Row 8: Ch 1, sc in first 7 sc, turn; leave remaining sts unworked (for 2nd leg)—7 sc.
Rows 9–24: Ch 1, sc in each sc across, turn.
Fasten off.
Second Leg
Row 8: Join D with sc in first unworked sc following Row 8 of the first leg, sc in remaining 6 unworked sc, turn—7 sc.
Rows 9–24: Ch 1, sc in each sc across, turn.
Fasten off.
Sew side seams and inner leg seams.
Apron
Complete the Fashionista look with a stylish apron that adds both charm and functional flair.
APRON
Beginning at the neck edge, with G, ch 16.
Row 1: Work 2 sc in 2nd ch from hook, 2 sc in each remaining ch across, turn—30 sc.
Row 2: Ch 1, [sc in next 4 sc, 2 sc in next sc] 6 times, turn—36 sc.
Row 3: Ch 1, sc in next 6 sc, 2 sc in each of next 6 sc, sc in next 12 sc, 2 sc in each of next 6 sc, sc in last 6 sc, turn—48 sc.
Row 4: Ch 1, sc in next 6 sc, ch 3, skip next 12 sc (for underarm), sc in next 12 sc, ch 3, skip next 12 sc (for underarm), sc in last 6 sc, turn—24 sc and 2 ch-3 spaces.
Row 5: Ch 1, sc in each sc and ch across, turn—30 sc.
Rows 6–11: Ch 1, sc in each sc across, turn.
Row 12: Ch 4 (counts as dc, ch 1 here and throughout), skip first sc, dc in next sc, *ch 1, dc in next sc; repeat from * across, turn—30 dc and 29 ch-1 spaces.
Row 13: Ch 1, sc in each dc and ch across, turn—59 sc.
Row 14: Ch 4 (counts as dc, ch 1 here and throughout), skip first 2 sc, dc in next sc, *ch 1, skip next sc, dc in next sc; repeat from * across, turn—30 dc and 29 ch-1 spaces.
Row 15: Ch 1, sc in each dc and ch across, turn—59 sc.
Rows 16–18: Ch 1, sc in each sc across, turn.
Rows 19–22: Repeat Rows 14 and 15 twice.
Fasten off.
Neck Ties
With G, ch 35 (for the first tie), join with slip st in the top corner of the apron, slip st in each ch across the opposite side of the apron foundation ch, ch 35 (for the 2nd tie). Fasten off.
Waist Ties
Join G with slip st on one side of the apron at waist (Row 11), ch 35. Fasten off. Repeat on the other side of the waist.
Flower/Hat
Finish off your Crochet Fashionista Farrah Doll with an adorable hat adorned with a flower.
FLOWER/HAT
With D, ch 2.
Round 1: Work 6 sc in 2nd ch from hook—6 sc.
Do not join, work in continuous rounds (spirals). Place a marker for beginning of the round. Move marker up as each round is completed.
Round 2: Working in front loops only, (slip st, ch 1, sc) in first st (petal made), *ch 1, (slip st, ch 1, sc) in next st; repeat from * around—6 petals.
Round 3: Ch 2, working behind petals into free back loops of Round 1, (slip st, ch 2, dc) in first sc, *ch 2, (slip st, ch 2, dc) in next sc; repeat from * around; slip st in the first sc again.
Fasten off.
Sew flower/hat to the top of the head.
Bag (Pocketbook)
Complete the doll’s look with a stylish bag that holds all her essentials!
BAG (pocketbook)
With C, ch 12.
Round 1: Sc in 2nd ch from hook and in next 9 ch, 3 sc in last ch, working across the opposite side of the foundation ch, sc in next 9 ch, 2 sc in last ch—24 sc.
Do not join; work in continuous rounds (spirals). Place a marker for beginning of the round. Move marker up as each round is completed.
Round 2: Work 2 sc in the first sc, sc in next 9 sc, 2 sc in each of the next 3 sc, sc in the next 9 sc, 2 sc in each of the last 2 sc—30 sc.
Rounds 3–11: Sc in each sc around.
Round 12: [Sc in next 3 sc, sc2tog] 6 times—24 sc.
Round 13: Sc in next 3 sc, ch 35 (for strap), skip next 10 sc, slip st in next 2 sc, TURN; leave remaining sts unworked.
Strap
Ch 1, sc in each of the 35 ch, slip st in next sc; leave remaining sts unworked. Fasten off.
Flower
With C, ch 5; join with slip st in the first ch to form a ring.
Round 1: Ch 1, work 12 sc in the ring; join with slip st in the first sc.
Round 2: Working in front loops only, ch 1, 2 sc in the same st as join, 2 sc in each remaining sc around; join with slip st in the first sc—24 sc.
Round 3: Ch 3, working behind the sts of Round 2 and into free back loops of Round 1, dc in the same st as join, 2 dc in each remaining st around; join with slip st in the top of the beginning ch. Fasten off.
Sew the flower to the front of the bag. Sew the button to the center of the flower.
Assembly and Finishing
Now it’s time to assemble the pieces you’ve crocheted and bring the doll to life!
Sew toe: Flatten the last row, matching stitches and ensuring that the toe faces forward, and sew through both thicknesses across.
Sew legs to the bottom of the body.
Finishing Touches
Weave in ends and carefully place clothing and accessories on the doll.
Embroider Face
With F, embroider satin stitch eyes and couched stitch eyebrows.
With A, embroider satin stitch nose.
With C, embroider a couched stitch smile.
With red crayon, gently rub color onto the face for cheeks.
Bracelet
Use any style and number of beads desired, sufficient to encircle the wrist of the doll.
Thread beads onto heavy-duty sewing thread.
Wrap beads around the wrist, then tie ends of the thread together and trim.
Frequently Asked Questions
What crochet hook is used for this pattern?
For this project, you will need a 4 mm [US G-6] crochet hook.
Is this project worked in rows or rounds?
The majority of this pattern is worked in continuous rounds, especially for the doll’s body and accessories.
Does this crochet project require assembly?
Yes, the project involves assembling various components, including sewing the legs and arms to the body.
Conclusion
You have now completed the Crochet Fashionista Farrah Doll, a charming piece that embodies creativity and craftsmanship. Whether displayed on a shelf or played with by a child, this handmade crochet doll showcases your skill and style. Enjoy the satisfaction that comes with every stitch, and feel free to customize your doll with colors and accessories that reflect your personality! Happy crocheting!