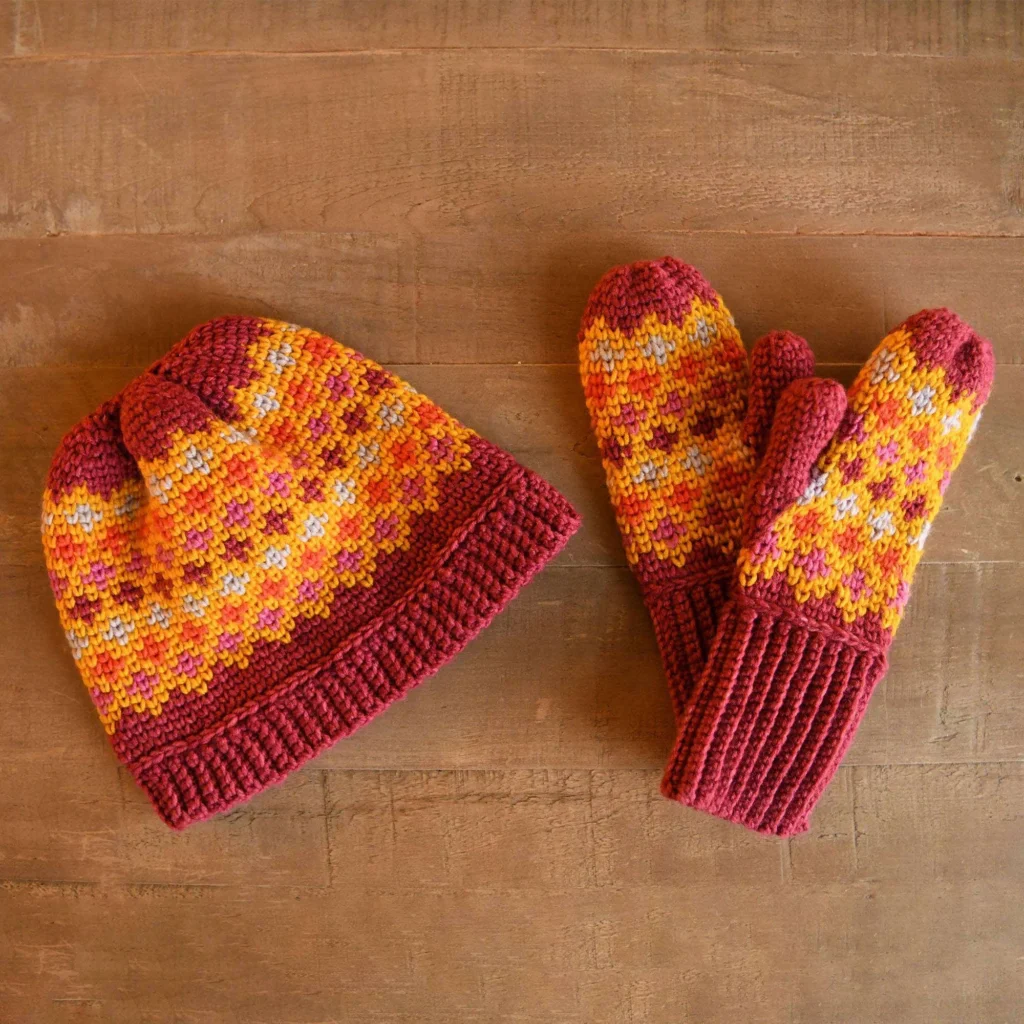
Shannon Crochet Hat & Mitt Set Pattern
Create a beautiful and cozy hat and mitten set with the Shannon Crochet Hat & Mitt Set Pattern! Perfect for chilly days, this pattern encourages creativity while providing warmth and style. Let’s get started!
About the Crochet Project
The Shannon Crochet Hat & Mitt Set is designed for those who love handmade accessories. This set is comfortable to wear and features a stylish ribbed design that ensures a snug fit. The project is suitable for intermediate crocheters but can be tackled by anyone wanting to try their hand at crochet. Using the vibrant colors from Caron® Big Donut O’Go™, your finished accessories will be as fun as they are functional.
Materials

To complete this crochet project, you will need the following materials:
Yarn
- Caron® Big Donut O’Go™ (9.9 oz/280 g; 502 yds / 459 m)
- Color: Lemon Plum (29002)
- This O’Go contains five distinct colors:
- Color A: Maroon
- Color B: Yellow
- Color C: Orange
- Color D: Lavender
- Color E: Pink
Crochet Hooks
- Sizes:
- U.S. G/6 (4 mm)
- U.S. H/8 (5 mm)
- (Or size needed to obtain gauge)
Technical Notes
Before you start crocheting, follow these initial guidelines for working with the O’Go format:
- To begin, carefully cut the plastic tie where the ends of the O’Go meet and pull the tie to remove it.
- Colors can be separated by gently pulling apart and cutting at the color transition.
- Place each color section in its own resealable bag labeled A, B, C, D, and E for easier access.
- To change color, work to the last two loops on your hook, draw the new color through those loops, and proceed with the new color.
- When working from a chart, carry the yarn not in use loosely across the top of your work, and work the next row over it.
Mittens
Ribbing
- With Color A and the smaller hook, ch 21.
- 1st row: (RS) 1 sc in 2nd ch from hook and in each ch to end of chain. Turn. (20 sc)
- 2nd row: Ch 1. 1 scbl in each sc to end of row. Turn.
- To join ribbing into a round, with WS facing, fold the cuff lengthwise in half, placing the chain edge in front of the last row.
Working through both thicknesses of the foundation chain and the back loops of the last row, sl st in each st to the end of the row.
Hand
- Change to the larger hook.
- 1st set-up rnd: With Color A, ch 1. Work 28 sc evenly around the top edge of the ribbing. Join with sl st to the first sc.
- 2nd set-up rnd: Ch 1. 1 scbp around each sc. Join with sl st to the first scbp.
- Note: Do not join at ends of rnds. Continue working in a spiral, placing a marker on the first st of the rnd for easier counting.
- 1st rnd: 1 splsc in each sc around. Do not join in rnd.
- The 1st rnd of Chart is complete. Continue in the Chart in splsc until the 6th row of the chart has been completed, reading rnds from right to left.
- Note: Work gusset sts with Color A only. (Chart is shown on page 4.)
Shape Thumb Gusset
- 1st rnd: Work the 7th row of the Chart across the first 13 sts. With Color A, work 2 splsc in each of the next 2 sts. Continue working the 7th row of the Chart to the end of rnd. (30 sts)
- 2nd rnd: Work the 8th row of the Chart, noting 4 gusset sts in A.
- 3rd rnd: Work the 9th row of the Chart across the first 13 sts. With A, work 2 splsc in the next st, 1 splsc in each of the next 2 sts, and 2 splsc in the next st. Continue working the 9th row of the Chart to the end of rnd. (32 sts)
- 4th rnd: Work the 10th row of the Chart, noting 6 gusset sts in A.
- 5th rnd: Work the 11th row of the Chart across the first 13 sts. With A, work 2 splsc in the next st, 1 splsc in each of the next 4 sts, and 2 splsc in the next st. Continue working the 11th row of the Chart to the end of rnd. (34 sts)
- 6th rnd: Work the 12th row of the Chart, noting 8 gusset sts in A.
- 7th rnd: Work the 13th row of the Chart across the first 13 sts. Ch 2. PM on 2nd ch. Skip the next 8 sts. Continue working the 13th row of the Chart to the end of rnd.
- 8th rnd: Work the 14th row of the Chart across the first 13 sts. With the appropriate color, work 1 sc in each of the next 2 ch. Continue working the 14th row of the Chart, working in splsc to the end of Chart. Break Color A for the thumb gusset.
- Continue working the Chart until the 28th rnd is complete. Break B, C, D, and E.
Shape Top (Hand)
- Next 3 rnds: With Color A, work 1 splsc in each st around.
- Next rnd: (1 splsc in each of the next 2 sts, splsc2tog) 7 times. (21 sts)
- Next rnd: (1 splsc in next st, splsc2tog) 6 times. (14 sts)
- Fasten off, leaving a long end. Draw the end tightly through remaining sts and fasten securely.
Thumb
- Join Color A with sl st at the marked ch.
- 1st rnd: Ch 1. 1 sc in the same space as the sl st. 1 sc in each of the next 8 sts. 1 sc in the last ch. (10 sc) PM for the beginning of the rnd. Do not join. Continue working in a spiral.
- 2nd rnd: 1 splsc in each sc around.
- Repeat the last rnd until the thumb from the marker measures 2″ [5 cm].
- Next rnd: (splsc2tog) 5 times.
- Fasten off, leaving a long end. Draw the end tightly through remaining sts and fasten securely.
Hat
Ribbing
- With Color A and the smaller hook, ch 7.
- 1st row: (RS) 1 sc in 2nd ch from hook and in each ch to the end of the chain. Turn. (6 sc)
- 2nd row: Ch 1. 1 scbl in each sc to the end of the row. Turn.
- Repeat the last row until the work, without stretching, measures 22” [56 cm] from the beginning, ending on a RS row. Do not fasten off.
- Join the ribbing in a round: with WS facing, fold the cuff lengthwise in half, placing the chain edge in front of the last row.
Working through both thicknesses of the foundation chain and the back loops of the last row, sl st in each st to the end of the row.
Body
- Change to the larger hook.
- 1st set-up rnd: With Color A, ch 1. Work 80 sc evenly around the top edge of the ribbing. Join with sl st to the first sc.
- 2nd set-up rnd: Ch 1. 1 scbp around each sc around. Join with sl st to the first st.
- Note: Do not join at ends of rnds. Continue working in a spiral placing a marker on the first st of the rnd for easier counting.
- 1st rnd: 1 splsc in each sc around. Do not join in rnd.
- The 1st rnd of Chart is complete. Continue in the Chart in splsc until the end of the Chart, reading rnds from right to left noting the 40-st rep will be worked twice. Break Colors B, C, D, and E at the end of the Chart. (Chart is shown on page 4.)
Shape Top (Hat)
- 1st rnd: With Color A, (1 splsc in each of the next 2 sts, splsc2tog) 20 times. (60 sts)
- 2nd rnd: (1 splsc in next st, splsc2tog) 20 times. (40 sts)
- 3rd rnd: *Splsc2tog. Repeat from * around. (20 sts)
- 4th rnd: Splsc2tog. Repeat from * around. (10 sts)
- Fasten off, leaving a long end. Draw the end tightly through remaining sts and fasten securely.
Frequently Asked Questions
What crochet hook is used for this pattern?
This pattern uses sizes U.S. G/6 (4 mm) and U.S. H/8 (5 mm) crochet hooks, or a size needed to obtain the gauge.
Is this project worked in rows or rounds?
The mittens and hat are both constructed in rounds, creating a seamless finish.
Does this crochet project require assembly?
No assembly is required for this project, as the mittens and hat are worked in the round and finished as individual pieces.
Conclusion
The Shannon Crochet Hat & Mitt Set is an enjoyable project that not only keeps you warm but allows you to express your creativity with color and texture. Whether you’re making it for yourself or as a gift, this lovely set will surely become a go-to accessory for cold weather. Happy crocheting!