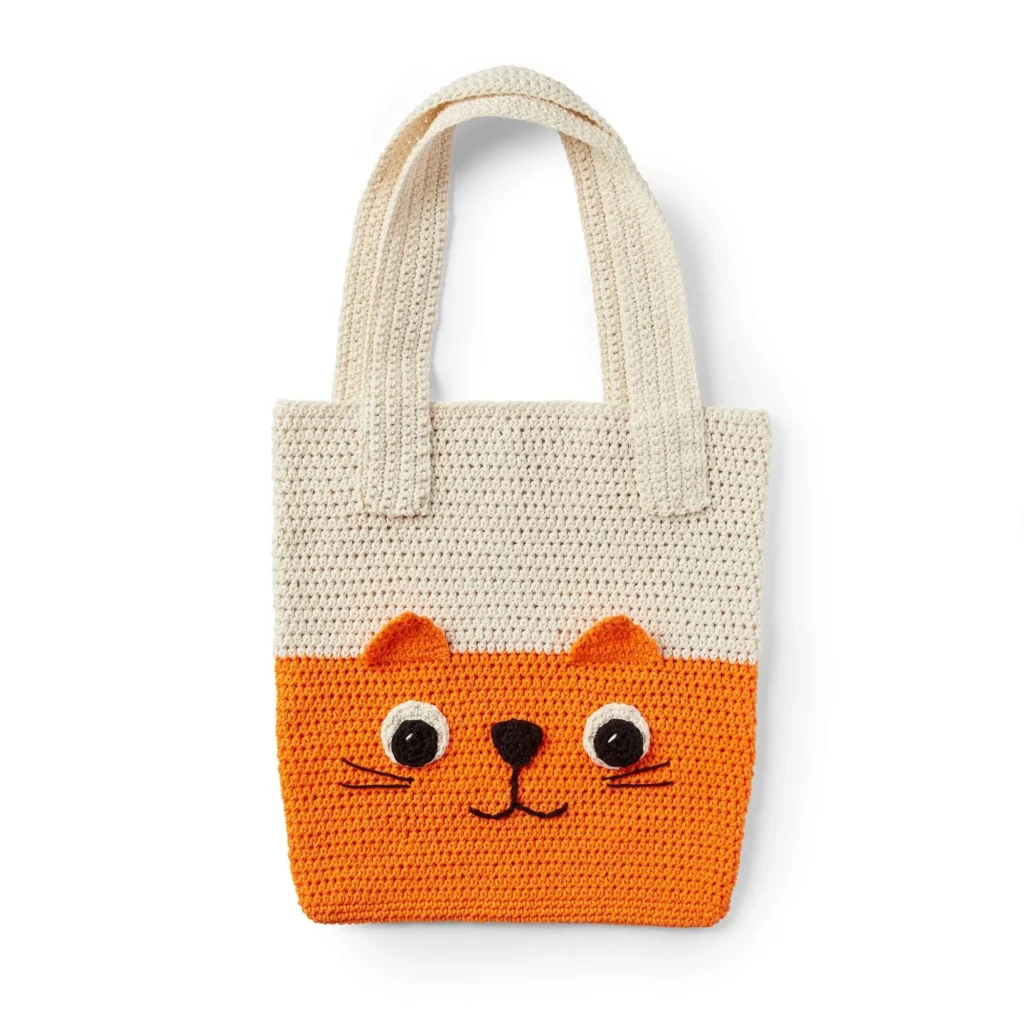
Crochet Kitty Tote Pattern: A Purr-fect Crafting Project
Crocheting can be incredibly rewarding, and the Crochet Kitty Tote Pattern is a delightful project that’s perfect for both beginners and seasoned crocheters. This adorable tote bag features a charming kitty design—perfect for carrying your crochet projects, groceries, or just about anything! Here’s everything you need to create your very own Kitty Tote.
Materials Needed

To get started, gather the following materials:
-
Yarn:
- Lily® Sugar’n Cream® (2.5 oz / 70.9 g; 120 yds / 109 m)
- Contrast A: Hot Orange (01628): 2 balls (230 yds / 210 m)
- Contrast B: Ecru (00004): 3 balls (350 yds / 320 m)
- Contrast C: Black (00002): 1 ball (17 yds / 16 m)
- Lily® Sugar’n Cream® (2.5 oz / 70.9 g; 120 yds / 109 m)
-
Crochet Hook:
- Size U.S. H/8 (5 mm) Susan Bates® Silvalume® crochet hook, or size needed to obtain gauge
-
Notions:
- Susan Bates® steel yarn needle
Instructions
Bag Construction
-
Foundation Chain: With Contrast A, chain 49.
-
1st Round:
- Single crochet (sc) in the 2nd chain from the hook.
- Sc in each chain to the last chain.
- 3 sc in the last chain.
- Do not turn; working in the remaining loops of the foundation chain, sc in each chain to the last chain.
- 2 sc in the last chain, join with a slip stitch (sl st) to the first sc (98 sc).
-
2nd Round:
- Chain 1.
- 2 sc in the first sc, sc in the next 46 sc, 2 sc in each of the next 3 sc.
- Sc in each sc to the last 2 sc, 2 sc in each of the last 2 sc.
- Join with sl st to the first sc (104 sc).
-
3rd Round: Repeat sc in each sc around and join with sl st.
-
4th Round: Chain 2 (does not count as half double crochet [hdc]), hdc in each sc around and join.
-
5th Round: Repeat the hdc around and join. Continue until the bag measures 8 inches (20.5 cm).
-
Transition to B: Break thread A and join thread B.
-
Continue with B: Work evenly in rounds until the bag measures 16 inches (40.5 cm). Fasten off.
Handles (Make 2)
- Foundation Chain: With B, chain 105.
- 1st Row: Sc in the 2nd chain from the hook. Sc in each chain to the end of the chain. Turn (104 sc).
- 2nd Row: Chain 1, word sc in each sc to the end. Turn.
- Repeat Last Row: Until the handle measures 2 inches (5 cm) wide. Fasten off.
Ears (Make 2)
- Foundation Chain: With A, chain 12.
- 1st Row: Sc in the 2nd chain from the hook and in each remaining chain. Turn (11 sc).
- 2nd Row: Chain 1, sc in each sc. Turn.
- 3rd, 4th, 5th, 6th Rows: Follow the specified instructions to create the ear shape, reducing the number of stitches as indicated.
- Final Row: Sc3tog. Fasten off, leaving a long end.
Eyes (Make 2)
Outer Eye:
- With B, chain 2.
- Work 1st to 3rd rounds as specified in the pattern.
- Fasten off.
Pupil (Make 2):
- With C, chain 2 and follow the same instructions as for the outer eye.
- Fasten off.
Highlight the pupil with a straight stitch using B and sew it onto the outer eye.
Nose
- With C, chain 4.
- Follow the instructions to create the nose shape, finishing with a round of sc around.
Finishing Touches
- Attach the handles to the bag as shown in the pattern picture.
- Sew the ears onto the front of the bag, positioning them at the top edge of the kitty’s head.
- Attach the eyes and nose to the bag’s front.
- Using C, embroider the snout and whiskers with an outline stitch for the finishing details.
Conclusion
The Crochet Kitty Tote is not only functional but also a fun and creative way to showcase your crochet skills. With simple stitches and a bit of creativity, you can craft this enchanting bag that is sure to turn heads. Whether you’re using it for errands, a day at the beach, or your next crochet session, this kitty tote is sure to bring a smile to your face. Happy crocheting!