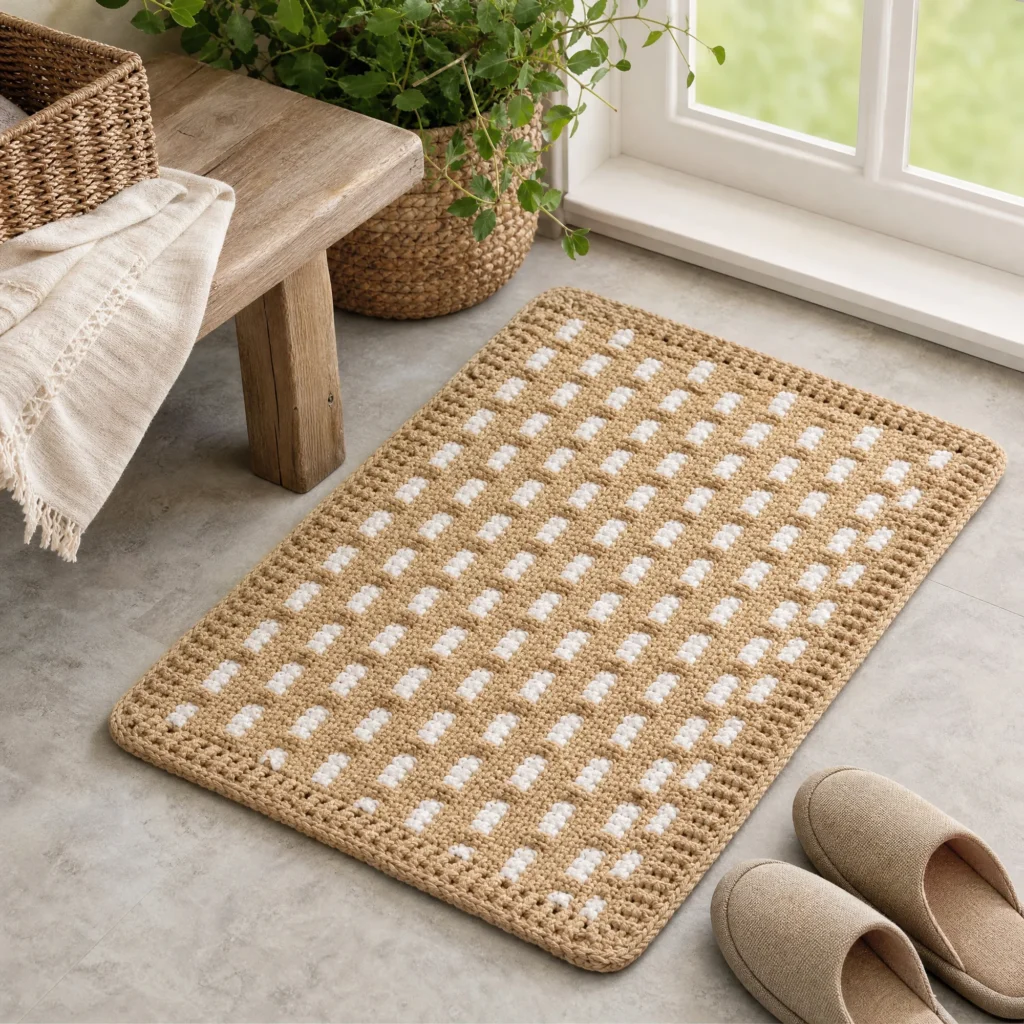
Crochet Hearth & Home Rug Pattern
Creating a cozy atmosphere at home can often be achieved through the perfect accessories. A handmade rug serves not just as a functional item for the floor, but also as a beautiful design feature that can elevate any space. The Crochet Hearth & Home Rug Pattern combines comfort and style, making it a wonderful project for your home decor.
About This Crochet Project
This crochet rug is designed with the intention of providing both aesthetics and utility. The textured surface, along with a striking color contrast, allows it to fit seamlessly in various home settings, from the living room to the entryway. The use of RED HEART® Super Saver Chunky® means this rug will not only be soft underfoot, but durable enough to withstand daily foot traffic.
Finished Measurements
Unfortunately, specific dimensions for the completed rug are not provided in the pattern details. However, you will be able to estimate the size based on the yarn used and the instructions provided, creating a rug that fits perfectly in your desired space.
Materials

To get started on your Crochet Hearth & Home Rug, you will need the following materials:
Yarn
- RED HEART® Super Saver Chunky®:
- 3 skeins in color 334 Buff (A)
- 1 skein in color 311 White (B)
Crochet Hook
- Susan Bates® Crochet Hook: 9mm [M-13 US]
Notions
- Yarn needle
- Non-slip rug pad (if placed on hard flooring)
Crochet Abbreviations
Familiarizing yourself with the crochet abbreviations used in this pattern will help you understand the instructions better. Here are the terms you’ll encounter:
- ch – chain
- sc – single crochet
- tr – treble crochet
- dc – double crochet
- fpdc – front post double crochet
- bpdc – back post double crochet
- st – stitch
Pattern Notes
This rug is worked as a body and then finished with a border. It starts off in rows and transitions into joined rounds. Pay special attention to the color changes and texture patterns which add depth and dimension to your project.
Instructions for the Rug Body
Foundation Chain
With color A (Buff), ch 79.
Rows 1-6
- Row 1 (right side): Sc in 2nd ch from hook and in each ch across, turn — 78 st.
- Row 2: Ch 1, sc in each sc; change to B, turn.
- Row 3: Ch 1, sc in first 2 sc, sc in back loops only of next 2 sc, *sc in next 4 sc, sc in back loops only of next 2 sc; repeat from * to last 2 sc, sc in last 2 sc, turn.
- Row 4: Ch 1, sc in each sc; change to A, turn.
- Row 5: Ch 1, sc in first 2 sc, tr in front loops only of next 2 sc 2 rows below, *sc in next 4 sc, tr in front loops only of next 2 sc 2 rows below; repeat from * to last 2 sc, sc in last 2 sc, turn.
- Rows 6-8: Ch 1, sc in each sc; change to B at end of Row 8, turn.
Rows 9-14
- Row 9: Ch 1, sc in first 5 sc, sc in back loops only of next 2 sc, *sc in next 4 sc, sc in back loops only of next 2 sc; repeat from * to last 5 sc, sc in last 5 sc, turn.
- Row 10: Ch 1, sc in each sc; change to A, turn.
- Row 11: Ch 1, sc in first 5 sc, tr in front loops only of next 2 sc 2 rows below, *sc in next 4 sc, tr in front loops only of next 2 sc 2 rows below; repeat from * to last 5 sc, sc in last 5 sc, turn.
- Rows 12-14: Ch 1, sc in each sc; change to B at end of Row 14, turn.
Repeat Pattern
- Rows 13-48: Repeat Rows 3-14 three times.
- Rows 49-52: Repeat Rows 3-6 once, turn. Do not fasten off. Continue working in joined rounds with right side facing at all times.
Instructions for the Border (Joined Rounds)
Joining the Border
With right side facing, join A with slip stitch in first sc.
Round 1 (Right Side)
- Ch 3 (counts as first dc here and throughout), 2 dc in first sc (corner made), dc in each sc to last sc, 3 dc in last sc (corner made);
- Working across ends of rows of first side, skip first row, dc in next 6 rows, [skip next row, dc in next 7 rows] twice, skip next row, dc in next 6 rows; repeat from * to * once, skip last row;
- Working across opposite side of foundation ch, 3 dc in first ch (corner made), dc in each ch to last ch, 3 dc in last ch (corner made);
- Working across ends of rows of 2nd side, skip first row, dc in next 6 rows; repeat from * to * once, skip last row; join with slip stitch in top of beginning ch-3 — 256 dc.
Rounds 2 and 3
- Slip stitch in next dc, ch 3, 2 dc in same st, [fpdc around next dc, bpdc around next dc] across to center dc of next corner, 3 dc in center dc, [bpdc around next dc, fpdc around next dc] across to center dc of next corner, 3 dc in center dc; repeat from * to * once; join with slip stitch in top of beginning ch-3 — 272 dc.
Round 4
- Slip stitch in each dc; join with slip stitch to first slip stitch. Fasten off.
Finishing Touches
Once you have completed your rug, the last step is to weave in any loose ends. This step is crucial to ensure your rug maintains a polished look. For added safety, particularly if you place the rug on hard flooring, attach a non-slip rug pad underneath to prevent slipping.
Frequently Asked Questions
What crochet hook is used for this pattern?
You will need a Susan Bates® Crochet Hook measuring 9mm [M-13 US].
What yarn is recommended for this project?
The pattern specifies using RED HEART® Super Saver Chunky®, with 3 skeins in 334 Buff and 1 skein in 311 White.
Is this project worked in rows or rounds?
The rug body is initially worked in rows and then transitions into joined rounds for the border.
Does this crochet project require assembly?
No assembly is required; you work the rug in one continuous piece before adding the border.
How many skeins of yarn do I need?
You will need 3 skeins of color A (Buff) and 1 skein of color B (White).
Conclusion
The Crochet Hearth & Home Rug Pattern not only results in a practical floor covering but also serves as a unique handcrafted piece that adds charm to any room. With attention to detail reflected in the stitch patterns and the bold color choices, this project allows for creativity and personalization in your home decor. Happy crocheting!