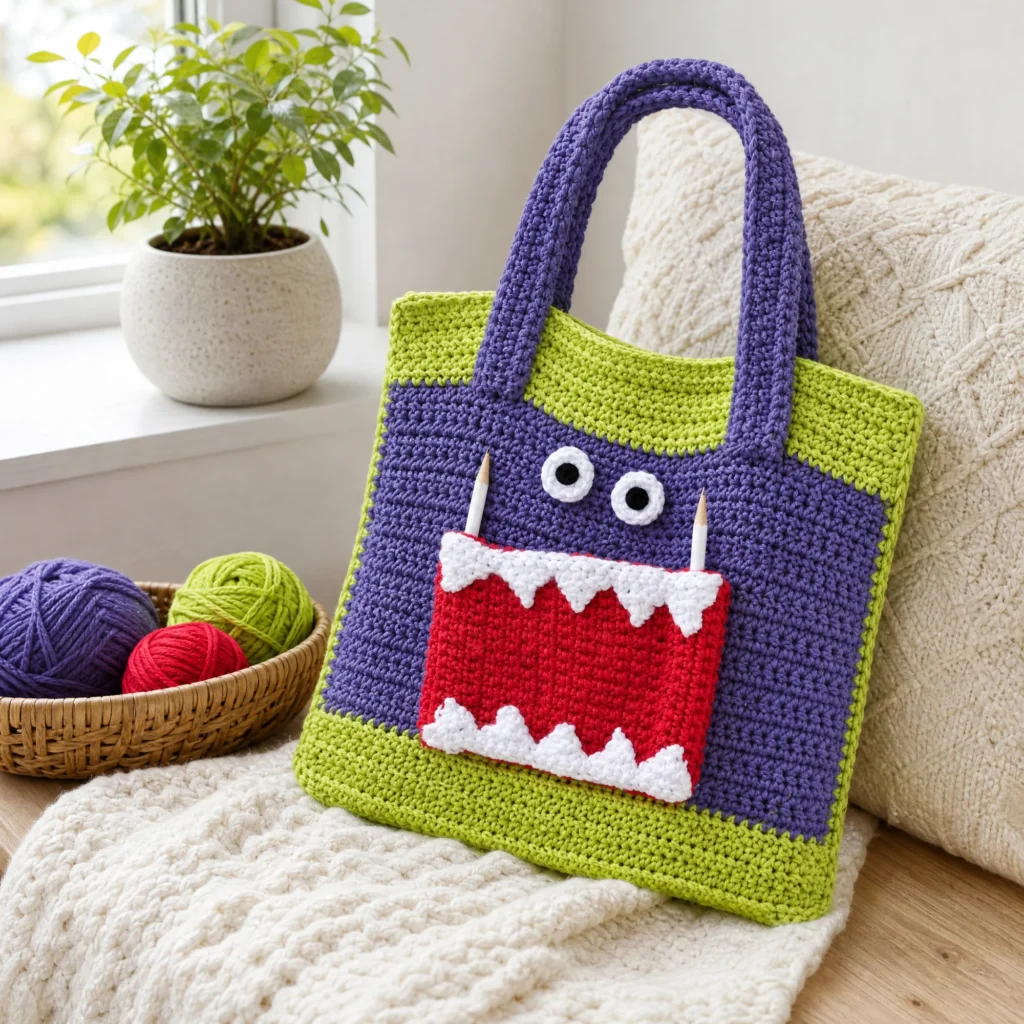
‘Monster Ate My Homework’ Tote Pattern
Crocheting can be a delightful way to express creativity while crafting something functional. In this post, I’ll share the ‘Monster Ate My Homework’ Tote Pattern, an enchanting project perfect for carrying books, crafts, or even snacks. This whimsical bag features a playful design that mimics a friendly monster, making it both a fun craft and a useful accessory.
About the Bag
The ‘Monster Ate My Homework’ tote is an engaging project that blends function with playful design. This tote features vibrant colors and a unique shape, with a mouth pocket that can hold pencils, pens, or small items. This multi-functional tote is not only stylish but also embodies a sense of whimsy that appeals to both kids and adults alike. Whether you want a personalized bag for school, a gift for a friend, or a cute accessory for your outings, this crochet tote is sure to bring smiles!
Materials

To create your ‘Monster Ate My Homework’ Tote, gather the following materials:
Yarn
- Lily® Sugar’n Cream® (70.9 g / 2.5 oz; 109 m / 120 yds)
- Contrast A: Hot Green (01712): 105 m / 116 yds or 1 ball
- Contrast B: Grape (00071): 250 m / 276 yds or 3 balls
- Contrast C: Red (00095): 52 m / 57 yds or 1 ball
- Contrast D: White (00001): 38 m / 42 yds or 1 ball
Tools
- Crochet hook: Size 4 mm (U.S. G or 6) crochet hook or size needed to obtain gauge
- Small piece of black felt for eyes
- Craft glue
Crochet Abbreviations
Familiarize yourself with these crochet abbreviations used in the pattern:
- ch = chain
- hdc = half double crochet
- sc = single crochet
- st(s) = stitch(es)
- RS = right side
- WS = wrong side
- sl st = slip stitch
- tog = together
Construction Overview
The ‘Monster Ate My Homework’ Tote is constructed in several parts: the main bag body, the mouth pocket, teeth, eyes, and handles. Each component adds to the whimsical character of the bag while serving a functional purpose.
Here’s how it comes together:
- Bag: The bag is made in two pieces that are identical.
- Mouth Pocket: This section adds charm and serves as a pencil holder.
- Teeth and Eyes: These embellishments create the monster’s playful face.
- Handles: Two handles are attached for comfortable carrying.
Official Crochet Instructions
BAG (make 2 pieces alike)
With A, ch 47.
1st row: 1 hdc in 3rd ch from hook. 1 hdc in each ch to end of chain. Turn. 45 hdc.
2nd row: Ch 2. 1 hdc in each hdc to end of row. Turn.
Rep last row until work from beg measures 2″ [5 cm]. Join B.
With B, rep 2nd row until work from beg measures 10″ [25.5 cm]. Join A.
With A, rep 2nd row until work from beg measures 12″ [30.5 cm]. Fasten off.
MOUTH POCKET
With C, ch 18.
1st row: (RS). 1 sc in 2nd ch from hook. 1 sc in each ch to end of chain. Turn. 17 sc.
2nd to 4th rows: Ch 1. 1 sc in each sc to end of row. Turn.
5th row: (Folding row). Ch 1. Working in back loops only, 1 sc in each sc to end of row. Turn. Place marker at end of last row.
6th to 8th rows: Ch 1. Working in both loops, 1 sc in each sc to end of row. Turn.
Side pencil pocket folding/placement section (continues Mouth Pocket)
9th row: Ch 1. Fold work along 5th row. Working through both thicknesses, 1 sc in each sc and rem loop of foundation ch to end of row. Turn. (first pencil pocket made).
10th row: Ch 1. 1 sc in each sc to end of row. Turn.
Rep last row until work from marked row measures 5½” [14 cm], ending on a WS row.
Next row: (RS). Ch 1. Working in front loops only, 1 sc in each sc to end of row. Turn. Place marker at end of row.
Next 3 rows: Ch 1. Working through both loops, 1 sc in each sc to end of row. Turn.
Next row: (RS). (Folding row). Ch 1. Working in back loops only, 1 sc in each sc to end of row. Turn.
Next 3 rows: Ch 1. 1 sc in each sc to end of row. Turn. Fasten off at end of last row.
Fold work along last Folding row worked. Thread yarn through needle and sew edge to rem loops of marked row (second pencil pocket made).
TEETH (make 2)
With D, ch 26.
1st row: 1 sc in 2nd ch from hook. 1 sc in each ch to end of chain. Turn. 25 sc.
First Tooth:
1st row: Ch 1. Sc2tog. 1 sc in next sc. Sc2tog. Turn. Leave rem sts unworked.
2nd row: Ch 1. 1 sc in first st. Sc2tog. Turn.
3rd row: Ch 1. Sc2tog. Fasten off.
Second Tooth:
Join D with sl st to next unworked sc. Work from * to * as given for First Tooth.
Third to Fifth Teeth:
Rep from to 3 times more.
5 teeth made.
(Sew Teeth to Mouth Pocket as shown in the picture, taking care not to sew side pencil pockets closed.)
EYES
With D, ch 2.
1st rnd: 6 sc in 2nd ch from hook. Join with sl st to first sc.
2nd rnd: Ch 1. 2 sc in each sc around. Join with sl st to first sc. 12 sc.
Fasten off.
HANDLES (make 2)
With B, ch 69.
1st row: 1 hdc in 3rd ch from hook. 1 hdc in each ch to end of chain. Turn. 67 hdc.
2nd row: Ch 2. 1 hdc in each hdc to end of row. Turn.
Rep last row 4 times more.
Fold work in half lengthwise. Working through both thicknesses, 1 sc in each hdc and rem loop of foundation ch to end of row. Fasten off.
FINISHING
With WS of Bag pieces tog, join A with sl st to top left corner.
Ch 1. Working through both thicknesses, work 1 rnd of sc evenly around side edges and bottom, having 3 sc in each bottom corner. Fasten off.
Sew Mouth Pocket onto Front of Bag, leaving top edge open.
Cut black circles from felt for Eyes approx 1/2″ [1.5 cm].
Glue black felt circles to centers of Eyes and sew to Front of Bag.
Attach Handles as shown in the picture.
Frequently Asked Questions
What crochet hook is used for this pattern?
You will need a size 4 mm (U.S. G or 6) crochet hook or a size needed to obtain gauge.
Is this project worked in rows or rounds?
The project is primarily worked in rows, constructing panels for the bag and the pocket.
Does this crochet project require assembly?
Yes, you will sew several components together, including the mouth pocket and attaching the handles.
Conclusion
The ‘Monster Ate My Homework’ Tote is a fun project that combines creativity with practicality. With its playful design and vibrant colors, it’s perfect for carrying your essentials in style. Whether you are an experienced crocheter or someone looking to try a new project, this tote is a delightful way to brighten your day and showcase your crochet skills. Happy crocheting!