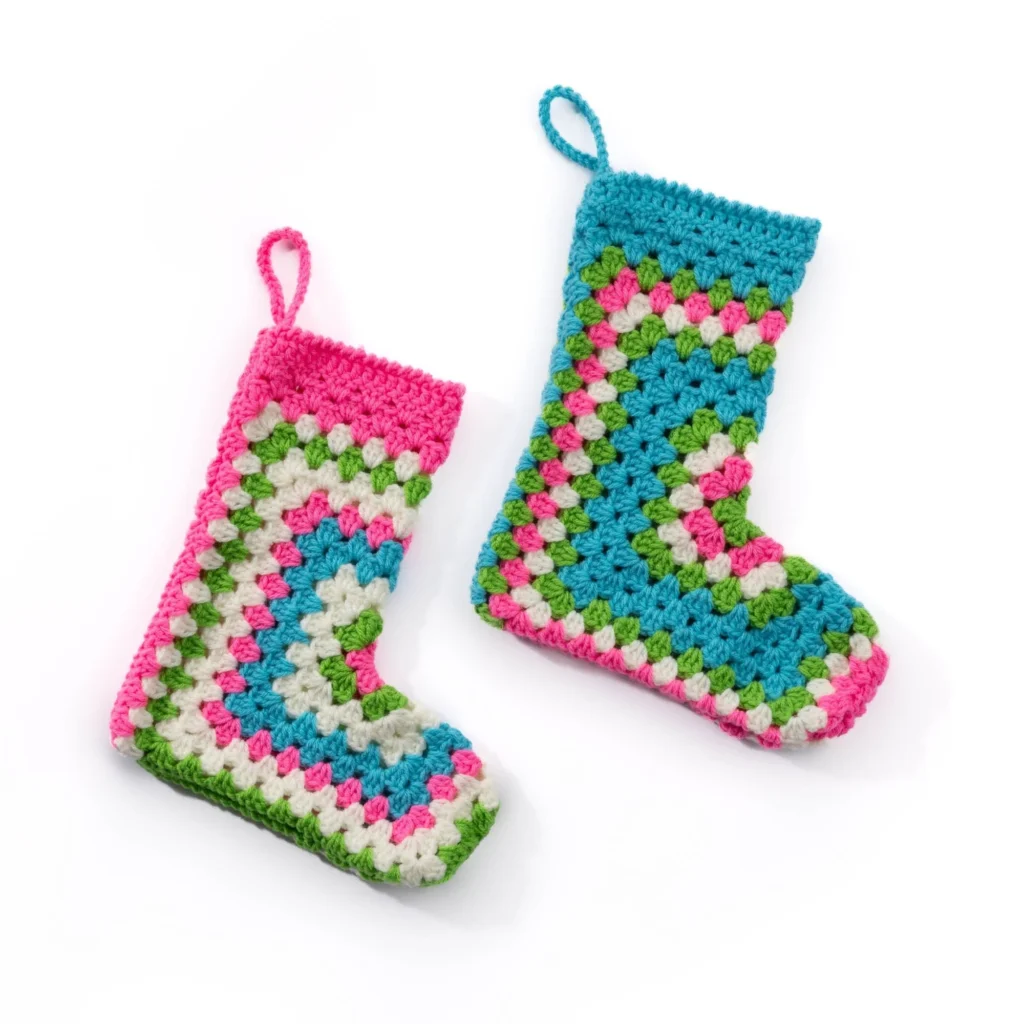
Crochet Hexi Christmas Stocking Pattern
The Crochet Hexi Christmas Stocking Pattern combines festive spirit with playful design. This delightful stocking features hexagonal motifs crafted in cheerful colors, perfect for adding a handmade touch to your holiday decor. Whether you’re hanging it by the fireplace or filling it with gifts, this stocking is sure to bring joy to the season.
About the Crochet Project
This project comprises two distinct versions, each with its unique color combinations. The stocking is constructed using hexagonal motifs that are stitched together, making it an engaging and creative endeavor for crocheters of varying skill levels.
Materials

Yarn
For this project, you will need the following yarns:
- Version 1
- Red Heart® Super Saver™ (7 oz/198 g; 364 yds/333 m)
- Contrast A Turqua (0512): 1 ball or 94 yds/85.5 m
- Contrast B Pretty n’ Pink (0722): 1 ball or 24 yds/22 m
- Contrast C Spring Green (0672): 1 ball or 32 yds/29 m
- Contrast D Soft White (0316): 1 ball or 24 yds/22 m
- Red Heart® Super Saver™ (7 oz/198 g; 364 yds/333 m)
- Version 2
- Red Heart® Super Saver™ (7 oz/198 g; 364 yds/333 m)
- Contrast A Turqua (0512): 1 ball or 32 yds/29 m
- Contrast B Spring Green (0672): 1 ball or 32 yds/29 m
- Contrast C Pretty n’ Pink (0722): 1 ball or 80 yds/73 m
- Contrast D Soft White (0316): 1 ball or 80 yds/73 m
- Red Heart® Super Saver™ (7 oz/198 g; 364 yds/333 m)
Tools
- Crochet hook: Sizes U.S. H/8 (5 mm) Susan Bates® Silvalume® crochet hook or size needed to obtain gauge.
- Stitch markers: Susan Bates® stitch markers.
- Needle: Susan Bates® steel yarn needle.
Crochet Abbreviations
- ch: chain
- dc: double crochet
- sl st: slip stitch
- sp: space
- tog: together
Pattern Notes
- This pattern is constructed in rounds. Be sure to count your stitches and check your work regularly to maintain the correct shape and size.
Version 1 Hexagon
Create the Hexagon Motif (Round-by-Round)
Start with Contrast C:
- Ch 4. Join with sl st to first ch to form a ring.
- 1st rnd: Ch 3 (counts as dc at beg of this and subsequent rnds). 2 dc in ring. (Ch 2. 3 dc) 5 times in ring. Ch 2. Join with sl st to top of ch 3. Completes: 6 groups of 3 dc and 6 ch-2 spaces. Break C.
- 2nd rnd: Join Contrast B with sl st in first ch-2 space. Ch 3. (2 dc. Ch 2. 3 dc) in same space as last sl st. *Skip next 3 dc. (3 dc. Ch 2. 3 dc) in next ch-2 space. Rep from * 4 times more. Join with sl st to top of ch 3. Break B.
- 3rd rnd: Join Contrast D with sl st in first ch-2 space. Ch 3. (2 dc. Ch 2. 3 dc) in same space as last sl st. *Skip next 3 dc. 3 dc in space between next 2 groups of 3-dc. Skip next 3 dc. (3 dc. Ch 2. 3 dc) in next corner ch-2 space. Rep from * 4 times more. Skip next 3 dc. 3 dc in space between next 2 groups of 3-dc. Skip last 3 dc. Join with sl st to top of ch 3. Break D.
- 4th rnd: Join Contrast C with sl st in first ch-2 space. Ch 3. (2 dc. Ch 2. 3 dc) in same space as last sl st. *(Skip next 3 dc, 3 dc in space between next 2 groups of 3-dc) twice. Skip next 3 dc. (3 dc. Ch 2. 3 dc) in next corner ch-2 space. Rep from * 4 times more. (Skip next 3 dc, 3 dc in space between next 2 groups of 3-dc) twice. Skip last 3 dc. Join with sl st to top of ch 3. Break C.
- 5th rnd: Join Contrast A with sl st in first ch-2 space. Ch 3. (2 dc. Ch 2. 3 dc) in same space as last sl st. [Skip next 3 dc. 3 dc in space between next 2 groups of 3-dc. Rep from * to * to next corner ch-2 space. Skip next 3 dc. (3 dc. Ch 2. 3 dc) in next corner ch-2 space] 5 times. Rep from * to * to end of rnd. Skip last 3 dc. Join with sl st to top of ch 3.
- 6th and 7th rnds: Sl st in each of next 2 dc and next ch-2 space. Ch 3. (2 dc. Ch 2. 3 dc) in same space as last sl st. [Skip next 3 dc. 3 dc in space between next 2 groups of 3-dc. Rep from * to * to next corner ch-2 space. Skip next 3 dc. (3 dc. Ch 2. 3 dc) in next corner ch-2 space] 5 times. Rep from * to * to end of rnd. Skip last 3 dc. Join with sl st to top of ch 3. Break A at end of 7th rnd.
- 8th rnd: With Contrast C, work as 5th rnd. Break C.
- 9th rnd: Join Contrast D with sl st in first ch-2 space. Ch 3. (2 dc. Ch 2. 3 dc) in same space as last sl st. *(Skip next 3 dc. 3 dc in space between next 2 groups of 3-dc) 7 times. Skip next 3 dc. (3 dc. Ch 2. 3 dc) in next corner ch-2 space – PM in ch-2 space just worked. Rep from * once more. (Skip next 3 dc. 3 dc in space between next 2 groups of 3-dc) 7 times. Skip next 3 dc. (3 dc. Ch 2. 3 dc) in next corner ch-2 space. Rep from * twice more. (Skip next 3 dc. 3 dc in space between next 2 groups of 3-dc) 7 times. Skip last 3 dc. Join with sl st to top of ch 3. Break D.
Version 1 Toe Shaping +
Marker Placement
To shape the toe:
10. 10th rnd: Join Contrast B with sl st in first ch-2 space. Ch 3. (2 dc. Ch 2. 3 dc) in same space as last sl st. (Skip next 3 dc. 3 dc in space between next 2 groups of 3-dc) 8 times. (3 dc. Ch 2. 3 dc) in next marked corner ch-2 space. (dc3tog in space between next 2 groups of 3 dc) 8 times. (3 dc. Ch 2. 3 dc) in next marked corner ch-2 space. *(Skip next 3 dc. 3 dc in space between next 2 groups of 3-dc) 8 times. Skip next 3 dc. (3 dc. Ch 2. 3 dc) in next corner ch-2 space. Rep from * twice more. (Skip next 3 dc. 3 dc in space between next 2 groups of 3-dc) 8 times. Skip last 3 dc. Join with sl st to top of ch 3. Break B. PM in 4th corner ch-2 space of 10th rnd.
Version 1 Stocking Sides
Stocking Sides
1st row: With RS of Hexagon facing, join C with sl st in marked 4th corner ch-2 space. Ch 3. 2 dc in same space.
*(3 dc in space between next 2 groups of 3-dc) 9 times. (3 dc. Ch 2. 3 dc) in next corner ch-2 space. Rep from * once more. (3 dc in space between next 2 groups of 3-dc) 9 times. 3 dc in next corner ch-2 space. Break C. Leave remaining stitches unworked.
2nd row: (RS) Join A with sl st in the top of ch 3 at the beginning of the 1st row. Ch 3. *(3 dc in space between next 2 groups of 3-dc) 10 times. (3 dc. Ch 2. 3 dc) in the next corner ch-2 space. Rep from * once more. (3 dc in space between next 2 groups of 3-dc) 10 times. Skip next 2 dc. 1 dc in last dc. Break A. PM in each of the two ch-2 corner spaces of the last row.
Version 1 Stocking Top Edge
Stocking Top Edge
1st row: With RS of Stocking facing, join A with sl st in the first marked corner ch-2 space. Ch 3. 2 dc in same space. (3 dc in space between next 2 groups of 3-dc) 11 times. 3 dc in the second marked corner ch-2 space. Turn.
2nd row: (WS) Ch 3. (3 dc in space between next 2 groups of 3-dc) 12 times. Skip next 2 dc. 1 dc in the top of ch 3. Turn.
3rd row: Ch 3. 1 dc in each dc to the end of the row. Do not turn.
4th row: Ch 1. Working from left to right instead of from right to left as usual, work 1 reverse sc in each dc to the end of the row. Fasten off.
Version 1 Finishing / Assembly
Finishing
- Fold the stocking with sides, bottom, and toe edges aligned (see photo).
- Using a matching shade, join sides, bottom edge, and toe seams.
- Hanging Loop: Using 2 strands of A held together, join with sl st to the top edge at the side seam. Ch 24. Join with sl st in the seam. Fasten off.
Version 2 Hexagon
Create the Hexagon Motif (Round-by-Round)
Start with Contrast C:
- Ch 4. Join with sl st to first ch to form a ring.
- 1st rnd: Ch 3 (counts as dc at beg of this and subsequent rnds). 2 dc in ring. (Ch 2. 3 dc) 5 times in ring. Ch 2. Join with sl st to top of ch 3. Completes: 6 groups of 3 dc and 6 ch-2 spaces. Break C.
- 2nd rnd: Join Contrast B with sl st in first ch-2 space. Ch 3. (2 dc. Ch 2. 3 dc) in same space as last sl st. *Skip next 3 dc. (3 dc. Ch 2. 3 dc) in next ch-2 space. Rep from * 4 times more. Join with sl st to top of ch 3. Break B.
- 3rd rnd: Join Contrast D with sl st in first ch-2 space. Ch 3. (2 dc. Ch 2. 3 dc) in same space as last sl st. *Skip next 3 dc. 3 dc in space between next 2 groups of 3-dc. Skip next 3 dc. (3 dc. Ch 2. 3 dc) in next corner ch-2 space. Rep from * 4 times more. Skip next 3 dc. 3 dc in space between next 2 groups of 3-dc. Skip last 3 dc. Join with sl st to top of ch 3. Break D.
- 4th rnd: Join Contrast C with sl st in first ch-2 space. Ch 3. (2 dc. Ch 2. 3 dc) in the same space as the last sl st. *(Skip next 3 dc, 3 dc in space between next 2 groups of 3-dc) twice. Skip next 3 dc. (3 dc. Ch 2. 3 dc) in the next corner ch-2 space. Rep from * 4 times more. (Skip next 3 dc, 3 dc in space between next 2 groups of 3-dc) twice. Skip last 3 dc. Join with sl st to top of ch 3. Break C.
- 5th rnd: Join Contrast A with sl st in first ch-2 space. Ch 3. (2 dc. Ch 2. 3 dc) in the same space as the last sl st. [Skip the next 3 dc. 3 dc in space between the next 2 groups of 3-dc. Rep from * to * to the next corner ch-2 space. Skip the next 3 dc. (3 dc. Ch 2. 3 dc) in the next corner ch-2 space] 5 times. Rep from * to * to the end of the rnd. Skip the last 3 dc. Join with sl st to the top of ch 3.
- 6th rnd: Sl st in each of the next 2 dc and the next ch-2 space. Ch 3. (2 dc. Ch 2. 3 dc) in the same space as the last sl st. [Skip next 3 dc. 3 dc in space between next 2 groups of 3-dc. Rep from * to * to the next corner ch-2 space. Skip next 3 dc. (3 dc. Ch 2. 3 dc) in the next corner ch-2 space] 5 times. Rep from * to * to the end of the rnd. Skip the last 3 dc. Join with sl st to the top of ch 3. Break A.
- 7th rnd: Join Contrast C with sl st in the first ch-2 space. Ch 3. (2 dc. Ch 2. 3 dc) in the same space as the last sl st. [Skip next 3 dc. 3 dc in space between next 2 groups of 3-dc. Rep from * to * to the next corner ch-2 space. Skip next 3 dc. (3 dc. Ch 2. 3 dc) in the next corner ch-2 space] 5 times. Rep from * to * to the end of the rnd. Skip the last 3 dc. Join with sl st to the top of ch 3. Break C.
- 8th rnd: With D, work as for 7th rnd.
- 9th rnd: Sl st in each of the next 2 dc and the first ch-2 space. Ch 3. (2 dc. Ch 2. 3 dc) in the same space as the last sl st. *(Skip next 3 dc. 3 dc in space between next 2 groups of 3-dc) 7 times. Skip next 3 dc. (3 dc. Ch 2. 3 dc) in the next corner ch-2 space – PM in ch-2 space just worked. Rep from * once more. (Skip next 3 dc. 3 dc in space between next 2 groups of 3-dc) 7 times. Skip next 3 dc. (3 dc. Ch 2. 3 dc) in the next corner ch-2 space. Rep from * twice more. (Skip next 3 dc. 3 dc in space between next 2 groups of 3-dc) 7 times. Skip the last 3 dc. Join with sl st to the top of ch 3. Break D.
Version 2 Toe Shaping + Marker Placement
To shape the toe:
11. 10th rnd: Join Contrast B with sl st in the first ch-2 space. Ch 3. (2 dc. Ch 2. 3 dc) in the same space as the last sl st. (Skip next 3 dc. 3 dc in space between the next 2 groups of 3-dc) 8 times. (3 dc. Ch 2. 3 dc) in the next marked corner ch-2 space. (dc3tog in space between the next 2 groups of 3 dc) 8 times. (3 dc. Ch 2. 3 dc) in the next marked corner ch-2 space. *(Skip next 3 dc. 3 dc in space between the next 2 groups of 3-dc) 8 times. Skip next 3 dc. (3 dc. Ch 2. 3 dc) in the next corner ch-2 space. Rep from * twice more. (Skip next 3 dc. 3 dc in space between the next 2 groups of 3-dc) 8 times. Skip the last 3 dc. Join with sl st to the top of ch 3. Break B. PM in the 4th corner ch-2 space of the 10th rnd.
Version 2 Stocking Sides
Stocking Sides
1st row: With RS of Hexagon facing, join D with sl st in the marked 4th corner ch-2 space. Ch 3. 2 dc in the same space.
*(3 dc in space between next 2 groups of 3-dc) 9 times. (3 dc. Ch 2. 3 dc) in the next corner ch-2 space. Rep from * once more. (3 dc in space between next 2 groups of 3-dc) 9 times. 3 dc in the next corner ch-2 space. Break D. Leave remaining stitches unworked.
2nd row: (RS) Join C with sl st in the top of ch 3 at the beginning of the 1st row. Ch 3. *(3 dc in space between the next 2 groups of 3-dc) 10 times. (3 dc. Ch 2. 3 dc) in the next corner ch-2 space. Rep from * once more. (3 dc in space between next 2 groups of 3-dc) 10 times. Skip next 2 dc. 1 dc in last dc. Break C. PM in each of the two ch-2 corner spaces of the last row.
Version 2 Stocking Top Edge
Stocking Top Edge
1st row: With RS of Stocking facing, join A with sl st in the first marked corner ch-2 space. Ch 3. 2 dc in the same space. (3 dc in space between next 2 groups of 3-dc) 11 times. 3 dc in the second marked corner ch-2 space. Turn.
2nd row: (WS) Ch 3. (3 dc in space between next 2 groups of 3-dc) 12 times. Skip next 2 dc. 1 dc in the top of ch 3. Turn.
3rd row: Ch 3. 1 dc in each dc to the end of the row. Do not turn.
4th row: Ch 1. Working from left to right instead of right to left, as usual, work 1 reverse sc in each dc to the end of the row. Fasten off.
Version 2 Finishing / Assembly
Finishing
- Fold the stocking with sides, bottom, and toe edges aligned (see photo).
- Using a matching shade, join sides, bottom edge, and toe seams.
- Hanging Loop: Using 2 strands of A held together, join with sl st to the top edge at the side seam. Ch 24. Join with sl st in the seam. Fasten off.
Frequently Asked Questions
What crochet hook is used for this pattern?
You’ll need a U.S. H/8 (5 mm) Susan Bates® Silvalume® crochet hook or size needed to obtain gauge.
Is this project worked in rows or rounds?
This project consists of rounds, creating hexagonal motifs that are then assembled into a stocking.
Does this crochet project require assembly?
Yes, this project involves assembling the hexagons into the shape of a stocking.
To explore more festive projects, check out these 10 festive free Christmas crochet patterns that will brighten your holiday season!
For decorating your tree, you may also love these 10 free crochet Christmas ornament patterns to trim your tree this year.
This Crochet Hexi Christmas Stocking Pattern is not just a delightful project—it’s a creative way to celebrate the festive season while honing your crochet skills. Happy crocheting!