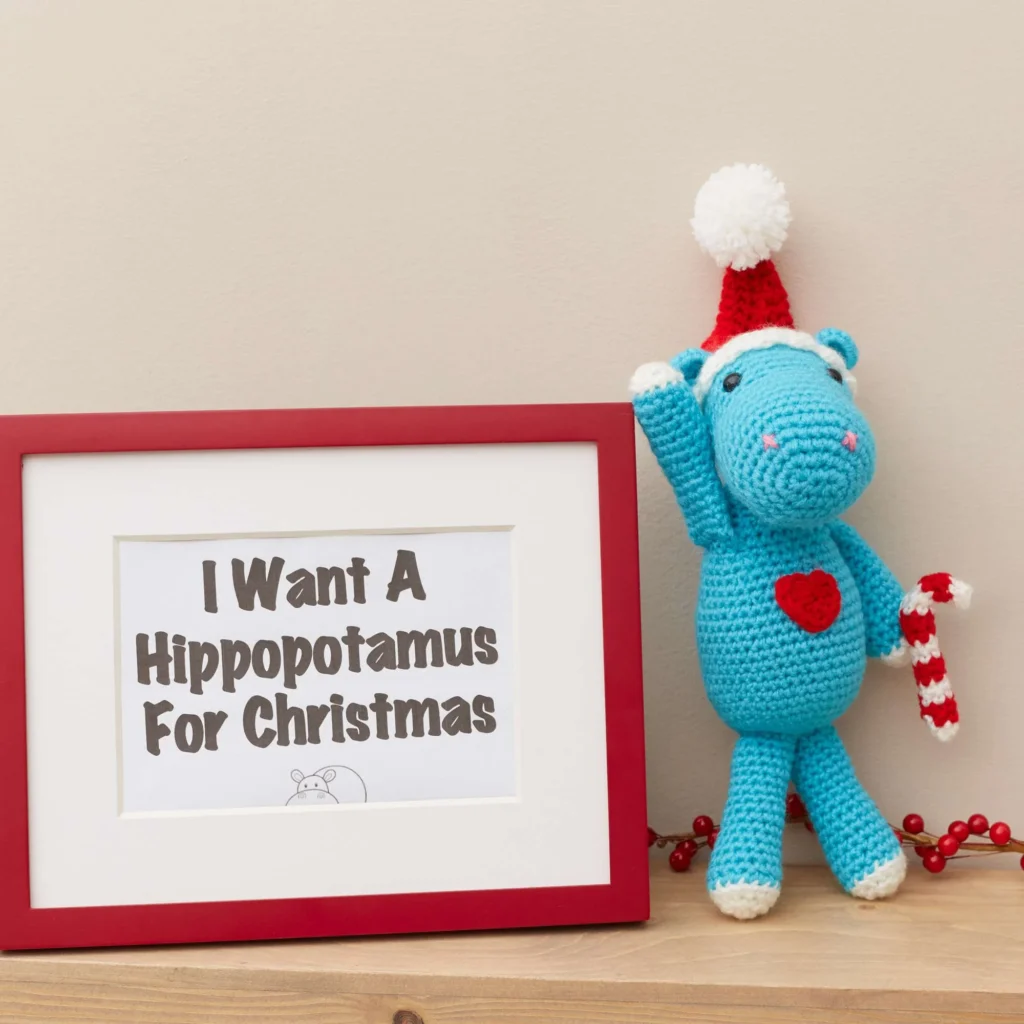
Crochet I Want a Hippopotamus for Christmas Pattern
Crocheting an adorable hippopotamus for the holiday season can be a delightful experience. This charming pattern, based on the classic Christmas song “I Want a Hippopotamus for Christmas,” provides crafters with a fun and festive project, perfect for decoration or as a special gift. With detailed instructions and charming embellishments, you’ll create a playful hippo complete with arms, legs, a hat, a heart, and even a candy cane!
About the Crochet Project
This crochet pattern features a lovable hippo that showcases your crochet skills while allowing for creative embellishment. The finished hippo can serve as a seasonal decoration or a playful gift for children. You can also customize it with different colors or embellishments to match your holiday decor.
Materials

Before you get started, gather the following materials:
Yarn
- RED HEART® Super Saver®:
- 1 skein each of:
- 512 Turqua (Color A)
- 316 Soft White (Color B)
- 319 Cherry Red (Color C)
- 706 Perfect Pink (Color D)
- 1 skein each of:
Crochet Hook
- Susan Bates® Crochet Hook:
- 3.5mm [US E-4]
- 3.75mm [US F-5]
- 4mm [US G-6]
Notions
- Susan Bates® split lock stitch markers
- Susan Bates® Easy Pom Pon Maker, 1¾” (4.5 cm) diameter
- Yarn needle
- Tapestry needle
- 1 pair 8mm post-and-washer safety eyes
- Plush stuffing
- Flexible drinking straw for the candy cane insert
Crochet Abbreviations
This pattern uses the following abbreviations:
- sc: single crochet
- ch: chain
- st: stitch
- sl st: slip stitch
- st2tog: stitch two together (detailed in special stitches)
Special Technique
Magic Ring
Wrap yarn around your left middle finger twice, leaving a 6″ (15 cm) tail. Insert hook under both strands and pull up a loop. Ch 1, and begin working directly into the center of the ring. This ring can be tightened later by pulling on the yarn tail.
Special Stitch
St2tog = Stitch 2 together: This is similar to a sc2tog (single crochet 2 together), but with a small difference that makes it nearly invisible. Insert hook through the front loop of the 1st st, then the 2nd st to be decreased without performing a yarn-over in between, yarn over, and pull up a loop through both front loops. Yarn over and draw the remaining 2 loops on the hook.
Instructions
Arms (make 2)
With Color B, create a magic ring.
Round 1: With size F hook, ch 1, 6 sc in ring, join with sl st in first sc.
Round 2: Ch 1, 2 sc in each sc around, join with sl st in first sc – 12 sc.
Fasten off. Join Color A with sl st in back loop of any sc.
From this point, work in unjoined rounds as follows:
Round 3: Ch 1, sc in the back loop of the same sc and each sc around.
Rounds 4-9: Sc in each sc around.
Round 10: [Sc in each of the next 4 sc, st2tog over next 2 sc] twice – 10 sc.
Rounds 11-16: Sc in each sc around.
Stuff the bottom ⅔ of the Arm.
Hold the top of the Arm closed and seam by working sc in each of the next 5 sc and going through both layers of fabric.
Fasten off.
Body
With Color A, create a magic ring, and work in unjoined rounds as follows:
Round 1: With size F hook, ch 1, 6 sc in ring.
Round 2: 2 sc in each sc around – 12 sc.
Round 3: *Sc in next sc, 2 sc in next sc; repeat from * around – 18 sts.
Round 4: *Sc in each of the next 2 sc, 2 sc in next sc; repeat from * around – 24 sts.
Round 5: *Sc in each of the next 3 sc, 2 sc in next sc; repeat from * around – 30 sts.
Round 6: *Sc in each of the next 4 sc, 2 sc in next sc; repeat from * around – 36 sts.
Round 7: *Sc in each of the next 5 sc, 2 sc in next sc; repeat from * around – 42 sts.
Rounds 8-18: Sc in each sc around.
Round 19: *Sc in each of the next 5 sc, st2tog over next 2 sc; repeat from * around – 36 sts.
Round 20: Sc in each sc around.
Round 21: *Sc in each of the next 4 sc, st2tog over next 2 sc; repeat from * around – 30 sts.
Round 22: Sc in each sc around.
Round 23: *Sc in each of the next 3 sc, st2tog over next 2 sc; repeat from * around – 24 sts.
Round 24 (arm joining round): Holding first Arm against topmost round, join by working sc in each of the next 5 sc and going through both layers of fabric, sc in each of the next 8 sc on Body, join the second Arm the same as the first Arm, sc in each of the last 6 sc on Body.
Round 25: Sc in each sc around.
Round 26: *Sc in each of the next 2 sc, st2tog over next 2 sc; repeat from * around – 18 sts.
Round 27: Sc in each sc around.
Round 28: Sc in each of the next 2 sts, hdc in the next 9 sts, sc in each of the last 7 sts.
Fasten off, leaving a long tail for sewing the head to the neck.
Stuff the piece firmly and set aside.
Head
Note: The head is worked from the snout upwards.
Using Color A and size F hook, ch 4.
Round 1: 2 sc in 2nd ch from hook and in each of the next 2 ch, rotate piece 180 degrees, working in unused loops at the opposite side of the foundation ch work 2 sc in each of the next 3 ch, join with sl st in first sc – 12 sc.
From this point, work in unjoined rounds as follows:
Round 2: *Sc in next sc, 2 sc in next sc; repeat from * around – 18 sts.
Round 3: *Sc in each of the next 2 sc, 2 sc in next st; repeat from * around – 24 sts.
Round 4: *Sc in each of the next 3 sc, 2 sc in next st; repeat from * around – 30 sts.
Round 5: *Sc in each of the next 4 sc, 2 sc in next st; repeat from * around – 36 sts.
Rounds 6-10: Sc in each sc around.
Round 11: *Sc in each of the next 4 sc, st2tog over next 2 sc; repeat from * around – 30 sc.
Round 12: Sc in each sc around.
Round 13: *Sc in each of the next 4 sc, 2 sc in next sc; repeat from * around – 36 sc.
Round 14: *2 sc in next st, sc in each of the next 17 sc; repeat from * once more – 38 sts.
Rounds 15-19: Sc in each sc around.
Round 20: *st2tog over next 2 sc, sc in each of the next 17 sc; repeat from * once more – 36 sc.
Round 21: *Sc in each of the next 4 sc, st2tog over next 2 sc; repeat from * around – 30 sc.
Place the eyes on or near Round 15, spaced about 7 sts apart, making certain they are parallel to the straight snout seam created by Round 1.
Stuff the piece firmly. Continue stuffing as further rounds are completed.
Round 22: *Sc in each of the next 3 sts, st2tog over next 2 sc; repeat from * around – 24 sts.
Round 23: *Sc in each of the next 2 sts, st2tog over next 2 sc; repeat from * around – 18 sts.
Rounds 24 and 25: *Sc in next sc, st2tog over next 2 sc; repeat from * around – 8 sts.
Fasten off, leaving a long tail.
Finish stuffing the top of the piece.
Weave the yarn tail through the sts of the final round and pull tight to close the hole.
Ears (make 2)
With Color A, create a magic ring, and work in unjoined rounds as follows:
Round 1: With size F hook, ch 1, 6 sc in ring.
Round 2: 2 sc in each sc around – 12 sc.
Fasten off, leaving a long tail for sewing to the head.
Legs (make 2)
With Color B, create a magic ring.
Round 1: With size F hook, 6 sc in ring, join with sl st in first sc.
Round 2: Ch 1, 2 sc in each sc around – 12 sc.
Round 3: *Sc in each of the next 3 sc, 2 sc in next sc; repeat from * around, join with sl st in first sc – 15 sc.
Fasten off Color B.
Join Color A with sl st in the back loop of any sc.
From this point, work in unjoined rounds as follows:
Round 4: Ch 1, sc in back loop of same sc and of each sc around.
Rounds 5-7: Sc in each sc around.
Round 8: St2tog over the next 2 sc, sc in each of the next 13 sc – 14 sc.
Round 9: Sc in each sc around.
Round 10: St2tog over the next 2 sc, sc in each of the next 12 sc – 13 sc.
Rounds 11-18: Sc in each sc around.
Fasten off, leaving a long tail for sewing to the body.
Stuff the piece firmly and set aside.
Hat
Band
Using Color B and size G hook, ch 4.
Row 1: Sc in 2nd ch from hook and in each ch to end – 3 sc.
Rows 2-28: Ch 1, sc in the back loop of each sc across.
Hold the short edges of the Band together and seam by working sl st in back loop of each of the next 3 sc and going through both layers of fabric.
Do not fasten off.
Crown
Round 1: Working in edge sts of Band, ch 1, sc in same st and in each of the next 27 edge sts, join with sl st in first sc – 28 sc.
Fasten off. Join Color C with sl st in the back loop of any sc.
Round 2 (ear hole round): Ch 1, sc in back loop of same sc, [sc in back loop of each of the next 6 sc, ch 3, skip 3 sc] twice, sc in back loop of each of the last 9 sts, join with sl st in first sc.
From this point, work in unjoined rounds as follows:
Round 3: Ch 1, sc in same sc and in each st around, including ch sts – 28 sc.
Round 4: *St2tog over next 2 sc, sc in each of the next 5 sc; repeat from * around – 24 sc.
Round 5: *St2tog over next 2 sc, sc in each of the next 4 sc; repeat from * around – 20 sc.
Round 6: *St2tog over next 2 sc, sc in each of the next 3 sc; repeat from * around – 16 sc.
Round 7: *St2tog over next 2 sc, sc in each of next 6 sc; repeat from * once more – 14 sc.
Round 8: *St2tog over next 2 sc, sc in each of the next 12 sc – 13 sts.
Rounds 9-17: *St2tog over next 2 sc, sc in each sc to end – 4 sc.
Fasten off, leaving a long tail.
Weave the yarn tail through the sts of the final round and pull tight to close hole.
Pompom
With Color B, make a pompom and sew to the tip of the Hat.
Heart
With Color C and size E hook, ch 2.
Round 1: Skip 1 ch, working over yarn tail, work (2 dc, 2 hdc, 1 dc, 2 hdc, 2 dc, slip st) in 2nd ch from hook.
Fasten off, leaving a long tail for sewing to the Body.
Pull the beginning yarn tail tight to close the hole.
Candy Cane
With Color B, create a magic ring, and work in unjoined rounds as follows:
Round 1: With size F hook, ch 1, 6 sc in ring.
Round 2: Sc in each sc around.
[Change to Color C and work 2 rounds evenly in sc, change to Color B and work 2 rounds evenly in sc] twice.
Change to Color C.
Next 2 rounds: Sc in each of the next 2 sc, hdc in each of the next 2 sc, sc in each of the last 2 sc.
Change to Color B.
Work 6 more rounds evenly in sc, keeping with striping pattern (2 rounds per color).
Fasten off, leaving a long tail of Color B.
Cut a length of straw so that the bendable portion fits inside the bend created by the hdc sts. Insert straw and trim excess.
Weave the yarn tail through the sts of the final round and pull tight to close hole.
Finishing
Using the yarn end from the neck area of the body (Round 28) and a tapestry needle, begin sewing at the back of the head on the underside at Round 13. Note: You may need to adjust the head due to the elongated shape of the head. Knot securely and fasten off, trimming the yarn end.
Sew the Legs to the bottom of the Body with their tops just touching, making certain that the color change jogs face backwards.
Sew the heart to the upper midsection of the Body.
Sew the Candy Cane to the end of the Arm using a yarn scrap.
With Color D and a yarn needle, embroider an X for each nostril, spaced about 7 sts apart.
Fold the Ears in half and sew them to the Head 6 rounds back from the eyes, spaced about 10 sts apart.
Place the Hat on the Head, fitting the ears through the ear holes. Do not sew Hat to Head.
Weave in all loose ends, working them to the inside of the Hippo.
Frequently Asked Questions
What crochet hook is used for this pattern?
This pattern requires Susan Bates® Crochet Hooks in sizes 3.5mm [US E-4], 3.75mm [US F-5], and 4mm [US G-6].
Is this project worked in rows or rounds?
The project is primarily worked in rounds, utilizing the magic ring technique for the pieces.
Does this crochet project require assembly?
Yes, the project requires assembly to attach the various components such as the arms, legs, ears, and other embellishments.
For additional crochet inspiration and holiday projects, check out these links: 11 Crochet Christmas Wind Spinner Patterns and 10 Festive Free Christmas Crochet Patterns.