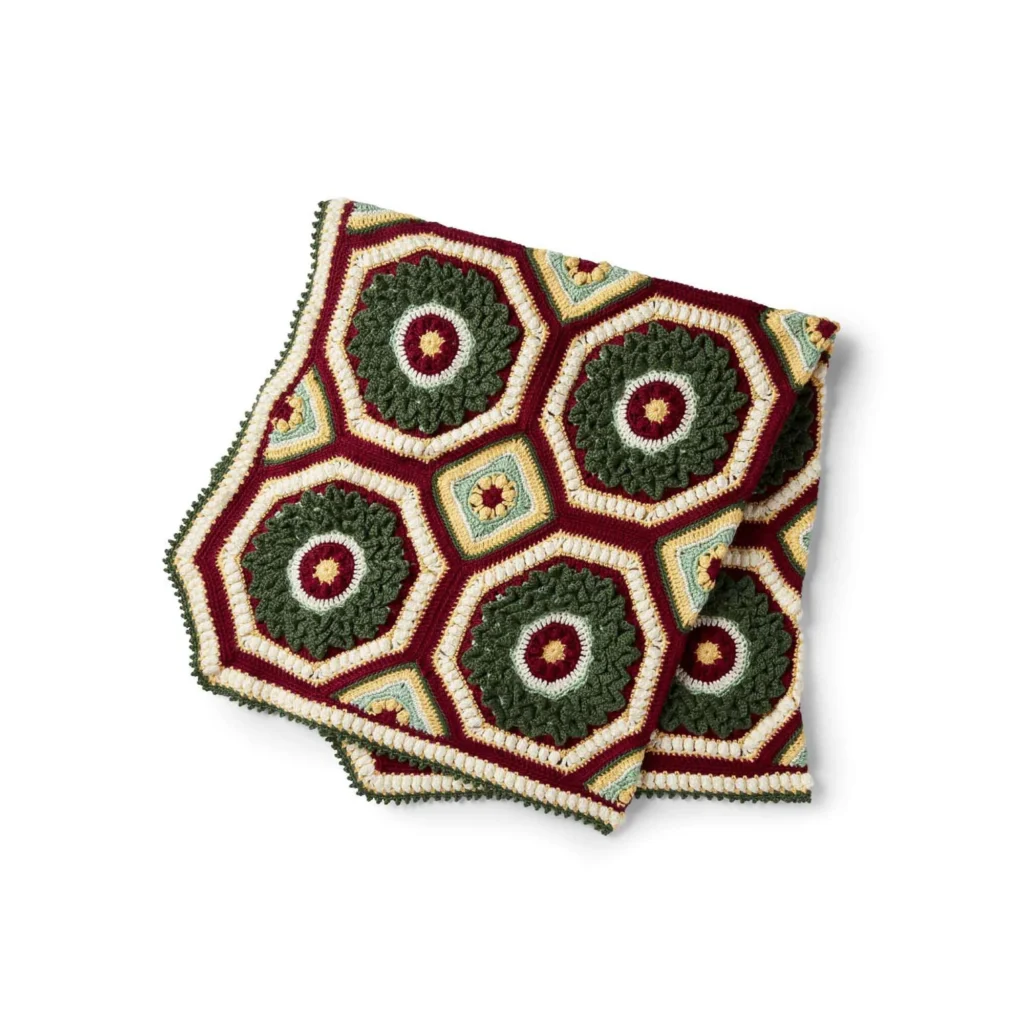
Home for Christmas Crochet Afghan Pattern
Crochet is not just a hobby; it’s a fantastic way to create beautiful, memorable items that can enhance your home decor or serve as heartfelt gifts. The Home for Christmas Crochet Afghan is a delightful pattern that you can enjoy making as you prepare for the season. With its range of vibrant colors and cozy motifs, this afghan will surely bring festive warmth to your home. You may also find 11 Crochet Christmas Wind Spinner Patterns For Festive Holiday Decor useful.
In this guide, we will walk you through the materials needed, provide a detailed overview of the pattern, and give step-by-step instructions for creating this enchanting project. As a bonus, we’ll also add contextual recommendations for additional crochet patterns that can complement your holiday crafting.

About the Blanket
The Home for Christmas Crochet Afghan is constructed from a variety of motifs, including wreaths, squares, and triangles. This pattern calls for vibrant colors that capture the spirit of the holiday season and create a warm, inviting feel within any space. You’ll be making various motifs—specifically 16 wreath motifs, 9 square motifs, and 12 triangle motifs—which will then be assembled into a larger blanket.
You can find even more festive inspiration in patterns like the 10 festive free Christmas crochet patterns to make your holidays merry.
Materials
To complete your crochet afghan, gather the following materials:
Yarn
- Caron® Simply Soft® (6 oz/170.1 g; 315 yds/288 m)
- Contrast A: Sunshine (39755) — 3 balls
- Contrast B: Burgundy (39762) — 4 balls
- Contrast C: Off White (39702) — 4 balls
- Contrast D: Sage (39705) — 2 balls
- Contrast E: Dark Sage (39707) — 5 balls
Crochet Hook
- Size U.S. H/8 (5 mm) crochet hook or size needed to obtain gauge.
Gauge
It is essential to achieve the correct gauge to ensure your afghan corresponds to the intended size and drape. Be sure to check your gauge before starting the pattern.
Crochet Abbreviations
Here are some commonly used abbreviations in this pattern:
- ch: chain
- dc: double crochet
- sc: single crochet
- sl st: slip stitch
- sp: space
- sts: stitches
- ( ): instructions within parentheses are worked as one stitch
- *…: repeat instructions after the asterisk as directed
Pattern Notes
Each motif is worked separately before being joined together. Familiarize yourself with the construction of each motif, especially the wreath, as it forms a central piece of the afghan. Special techniques, such as the Popcorn stitch and V-stitch, are incorporated into the different motifs, adding textures and visual interest.
Wreath Motif (Make 16)
Base Motif (Stage 1)
-
Colors: With A ch 3 (start at beginning).
Rnd 1: 16 dc in 3rd ch from hook. Join with sl st to first dc. Fasten off A. (16 dc).
-
Rnd 2: Join B with sl st to first dc. Ch 4. Popcorn in next dc. *Ch 1. 1 dc in next dc. Ch 1. Popcorn in next dc. Rep from * 6 times more. Ch 1. Join with sl st to 3rd ch of beg ch-4. (16 sts. 16 ch-1 sps).
-
Rnd 3: Ch 1. 1 sc in same sp as sl st. 2 sc in each of next 2 ch-1 sps. *1 sc in next dc. 2 sc in each of next 2 ch-1 sps. Rep from * 6 times more. Join with sl st to first sc. Fasten off B. (40 sc).
-
Rnd 4: Join C with sl st to first sc. Ch 3. 1 dc in each sc around. Join with sl st to top of ch 3. Fasten off C.
-
Rnd 5: Join D with sl st to first dc. Ch 1. (1 sc. Ch 1. 1 sc) in same sp as last sl st. 1 sc in each of next 4 dc. *(1 sc. Ch 1. 1 sc) in next dc. 1 sc in each of next 4 dc. Rep from * 6 times more. Join with sl st to first sc. (48 sc and 8 ch-1 sps).
-
Rnd 6: Sl st to next ch-1 sp. Ch 4. 1 dc in same sp as last sl st – beg V-st made. Skip next sc. (1 dc. Ch 1. 1 dc) in next sc – V-st made. Skip next 2 sc. V-st in next sc. Skip next sc. *V-st in next ch-1 sp. Skip next sc. V-st in the next sc. Skip next 2 sc. V-st in next sc. Skip next sc. Rep from * 6 times more. Join with sl st to 3rd ch of ch-4. (24 V-sts).
-
Rnd 7: Sl st in next ch-1 sp. Beg V-st. (V-st between next 2 V-sts) 3 times. *V-st in next corner ch-1 sp. (V-st between next 2 V-sts) 3 times. Rep from * 6 times more. Join with sl st to 3rd ch of ch-4. (24 V-sts).
-
Rnd 8: Sl st to next ch-1 sp. Beg V-st. (V-st between next 2 V-sts) 4 times. *V-st in next corner ch-1 sp. (V-st between next 2 V-sts) 4 times. Rep from * 6 times more. Join with sl st to 3rd ch of ch-4. Fasten off D. (40 V-sts).
-
Rnd 9: Join B with sl st to any corner ch-1 sp. Beg V-st. (3 dc in next ch 1 sp) 4 times. *V-st in next corner ch-1 sp. (3 dc in next ch-1 sp) 4 times. Rep from * 6 times more. Join with sl st to 3rd ch of ch 4. Fasten off B. (14 dc between corner ch-1 sps).
-
Note: Do not skip first dc after corner V-st in 10th rnd.
Wreath Leaves (Stage 2 Overlay)
(overlay applied after base motif)
-
Overlay 1st rnd (Surface Scale stitch) — Beg at 8th rnd: Join E with sl st to first post of corner V-st. Ch 3. 4 dc down the same post as sl st. Ch 1. 5 dc up the second post of the same V-st – beg Surface Scale st made. *Skip next V-st. Surface Scale st around next V-st. Rep from * around. Join with sl st to top of ch-3. (20 Surface Scale sts). Fasten off E.
-
Overlay 2nd rnd — Beg at 7th rnd: Join E with sl st to the first post of the 2nd V-st after corner V-st. Beg Surface Scale st around the same V-st as sl st. *Skip next V-st. Surface Scale st around next V-st. Rep from * around. Join with sl st to top of ch-3. (16 Surface Scale sts). Fasten off E.
-
Overlay 3rd rnd — Beg at 6th rnd: Join E with sl st to first post of corner V-st. Beg Surface Scale st around the same V-st as sl st. *Skip next V-st. Surface Scale st around next V-st. Rep from * around. Join with sl st to top of ch-3. (12 Surface Scale sts). Fasten off E.
Square Motif (Make 9)
-
With B
- 1st rnd: 12 dc in 3rd ch from hook. Join with sl st to first dc. Fasten off A. (12 dc).
-
2nd rnd: Join A with sl st to first dc. Ch 4 (counts as 1 dc and ch 1). Popcorn in next dc. *Ch 1. 1 dc in next dc. Ch 1. Popcorn in next dc. Rep from * 4 times more. Ch 1. Join with sl st to 3rd ch of ch-4. (6 popcorns and 6 dc).
-
3rd rnd: Join D with sl st to first dc. Ch 1. 1 sc in the same sp as sl st. 2 sc in next ch-1 sp. 1 sc in next popcorn st. 2 sc in next ch-1 sp. *1 sc in next dc. 2 sc in next ch-1 sp. 1 sc in next popcorn st. 2 sc in next ch-1 sp. Rep from * 4 times more. Join with sl st to first sc. (36 sc).
-
4th rnd: Ch 3. 1 dc in the same sp as sl st. 1 dc in next sc. 1 hdc in next sc. 1 sc in each of the next 4 sc. 1 hdc in next sc. 1 dc in next sc. *(2 dc. Ch 2. 2 dc) in next sc. 1 dc in next sc. 1 hdc in next sc. 1 sc in each of the next 4 sc. 1 hdc in next sc. 1 dc in next sc. Rep * twice more. 2 dc in the same sp as the first 2 dc. Ch 2. Join with sl st to top of ch 3. (12 sts between corner ch-2 sps).
-
5th rnd: Join C with sl st to corner ch-2 sp. Ch 1. (1 sc. Ch 1. 1 sc) in the same sp as sl st. 1 sc in each st to the next corner ch-2 sp. *(1 sc. Ch 1. 1 sc) in next corner ch-2 sp. 1 sc in each st to the next corner ch-2 sp. Rep from * twice more. Join with sl st to first sc. (14 sc between corner ch-1 sps).
-
6th rnd: Join A with sl st to corner ch-1 sp. Ch 3. 1 dc in the same sp as sl st. 1 dc in each sc to the next corner ch-1 sp. *(2 dc. Ch 2. 2 dc) in the next corner ch-1 sp. 1 dc in each sc to the next corner ch-1 sp. Rep from * twice more. 2 dc in the first corner ch-1 sp. Ch 2. Join with sl st to the top of ch 3. (18 dc between corner ch-2 sps).
-
7th rnd: Join E with sl st to corner ch-2 sp. Ch 1. (1 sc. Ch 1. 1 sc) in the same sp as sl st. 1 sc in each dc to the next corner ch-2 sp. *(1 sc. Ch 1. 1 sc) in the next ch-2 sp. 1 sc in each dc to the next corner ch-2 sp. Rep from * twice more. Join with sl st to first sc. Fasten off E. (20 sc between corner ch-1 sps).
Triangle Motif (Make 12)
-
Colors + Structure
The triangle is completed in rows, do not turn, RS facing each row. With B ch 3.
- 1st row (RS): 7 dc in 3rd ch from hook. Do not turn. Fasten off A. (7 dc).
-
2nd row (RS): Join A with sl st to (1 dc). Ch 4. Popcorn in the next dc. (Ch 1. 1 dc in next dc. Ch 1. Popcorn in the next st) twice. Ch 1. 1 dc in the last dc. Do not turn. Fasten off A. (4 dc and 3 popcorns).
-
3rd row (RS): Join D with sl st to 3rd ch of ch-4. Ch 1. 1 sc in same sp as sl st. 2 sc in next ch-1 sp. *1 sc in next st. 2 sc in next ch-1 sp. Rep from * 4 times more. 1 sc in the last dc. Do not turn. Break D. (19 sc).
-
4th row (RS): Join D with sl st to first sc. Ch 3. 1 dc in the same sp as sl st. 1 dc in the next sc. 1 hdc in the next sc. 1 sc in each of the next 4 sc. 1 hdc in the next sc. 1 dc in the next sc. (2 dc. Ch 2. 2 dc) in next sc. 1 dc in the next sc. 1 hdc in the next sc. 1 sc in each of the next 4 sc. 1 hdc in the next sc. 1 dc in the next sc. 2 dc in the last sc. Do not turn. Break D. (12 sts before and after corner ch-2 sp).
-
5th row (RS): Join C with sl st to the top of ch 3. Ch 1. 2 sc in the same sp as sl st. 1 sc in each st to the next ch-2 sp. (1 sc. Ch 1. 1 sc) in the next ch-2 sp. 1 sc in each st to the last dc. 2 sc in the last dc. Do not turn. Break C. (14 sc before and after corner ch-1 sp).
-
Note: Do not skip the hidden stitch in the corners.
-
6th row (RS): Join A with sl st to the first sc. Ch 3. 1 dc in the same sp as sl st. 2 dc in the next sc. 1 dc in each sc to the next corner ch-1 sp. *(2 dc. Ch 2. 2 dc) in next corner ch-1 sp. 1 dc in each sc to the last 2 sc. 2 dc in each of the last 2 sc. Do not turn. Break A. (18 dc before and after corner ch-2 sp).
-
7th row (RS): Join E with sl st to the top of ch 3. Ch 1. 2 sc in the same sp as sl st. 1 sc in each dc to the next ch-2 sp. (1 sc. Ch 1. 1 sc) in the next ch-2 sp. 1 sc in each dc to the last dc. 2 sc in the last dc. Fasten off E. (20 sc before and after corner ch-1 sp).
Finishing (Assembly)
Once all motifs are complete, it’s time to sew them together through back loops only. Follow the provided diagram (found within your materials) to ensure you’re piecing the motifs correctly. After assembly, complete the edging as follows:
Edging Rounds
-
1st rnd: Following diagram, with RS facing, join B with sl st to corner ch-1 sp. Ch 1. (1 sc. Ch 2. 1 sc) in same sp as sl st. *1 sc in each of next 21 sts. (1 sc. Ch 2. 1 sc) in next corner ch-1 sp. 163 sc evenly spaced to next corner ch-1 sp. (1 sc. Ch 2. 1 sc) in next ch-1 sp. Rep from * twice more, then from * to ** once. Join with sl st to first sc.
-
2nd rnd: Sl st to next ch-1 sp. Ch 1. (1 sc. Ch 1. 1 sc) in the same sp as last sl st. 1 sc in each sc to next corner ch-1 sp. *(1 sc. Ch 1. 1 sc) in next corner ch-1 sp. 1 sc in each sc to next corner ch-1 sp. Rep from * 6 times more. Join with sl st to first sc. Fasten off B.
-
3rd rnd: Join A with sl st to any corner ch-1 sp. Ch 1. [(1 sc. Ch 1. 1 sc) in corner ch-1 sp. Ch 1. Skip next sc. *1 sc in next sc. Ch 1. Skip next sc. Rep from * to next corner ch-1 sp]. Rep [ ] 7 times more. Join with sl st to first sc. Fasten off A.
-
4th rnd: Join C with sl st to any corner ch-1 sp. Ch 4. 1 dc in same sp as sl st. Ch 1. [Popcorn in next ch-1 sp. Ch 1. Rep from * to * to next corner ch-1 sp. (1 dc. Ch 1. 1 dc) in next corner ch-1 sp]. Rep [ ] 6 times more. Rep from * to * once more. Join with sl st to 3rd ch of ch-4. Fasten off C.
-
5th rnd: Join E with sl st to any corner ch-1 sp. Ch 1. (1 sc. Picot. 1 sc) in the same sp as sl st. *(1 sc. Picot. 1 sc) in next ch-1 sp. Rep from * around. Join with sl st to first sc. Fasten off E.
Frequently Asked Questions
What crochet hook is used for this pattern?
The pattern requires a size U.S. H/8 (5 mm) crochet hook, or you may use a different size as needed to obtain gauge.
Is this project worked in rows or rounds?
The Home for Christmas Crochet Afghan is made using a series of motifs worked in rounds.
Does this crochet project require assembly?
Yes, you will need to assemble all the completed motifs together by sewing them through back loops only before working the edging.
Conclusion
Creating the Home for Christmas Crochet Afghan is a rewarding experience that results in a charming addition to your holiday decor. With multiple motifs to work on, you can enjoy this project as a cozy craft during the holidays. The combination of colors and textures will surely brighten your home and create cherished memories for years to come. Happy crocheting!