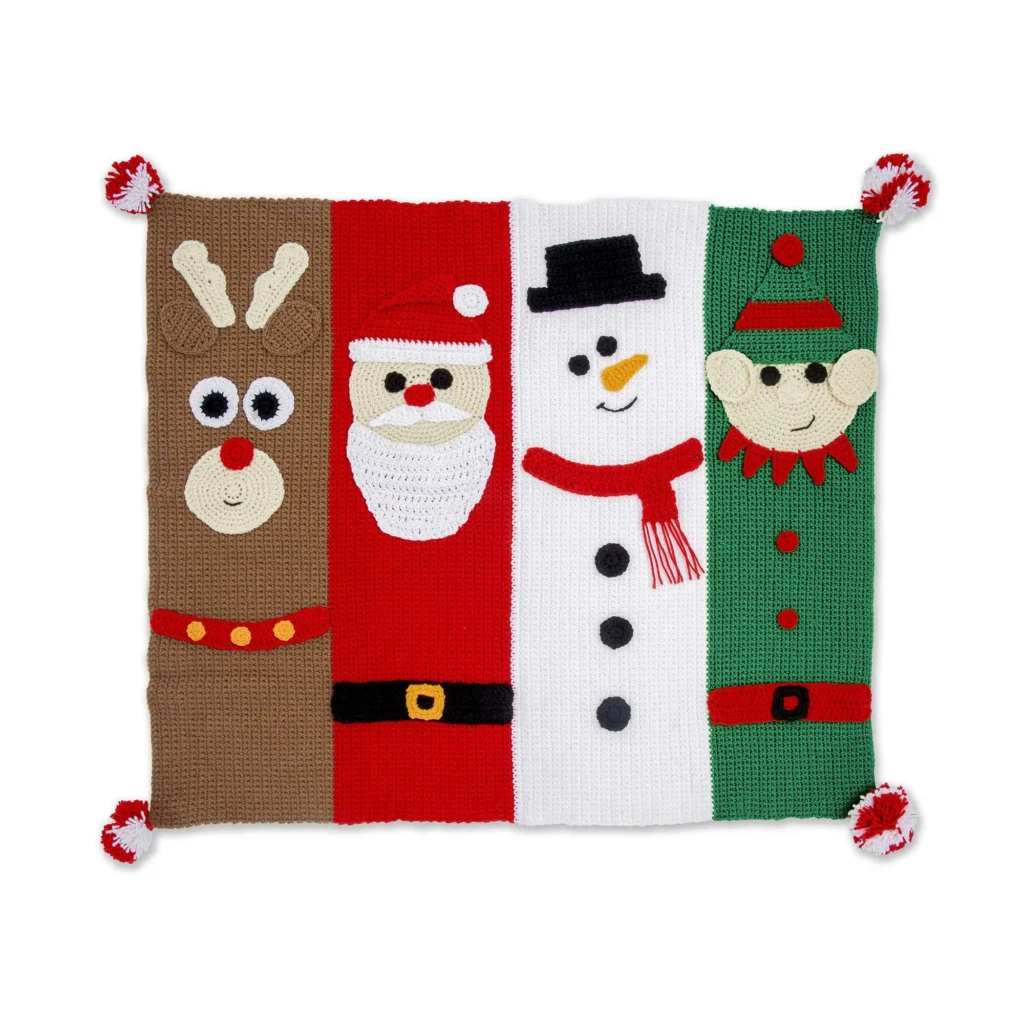
Christmas Characters Crochet Blanket Pattern
Crochet your way through the holiday season with this exciting and playful Christmas Characters Crochet Blanket Pattern. This delightful blanket features festive panels of beloved characters like a Rudolph the Red-Nosed Reindeer, Santa Claus, a snowman, and an elf, perfect for spreading cheer and warmth. Whether you’re curling up on the couch or decorating for the holidays, this blanket will surely bring smiles all around.
About the Blanket
The blanket utilizes the vibrant and versatile Bernat® Super Value™ yarn, known for its softness and amazing stitch definition. The design is structured around four colorful panels, each showcasing a different Christmas character. Made from a combination of seven carefully chosen yarn colors, this blanket will become a cherished holiday staple in your home.
Materials

To create your Christmas Characters Crochet Blanket, gather the following materials:
Yarn
- Bernat® Super Value™ (7 oz / 197 g; 440 yds / 402 m): 7 balls total, one ball each of:
- Contrast A Walnut (07483): 1 ball
- Contrast B True Red (53707): 1 ball
- Contrast C White (07391): 1 ball
- Contrast D Kelly (00609): 1 ball
- Contrast E Bright Yellow (00608): 1 ball
- Contrast F Black (07421): 1 ball
- Contrast G Dark Heather (53022): 1 ball
Crochet Hook
- Size U.S. H/8 (5 mm) crochet hook or size needed to obtain gauge.
Other Notions
- Yarn needle
Gauge
Before starting, ensure your gauge matches, or adjust your hook size accordingly. Although specific gauge measurements are not provided, this pattern is designed for worsted weight yarn, which is standard for a warm and cozy blanket.
Main Blanket Instructions
The main structure of the blanket comprises four stripes/panels, each worked side-to-side in a different color, creating an engaging and visually appealing design. Here are the instructions to get started:
Stripe Foundation
- With A, ch 113.
- 1st row: (RS). 1 sc in 2nd ch from hook. 1 sc in each ch to end of chain. Turn. 112 sc.
- 2nd row: Ch 1. 1 sc in each st to end of row. Turn.
- 3rd to 40th rows: As 2nd row. Break A. Join B.
- 41st to 80th rows: With B, as 2nd row. Break B. Join C.
- 81st to 120th rows: With C, as 2nd row. Break C. Join D.
- 121st to 160th rows: With D, as 2nd row. Fasten off.
Panel I: Rudolph
Let’s bring Rudolph to life with the following steps:
Left Antler
- With G, ch 17.
- 1st row: (RS). 1 sc in 2nd ch from hook. 1 sc in each ch to end of chain. Turn. 16 sc.
- 2nd row: Ch 1. 1 sc in each st to end of row. Turn.
- 3rd rnd: Ch 1. 1 sc in each of first 5 sts. Skip next 2 sts. 7 dc in next st. Skip next 2 sts. 1 sc in next st. Skip next 2 sts. 8 dc in next st. Skip next 2 sts. Do not turn. Work 1 rnd of sc evenly along top, side, and bottom of Right Antler. Join with sl st to first sc. Fasten off.
Right Antler
Work from 3 to 3 as for Left Antler.
- 3rd row: Ch 1. Skip first 2 sts. 8 dc in next st. Skip next 2 sts. 1 sc in next st. Skip next 2 sts. 7 dc in next st. Skip next 2 sts. 1 sc in each of last 5 sts. Do not turn. Work 1 rnd of sc evenly along bottom, side, and top of Left Antler. Join. Fasten off.
Ears (make 2)
- With A, ch 5.
- 1st row: 1 sc in 2nd ch from hook. 1 sc in each ch to end of chain. Turn. 4 sc.
- 2nd row: Ch 1. 2 sc in first st. 1 sc in each of next 2 sts. 2 sc in last st. Turn. 6 sc.
- 3rd row: Ch 1. 2 sc in first st. 1 sc in each of next 4 sts. 2 sc in last st. Turn. 8 sc.
- 4th to 8th rows: Ch 1. 1 sc in each st to end of row. Turn. 9 sc.
- 9th row: Ch 1. Sc2tog. 1 sc in each of next 4 sts. Sc2tog. Turn. 6 sc.
- 10th row: Ch 1. Sc2tog. 1 sc in each of next 2 sts. Sc2tog. Turn. 4 sc.
- 11th row: Ch 1. Sc2tog twice. 2 sc.
- 12th rnd: Ch 1. Sc2tog. Do not turn. Work 1 rnd of sc evenly around Ear. Join. Fasten off, leaving a long tail.
Eyes (make 2)
- With F, begin using magic loop.
- 1st rnd: Ch 1. 8 sc in loop. Join.
- 2nd rnd: Ch 1. 2 sc in each st around. Join. 16 sts. Break F. Join C.
- 3rd rnd: Ch 1. 2 sc in each of first 4 sts. 2 hdc in next st. 2 dc in each of next 6 sts. 2 hdc in next st. 2 sc in each of last 4 sts. Join. Fasten off, leaving a long tail.
Nose
- With B, begin using magic loop.
- 1st rnd: Ch 1. 10 sc in loop. Join.
- 2nd rnd: Ch 1. 2 sc in each st around. Join. 20 sts. Fasten off, leaving a long tail.
Snout
- With G, begin using magic loop.
- 1st rnd: Ch 1. 10 sc in loop. Join.
- 2nd rnd: Ch 1. 2 sc in each st around. Join. 20 sts.
- 3rd rnd: Ch 1. *2 sc in next st. 1 sc in next st. Rep from * around. Join. 30 sts.
- 4th rnd: Ch 1. 1 sc in each st around. Join.
- 5th rnd: Ch 1. *2 sc in next st. 1 sc in each of next 2 sts. Rep from * around. Join. 40 sts.
- 6th rnd: Ch 1. *2 sc in next st. 1 sc in each of next 3 sts. Rep from * around. Join. 50 sts.
- 7th rnd: Ch 2. *1 dc in each of first 15 sts. 1 hdc in next st. 1 sc in each of next 18 sts. 1 hdc in next st. 1 dc in each of last 15 sts. Join. Fasten off, leaving a long tail.
Optional: Using strand of F, backstitch a smile between 3rd and 4th rnds as shown in photo (see page 6).
Collar
Note: Starting chain is worked tightly to shape curved collar.
- With B, ch 34.
- 1st row: 1 dc in 3rd ch from hook (counts as first dc). 1 sc in each ch to end of ch. Turn. 32 sts.
- 2nd row: Ch 2. 1 dc in each st to end of row. Fasten off.
Collar Bells (make 3)
- With E, begin using magic loop.
- 1st rnd: Ch 1. 10 sc in loop. Join. Fasten off, leaving a long tail.
Assembly for Panel I
Stitch the Nose to the Snout. Stitch the Antlers, Ears, Nose/Snout, Collar, and Bells to the Blanket, as shown in the photo (see page 6). Note: When sewing pieces to the Blanket, work through the tops/fronts of sts.
Panel II: Santa
Next is Santa, and you’ll want to follow these precise instructions:
Hat
- With C, ch 25.
- 1st row: 1 sc in 2nd ch from hook. 1 sc in each ch to end of chain. Turn. 24 sts.
- 2nd and 3rd rows: Ch 1. 1 sc in each st to end of row. Turn. Break C. Join B.
- 4th row: With B, ch 1. Sc2tog. 1 sc in each st to last 2 sts. Sc2tog. Turn. 22 sts.
- 5th row: Ch 1. 1 sc in each st across. Turn.
- 6th to 23rd rows: Rep 4th and 5th rows 9 times more. 4 sts.
- 24th and 25th rows: As 5th row.
- 26th row: Ch 1. (Sc2tog) twice. 2 sts.
- 27th row: Ch 1. 1 sc in each st to end of row. Fasten off.
Hat Pompom
- With C, begin using magic loop.
- 1st rnd: Ch 1. 10 sc in loop. Join.
- 2nd rnd: Ch 1. 2 sc in each st around. Join. 20 sts. Fasten off.
Santa Head with Beard
- With G, begin using magic loop.
- 1st rnd: Ch 1. 10 sc in loop. Join.
- 2nd rnd: Ch 1. 2 sc in each st around. Join. 20 sts.
- 3rd rnd: Ch 1. *2 sc in first st. 1 sc in next st. Rep from * around. Join. 30 sts.
- 4th rnd: Ch 1. 1 sc in each st around. Join.
- 5th rnd: Ch 1. *2 sc in first st. 1 sc in each of next 2 sts. Rep from * around. Join. 40 sts.
- 6th rnd: Ch 1. *2 sc in first st. 1 sc in each of next 3 sts. Rep from * around. Join. 50 sts.
- 7th rnd: As 4th rnd.
- 8th rnd: Ch 1. *2 sc in first st. 1 sc in each of next 4 sts. Rep from * around. Join. 60 sts.
- 9th rnd: As 4th rnd.
- 10th rnd: Ch 1. *2 sc in first st. 1 sc in each of next 5 sts. Rep from * around. Join. 70 sts.
- 11th and 12th rnds: As 4th rnd. Break G. Join C.
- 13th row: Ch 2. 1 dc in each of next 26 sts. Turn, leaving rem sts unworked.
- 14th row: Ch 2. Dc2tog. 1 dc in each st to last 2 sts. Dc2tog. Turn. 24 sts.
- 15th row: Repeat until 10 sts remain. Fasten off, leaving a long tail.
Santa Eyes (make 2)
- With F, begin using magic loop.
- 1st rnd: Ch 1. 10 sc in loop. Join with sl st to first sc. Fasten off.
Santa Nose
- With B, begin using magic loop.
- 1st rnd: Ch 2. (3 dc in loop. 1 hdc in loop. 1 sc in loop. 1 hdc in loop) twice. Join. Fasten off, leaving a long tail.
Santa Mustache
- With C, ch 18.
- 1st row: 1 sl st in 2nd ch from hook. 1 sl st in next ch. 1 sc in next ch. 1 dc in each of next 2 ch. 1 tr in each of next 2 ch. 1 dc in next ch. 1 sl st in next ch. 1 dc in next ch. 1 tr in each of next 2 ch. 1 dc in each of next 2 ch. 1 sc in next ch. 1 sl st in each of last 2 ch. Fasten off, leaving a long tail.
Santa Belt
- With F, ch 34.
- 1st row: 1 dc in 4th ch from hook (counts as 2 dc). 1 dc in each ch to end of ch. Turn. 32 sts.
- 2nd and 3rd rows: Ch 2. 1 dc in each st to end of row. Turn. Fasten off, leaving a long tail.
Belt Buckle
- With E, begin using magic loop.
- 1st rnd: Ch 1. (5 sc in ring. Ch 2). 4 times. Join with sl st to first sc. Fasten off loosely.
Assembly for Panel II
FINISHING: Stitch all embellishments onto the red panel of the blanket as shown in the photo (see page 6).
Panel III: Snowman
Next, let’s create a friendly snowman as follows:
Hat
- With F, ch 25.
- 1st row: (RS). 1 sc in 2nd ch from hook. 1 sc in each ch to end of chain. Turn. 24 sts.
- 2nd to 4th rows: Ch 1. 1 sc in each st to end of row. Turn. Break F.
- 5th row: Join F in 5th st. Ch 1. 1 sc in each of next 16 sts. Turn, leaving rem sts unworked.
- 6th to 13th rows: Ch 1. 1 sc in each st across. Turn. Fasten off, leaving a long tail.
Eyes (make 2)
- With F, begin using magic loop.
- 1st rnd: Ch 1. 10 sc in ring. Join with sl st to first sc. Fasten off, leaving a long tail.
Nose
- With E, ch 10.
- 1st row: 1 sc in 2nd ch from hook. 1 hdc in each of next 2 sts. 1 dc in each of next 3 sts. 1 tr in each of last 3 sts. Ch 3. Join to base of last tr. Fasten off, leaving a long tail.
Buttons (make 3)
- With F, begin using magic loop.
- 1st rnd: Ch 1. 10 sc in loop. Join with sl st to first sc.
- 2nd rnd: Ch 1. 2 sc in each st around. Join. 20 sts. Fasten off.
Scarf
- With B, ch 34.
- 1st row: 1 dc in 3rd ch from hook (counts as 2 dc). 1 dc in each ch to end of chain. Turn. 32 sts.
- 2nd and 3rd rows: Ch 2. 1 dc in each st to end of row. Turn. Break B.
- 4th row: Join B to 8th st. Ch 2. 1 dc in each of next 5 sts. Turn, leaving rem sts unworked.
- 5th and 6th rows: Ch 2. 1 dc in each st to end of row. Turn. Fasten off.
Scarf Fringe
- Cut strands of B 6″ [15 cm] long.
- Fold in half and knot into fringe along the bottom of the scarf.
- Trim fringe evenly.
Assembly for Panel III
Stitch Hat, Eyes, Nose, and Scarf to panel as shown in the photo. Using a strand of F, backstitch a smile as shown in the photo (see page 6).
Panel IV: Elf
Finally, we’ll work on the cheerful elf:
Hat
- With D, ch 25.
- 1st row: 1 ch in 2nd ch from hook. 1 sc in each ch to end of chain. Turn. 24 sts.
- 2nd and 3rd rows: Ch 1. 1 sc in each ch to end of row. Turn. (As written)
- 4th row: Ch 1. Sc2tog. 1 sc in each st to last 2 sts. Sc2tog. Turn. 22 sts.
- 5th row: Ch 1. 1 sc in each st to end of row. Turn.
- 6th row: Ch 1. Sc2tog. 1 sc in each st to last 2 sts. Sc2tog. Turn. 20 sts.
- 7th row: Ch 1. 1 sc in each st to end of row. Turn. Break D. Join B.
- 8th to 13th rows: As 6th and 7th rows. Turn. 14 sts.
- Break B. Join D.
- 14th row: Ch 1. Sc2tog, 1 sc in each st to last 2 sts. Sc2tog. Turn. 12 sts.
- 15th row: Ch 1. 1 sc in each st to end of row. Turn.
- 16th to 23rd rows: As 14th and 15th rows. 4 sts.
- 24th and 25th rows: As 15th row. Turn.
- 26th row: Ch 1. (Sc2tog) twice. Turn. 2 sts.
- 27th row: As 15th row. Fasten off, leaving a long tail.
Hat Pompom
- With B, begin using magic loop.
- 1st rnd: Ch 1. 10 sc in loop. Join.
- 2nd rnd: Ch 1. 2 sc in each st to around. Join. Fasten off, leaving a long tail.
Head and Neck Fringe
- With G, begin using magic loop.
- 1st rnd: Ch 1. 10 sc in loop. Join with sl st to first sc.
- 2nd rnd: Ch 1. 2 sc in each st to around. Join. 20 sts.
- 3rd rnd: Ch 1. *2 sc in next st. 1 sc in next st. Rep from * around. Join. 30 sts.
- 4th rnd: Ch 1. 1 sc in each st around. Join.
- 5th rnd: Ch 1. *2 sc in next st. 1 sc in each of next 2 sts. Rep from * around. Join. 40 sts.
- 6th rnd: Ch 1. *2 sc in next st. 1 sc in each of next 3 sts. Rep from * around. Join. 50 sts.
- 7th rnd: As 4th rnd.
- 8th rnd: Ch 1. *2 sc in next st. 1 sc in each of next 4 sts. Rep from * around. Join. 60 sts.
- 9th rnd: As 4th rnd.
- 10th rnd: Ch 1. *2 sc in next st. 1 sc in each of next 5 sts. Rep from * around. Join. 70 sts.
- 11th and 12 rids: As 4th rnd. Break G. Join B.
- 13th row: *Ch 8. 1 sc in 2nd ch from hook. 1 hdc in each of next 2 ch. 1 dc in each of next 2 ch. 1 tr in each of last 2 ch. Skip next 3 sts from 12th rnd. Sl st in next st. Rep from * 4 times more. Fasten off.
Ears (make 2)
- With G, ch 5.
- 1st row: 1 sc in 2nd ch from hook. 1 sc in each ch to end of chain. Turn. 4 sts.
- 2nd row: Ch 1. *2 sc in first st. 1 sc in each st to last st. 2 sc in last st. Turn. 6 sts.
- 3rd row: As 2nd row. 8 sts.
- 4th to 8th rows: Ch 1. 1 sc in each st to end of row. Turn.
- 9th row: Ch 1. *Sc2tog. 1 sc in each st to last 2 sts. Turn. 6 sts.
- 10th row: As 9th row.
- 11th row: Ch 1. (Sc2tog) twice. 2 sts.
- 12th rnd: Ch 1. Sc2tog. Ch 1. Work 1 rnd of sc evenly around edge of Ear. Join. Fasten off.
Eyes and Buttons (make 2 in F and 2 in B)
With F, begin using magic loop.
- 1st rnd: Ch 1. 10 sc in loop. Join. Fasten off, leaving a long tail.
- Nose: With G, begin using magic loop.
- 1st rnd: Ch 2. [(3 dc, 1 hdc, 1 sc, 1 hdc) twice] all in loop. Join. Fasten off, leaving a long tail.
Belt
- With B, ch 34.
- 1st row: 1 dc in 4th ch from hook. 1 dc in each ch to end of chain. Turn. 32 sts.
- 2nd and 3rd rows: Ch 2. 1 dc in each st to end of row. Turn. Fasten off, leaving a long tail.
Belt Buckle
- With F, begin using magic loop.
- 1st rnd: Ch 1. (5 sc in ring. Ch 2). 4 times. Join with sl st to first sc. Fasten off loosely.
Finishing for Panel IV
With F and yarn needle, backstitch a face as shown in the photo (see page 6). Stitch Buckle to Belt. Stitch Pompom to Hat. Stitch Hat, Eyes, and Ears to Head. Stitch Buttons, Belt, Hat, Collar, and Head to the panel as shown in the photo.
Pompoms (optional; additional yarn may be required)
- Make 4 by winding B and C held together around 4 fingers approximately 30 times.
- Remove from fingers and tie tightly in the center.
- Cut through each side of loops.
- Trim to a smooth round shape.
- Attach pompom to Blanket at each corner.
Frequently Asked Questions
What crochet hook is used for this pattern?
The pattern recommends using a Size U.S. H/8 (5 mm) crochet hook or size needed to obtain gauge.
Is this project worked in rows or rounds?
The blanket is primarily worked in rows, with specific components such as antlers and facial features made in rounds.
Does this crochet project require assembly?
Yes, assembly is required to stitch the various character components onto the blanket, ensuring they are well attached and positioned correctly.
Conclusion
The Christmas Characters Crochet Blanket Pattern is a wonderful way to celebrate the holiday season with handmade warmth and charm. By following the detailed instructions for each festive panel, you’ll create a charming blanket that’s not only functional but also a delightful decorative piece. Happy crocheting and enjoy the coziness this blanket will bring! For more festive ideas, explore these 10 festive Christmas crochet patterns for your holiday crafting. And don’t forget to check out these 10 free crochet Christmas ornament patterns to complement your cheerful blanket project!