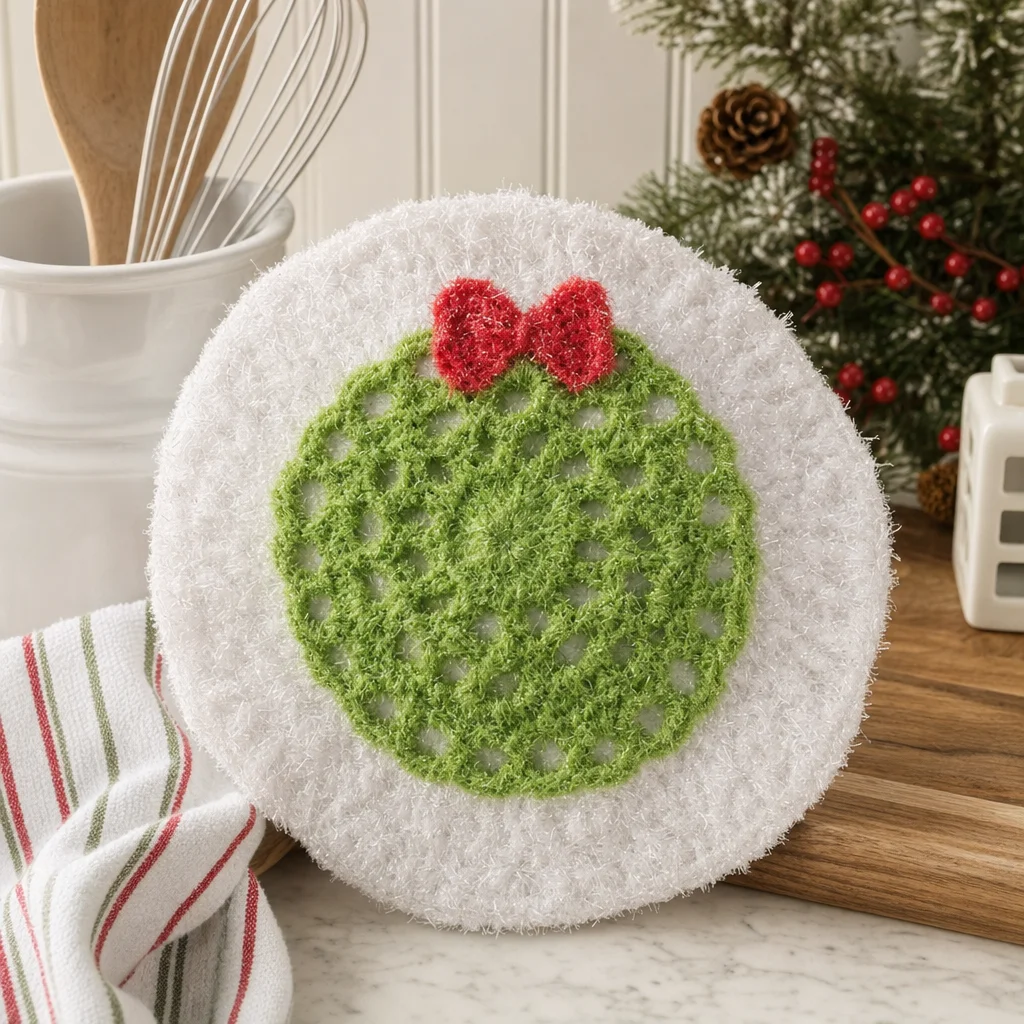
Crochet Christmas Wreath Dishcloth Pattern
Create a festive and functional dishcloth this holiday season with our Crochet Christmas Wreath Dishcloth Pattern. This charming project is not only practical but also a delightful decoration to brighten up your kitchen. With a design featuring a cute wreath and a colorful bow, this dishcloth makes an ideal gift or a festive addition to your home decor. Plus, it uses the popular RED HEART® Scrubby™ yarn, making it both durable and functional!
About the Crochet Project
This crochet pattern allows for creative expression while providing a useful item for your kitchen. The wreath design takes center stage in a circular formation, making this project a fun way to improve your crochet skills. Whether you are looking to make it as a gift or for yourself, this dishcloth pattern can help you get into the holiday spirit.
To complement your holiday crafting, you might also enjoy seeking out additional seasonal patterns. For more creative ideas, check out this collection of 10 festive free Christmas crochet patterns that will help fill your home with holiday cheer!
Materials

Before diving into the crochet pattern, let’s ensure you have everything you need:
-
Yarn (RED HEART® Scrubby™)
- 1 skein each of:
- 10 Coconut (A)
- 620 Lime (B)
- 905 Cherry (C)
- 1 skein each of:
-
Crochet Hook
- Susan Bates® 5mm [US H-8]
-
Notions
- Yarn needle
Crochet Abbreviations
Familiarize yourself with the following crochet abbreviations that will appear throughout the pattern:
- ch: chain
- dc: double crochet
- slip st: slip stitch
- tr: treble crochet
- *: repeat
Pattern Notes
This pattern consists of three main components: the dishcloth, the wreath, and the bow. The dishcloth is created in rounds, starting from the center and working outward. Each round increases the number of stitches to achieve the desired size and shape to make a functional dishcloth.
Dishcloth Instructions
Follow the instructions below to create the dishcloth, which is worked in rounds.
- With Yarn A (Coconut), chain 4; slip stitch to the first chain to join into a ring.
Round 1
- Chain 3 (counts as dc throughout), then work 15 dc in the ring.
- Slip stitch to the first dc to join.
Total: 16 dc
Round 2
- Chain 3, then work 4 dc in the same stitch.
- Double crochet in the next 3 dc.
- *5 dc in the next dc, dc in the next 3 dc; repeat from * twice.
- Slip stitch to the first dc to join.
Total: 32 dc
Round 3
- Chain 3, then work a dc in the next dc.
- Work 5 dc in the next dc.
- *DC in the next 7 dc, 5 dc in the next dc; repeat from * twice.
- DC in the last 5 dc.
- Slip stitch to the first dc to join.
Total: 48 dc
Round 4
- Chain 3, then work dc in the next 3 dc.
- Work 5 dc in the next dc.
- *DC in the next 11 dc, 5 dc in the next dc; repeat from * twice.
- DC in the last 7 stitches.
- Slip stitch to the first dc to join.
Total: 64 dc
Round 5
- Chain 3, then work dc in the next 5 dc.
- Work 5 dc in the next stitch.
- *DC in the next 15 dc, 5 dc in the next dc; repeat from * twice.
- DC in the last 9 dc.
- Slip stitch to the first dc to join.
Total: 80 dc
Round 6
-
Chain 3, then work dc in the next 7 dc.
-
Work 5 dc in the next stitch.
-
*DC in the next 19 dc, 5 dc in the next dc; repeat from * twice.
-
DC in the last 11 dc.
-
Slip stitch to the first dc to join.
Total: 96 dc -
Fasten off. Break Yarn A, leaving a 6-inch (15.2 cm) tail.
Wreath Instructions
Next, you will create the wreath with Yarn B (Lime).
- With Yarn B, make an adjustable ring:
- Wrap yarn around your finger with the yarn tail to the left and under the working yarn.
- Insert the hook through the circle from front to back.
- Using the working yarn, yarn over and pull up a loop.
Round 1
- Chain 4 (counts as dc + ch 1).
- In the ring, work [dc, ch 1] 19 times.
- Slip stitch to the first dc to join the round and tighten the beginning yarn tail to close the ring.
Total: 20 dc, 20 chain spaces
Round 2
-
Chain 4 (counts as dc + ch 1).
-
Work dc in the next chain space.
-
In each chain space around, work (dc, ch 1, dc).
-
Slip stitch to the first dc to join the round.
Total: 40 dc, 20 chain spaces -
Fasten off. Break Yarn B, leaving a 6-inch (15.2 cm) tail.
Bow Instructions
The final component is the bow created with Yarn C (Cherry).
- With Yarn C, make an adjustable ring.
Row 1
-
Chain 4 (counts as tr).
-
Work 2 tr in the ring.
-
Chain 4 (counts as tr) and slip stitch into the ring.
-
Chain 4 (counts as tr) and work 2 tr in the ring.
-
Chain 4 (counts as tr) and slip stitch into the ring.
Total: 8 tr -
Tighten the beginning yarn tail to close the adjustable ring, forming the bow.
-
Fasten off. Break Yarn C, leaving a 6-inch (15.2 cm) tail.
Finishing
With your yarn needle, weave in the ends from the bow. Attach the bow to the wreath using the wreath’s yarn tails (or an extra length of Yarn B), securing it at the top center of the wreath for the perfect finishing touch.
Now it’s time to secure the wreath to the center of the dishcloth. Use an extra length of Yarn A to whipstitch the wreath to the dishcloth. Finally, weave in all loose ends, and your festive dishcloth decoration is ready to use or gift!
Frequently Asked Questions
What crochet hook is used for this pattern?
The pattern recommends using a Susan Bates® 5mm [US H-8] crochet hook.
Does this project require assembly?
Yes, you will need to sew the bow onto the wreath and then attach the wreath to the dishcloth.
Is this project worked in rows or rounds?
This project is worked in rounds starting from the center and moving outward for both the dishcloth and wreath components.
For those new to crochet or looking for other festive project ideas, exploring different patterns can widen your crochet repertoire. Consider browsing through other projects such as 10 free crochet Christmas ornament patterns that are perfect for trimming your tree this holiday season. Happy crocheting!