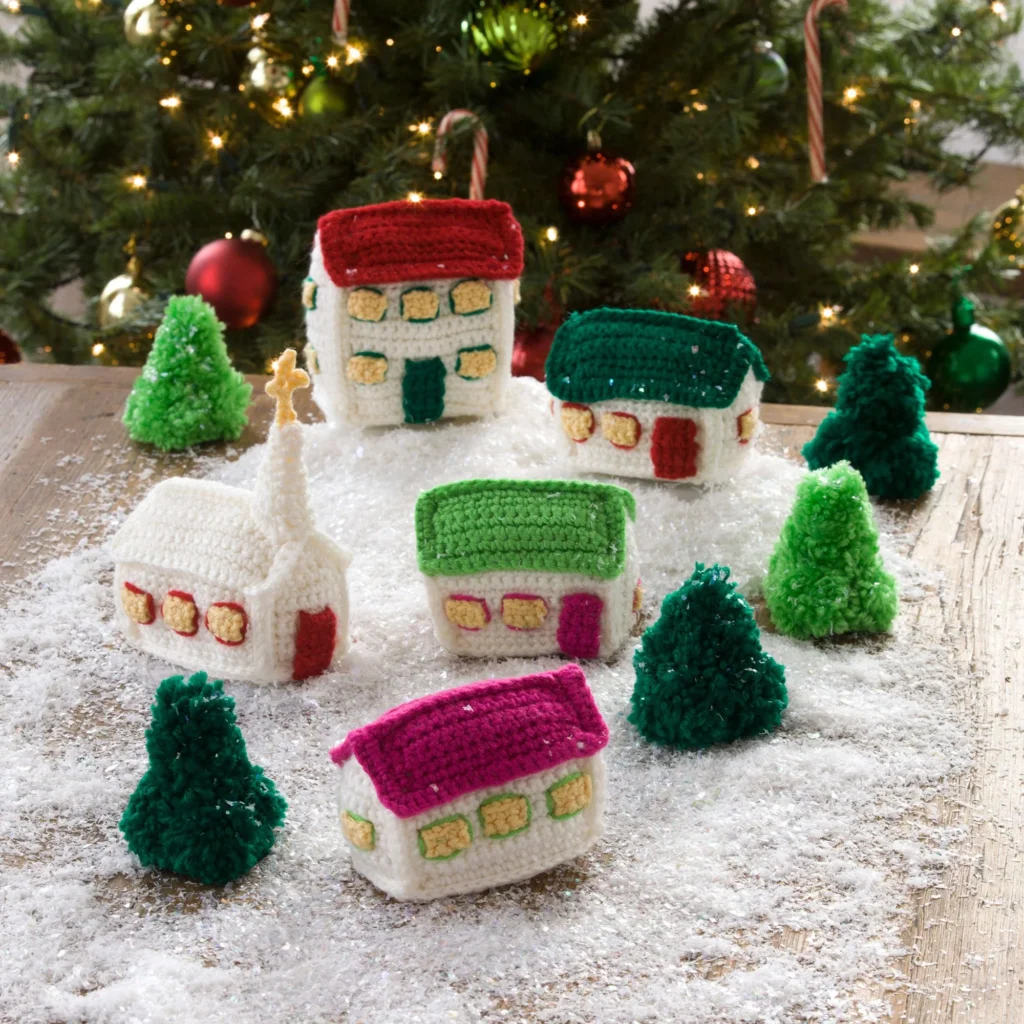
Crochet Christmas Village Pattern
Creating a charming crochet Christmas village is a delightful way to get into the holiday spirit. This crochet pattern features a collection of buildings and trees that can be used to decorate your home or given as gifts during the festive season. With easy-to-follow instructions and specific materials, you can craft a whimsical village that captures the essence of holiday cheer.

About the Crochet Project
This Crochet Christmas Village Pattern includes several components: small and large buildings, a church with a steeple, and charming trees. Each piece is designed to be easy to create, making this project suitable for those who may not have extensive crochet experience. The finished sizes of the buildings range from 3½” (9 cm) to 7” (18 cm) in height, allowing you to create a cohesive and visually appealing scene.
The use of different colors of yarn enhances the festive look of the village. You can also personalize your buildings and trees with embellishments or additional decorations if you wish. The inclusion of special stitches adds dimension to your work, making it not only a fun crafting experience but also an opportunity to refine your crochet skills.
Materials
To create your crochet Christmas village, you’ll need the following materials:
Yarn
- RED HEART® Super Saver®:
- 1 skein each of:
- 316 Soft White A
- 320 Cornmeal B
- 319 Cherry Red C
- 718 Shocking Pink D
- 368 Paddy Green E
- 672 Spring Green F
- 1 skein each of:
Tools
- Susan Bates® Crochet Hook: 3.75mm [US F-5]
- Stitch marker
- Hot glue gun and glue sticks (for trees only)
- Pompom maker (optional – for trees only)
- Polyester fiberfil
- Yarn needle
Finished Sizes (approx.)
- Small building: about 3½” (9 cm) tall
- Large building: about 5” (12.5 cm) tall
- Church with steeple: about 7” (18 cm) tall
- Tree: about 3½” (9 cm) tall
Crochet Abbreviations
Here are some abbreviations that will be used in this pattern:
- ch – chain
- sc – single crochet
- sc2tog – single crochet two together
- sl st – slip stitch
Special Stitch
Before starting the pattern, familiarize yourself with the special stitch used in this project:
- sc2tog = [Draw up a loop in next st] twice, yarn over and draw through all 3 loops on hook.
Pattern Pieces
SMALL BUILDING (make 3)
Side Wall (make 6 – 2 for each building)
- With A, ch 9.
- Row 1: Sc in 2nd ch from hook and in each ch across, turn—8 sc.
- Rows 2-6: Ch 1, turn, sc in each st across, turn.
- Row 7: Ch 1, sc2tog, sc in next 4 sts, sc2tog, turn—6 sc.
- Row 8: Ch 1, sc2tog, sc in next 2 sts, sc2tog, turn—4 sc.
- Row 9: Ch 1, [sc2tog] twice, turn—2 sc.
- Row 10: Ch 1, sc2tog, turn—1 sc.
Border Round:
- Ch 1, skip the sc2tog, sc in end of first 4 rows across side edge ch 2, sc in end of last 6 rows, ch 2;
- sc in each ch across opposite side of foundation ch, ch 2;
- sc in end of first 6 rows across next side edge, ch 2, sc in end of last 4 rows, ch 2;
- join with slip st in first sc—28 sc and 5 ch-2 spaces.
Fasten off.
Front Wall (make 3 – 1 for each building)
- With A, ch 15.
- Row 1: Sc in 2nd ch from hook and in each ch across, turn—14 sc.
- Rows 2-6: Ch 1, sc in each st across, turn.
Border Round:
- Ch 1, sc in each st across, ch 2;
- sc in end of each row across side edge, ch 2;
- sc in each ch across opposite side of foundation ch, ch 2;
- sc in end of each row across next side edge, ch 2;
- join with slip st in first sc—40 sc and 4 ch-2 spaces.
Fasten off.
Back Wall (make 3 – 1 for each building)
- Work same as Front Wall.
Floor (make 3 – 1 for each building)
- With A, ch 15.
- Row 1: Sc in 2nd ch from hook and in each ch across, turn—14 sc.
- Rows 2-8: Ch 1, sc in each st across, turn.
Border Round:
- Ch 1, sc in each st across, ch 2;
- sc in end of each row across side edge, ch 2;
- sc in each ch across opposite side of foundation ch, ch 2;
- sc in end of each row across next side edge, ch 2;
- join with slip st in first sc—44 sc and 4 ch-2 spaces.
Fasten off.
Roof Piece (make 6 – 2 each with D, E, and F)
Note: Three roofs are made, each from two roof pieces of the same color.
- Ch 15.
- Row 1: Sc in 2nd ch from hook and in each ch across, turn—14 sc.
- Rows 2-4: Ch 1, sc in each st across, turn.
Border Round:
- Ch 1, sc in each st across, ch 2;
- sc in end of each row across side edge, ch 2;
- sc in each ch across opposite side of foundation ch, ch 2;
- sc in end of each row across next side edge, ch 2;
- join with slip st in first sc—36 sc and 4 ch-2 spaces.
Fasten off.
Join Two Roof Pieces (to make 3 roofs)
- Hold two roof pieces of the same color together with rows and stitches matching. Working through both thicknesses and working into the 14 sts across the top edge of the pieces, join matching yarn with sc in first st of top edge, sc in next 13 sts.
Fasten off.
LARGE BUILDING (make 1)
Side Wall (make 2)
- With A, ch 9.
- Row 1: Sc in 2nd ch from hook and in each ch across, turn—8 sc.
- Rows 2-12: Ch 1, turn, sc in each st across, turn.
- Row 13: Ch 1, sc2tog, sc in next 4 sts, sc2tog, turn—6 sc.
- Row 14: Ch 1, sc2tog, sc in next 2 sts, sc2tog, turn—4 sc.
- Row 15: Ch 1, [sc2tog] twice, turn—2 sc.
- Row 16: Ch 1, sc2tog, turn—1 sc.
Border Round:
- Ch 1, skip the sc2tog, sc in end of first 4 rows across side edge ch 2,
- sc in end of last 12 rows, ch 2;
- sc in each ch across opposite side of foundation ch, ch 2;
- sc in end of first 12 rows across next side edge, ch 2,
- sc in end of last 4 rows, ch 2;
- join with slip st in first sc—40 sc and 5 ch-2 spaces.
Fasten off.
Front Wall (make 1)
- With A, ch 15.
- Row 1: Sc in 2nd ch from hook and in each ch across, turn—14 sc.
- Rows 2-12: Ch 1, sc in each st across, turn.
Border Round:
- Ch 1, sc in each st across, ch 2;
- sc in end of each row across side edge, ch 2;
- sc in each ch across opposite side of foundation ch, ch 2;
- sc in end of each row across next side edge, ch 2;
- join with slip st in first sc—52 sc and 4 ch-2 spaces.
Fasten off.
Back Wall (make 1)
- Work same as Front Wall.
Floor (make 1)
- Work same as Floor for Small Building.
Roof Piece (make 2)
- With C, work and join the same as Roof Pieces for Small Building.
CHURCH
Side Wall (make 2)
- Work same as Front Wall for Small Building.
Front Wall (make 1)
- Work same as Side Wall for Small Building.
Back Wall (make 1)
- Work same as Side Wall for Small Building.
Floor (make 1)
- Work same as Floor for Small Building.
Roof Piece (make 2)
- With C, work and join the same as Roof Pieces for Small Building.
Steeple (make 1)
- With A, ch 2.
- Round 1: Work 6 sc in 2nd ch from hook; join with slip st in first sc—6 sc.
- Rounds 2 and 3: Ch 1, sc in each st around; join with slip st in first sc.
- Round 4: Ch 1, [2 sc in next sc, sc in next 2 sc] twice; join with slip st in first sc—8 sc.
- Rounds 5 and 6: Ch 1, sc in each st around; join with slip st in first sc.
- Round 7: Ch 1, sc in next st, (hdc, dc) in next st, (dc, hdc) in next st, sc in next 2 sts, (hdc, dc) in next st, (dc, hdc) in next st, sc in next st; join with slip st in first sc—12 sts.
- Round 8: Ch 1, sc in next st, hdc in next st, 2 dc in each of next 2 sts, hdc in next st, sc in next 2 sts, hdc in next st, 2 dc in each of next 2 sts, hdc in next st, sc in next st; join with slip st in first sc—16 sts.
Fasten off.
Cross (make 1)
- With B, ch 6, place a marker in the 3rd ch from hook, slip st in 2nd ch from hook, slip st in marked ch, ch 3, slip st in 2nd ch from hook, slip st in next ch, slip st in marked ch, ch 2, slip st in 2nd ch from hook, slip st in marked ch, slip st in remaining 3 ch.
Fasten off.
WINDOW (make 42 – 7 for each small building, 15 for large building, and 6 for church)
- With B, ch 4.
- Row 1: Sc in 2nd ch from hook and in each ch across, turn—3 sc.
- Row 2: Ch 1, sc in each st across.
Fasten off.
DOOR (make 5 – 2 with C and 1 each with D, E, and F)
Note: C-colored doors are for one small building and church, D-colored door is for one small building, E-colored door is for large building, and F-colored door is for one small building.
- Ch 4.
- Row 1: Sc in 2nd ch from hook and in each ch across, turn—3 sc.
- Rows 2-5: Ch 1, sc in each st across.
Fasten off.
TREE (make 5 – 3 with E and 2 with F)
Base (make 5 – 3 with E and 2 with F)
- Ch 2.
- Round 1: Work 6 sc in 2nd ch from hook; join with slip st in first sc—6 sc.
- Round 2: Ch 1, 2 sc in each st around; join with slip st in first sc—12 sc.
- Round 3: Ch 1, [sc in next st, 2 sc in next st] 6 times; join with slip st in first sc—18 sc.
- Round 4: Ch 1, [sc in next 2 sts, 2 sc in next st] 6 times—24 sc.
Fasten off.
Pompoms (make 25 – 15 with E and 10 with F)
Note: Five pompons are used to make each of five trees.
- Use a pompom maker to make small pompoms or make them by hand using the following instructions:
- Cut a length of yarn about 6” (15 cm) long and set aside.
- Wrap yarn around two fingers 30 times.
- Carefully slip wraps from fingers and tie 6” (15 cm) length tightly around the center of wraps.
- Cut ends of wraps and shake to fluff pompom.
- Do not trim pompom until after tree is assembled.
Assembly
Small Building Assembly
- Hold Floor and Front Wall together with stitches of the lower long edge matching. Working through both thicknesses, join A with slip st in first st of long edge, slip st in each st across to join.
- Join Side Walls and Back Wall to Floor in the same manner as Front Wall was joined to Floor.
- Join the four corners of the Walls in the same manner.
- Whipstitch Door close to one end of Front Wall.
- Whipstitch two Windows to the remaining part of Front Wall. Whipstitch three Windows evenly spaced across Back Wall. Whipstitch one Window to each of the two Side Walls.
- With the same color as the Door, embroider an outline around each Window.
- Stuff piece lightly. It is better to under stuff than overstuff.
- Place Roof on top of the Building with stitches matching. Working through both thicknesses (inserting hook through Wall st first then into corresponding Roof st), join the same color yarn as Roof with sc in any st, sc in each st all the way around working (2 sc, ch 1, 2 sc) at each of the four corners.
Large Building Assembly
1-3. Work the same as steps 1-3 of Small Building Assembly.
4. Whipstitch Door to the center of Front Wall.
5. Whipstitch one Window on each side of the Door of Front Wall. Whipstitch three Windows evenly spaced above the Door and other two Windows of Front Wall. Whipstitch six Windows, in two rows of three Windows each, evenly spaced across Back Wall. Whipstitch two Windows, one above the other, to each of the two Side Walls.
6-8. Work the same as steps 6-8 of Small Building.
Church Assembly
1-3. Work the same as steps 1-3 of Small Building Assembly.
4. Whipstitch Door to the center of Front Wall.
5. Whipstitch three Windows evenly spaced across each of the two Side Walls.
6-8. Work the same as steps 6-8 of Small Building.
9. Lightly stuff Steeple. Whipstitch Steeple to Roof near the front of the Church.
10. Whipstitch Cross to the top of Steeple.
Tree Assembly
- Hot glue three Pompoms onto the Base. Let glue set and cool.
- Hot glue one Pompom on top (and at center) of the first three Pompoms. Let glue set and cool.
- Hot glue one more Pompom on top of the last Pompom that was glued in place. Let glue set and cool.
- Trim Pompoms to shape the Tree.
- Weave in any remaining ends.
Frequently Asked Questions
What crochet hook size is used for this pattern?
You will need a Susan Bates® Crochet Hook in size 3.75mm [US F-5].
Is this crochet project worked in rows or rounds?
This project includes both rows and rounds, depending on the specific components being created.
How many buildings are part of the crochet Christmas village pattern?
The pattern involves making three small buildings, one large building, and a church, for a total of five main structures.
Do I need stuffing for this project?
Yes, you’ll need polyester fiberfil to lightly stuff the buildings for added dimension.
How are the trees constructed in this pattern?
The trees are made by assembling several pompoms onto a base, creating a three-dimensional effect.
The Crochet Christmas Village Pattern provides a fun way to celebrate the holidays with handmade creations. Whether for your home or as gifts, this crochet project invites creativity and charm to the festive season. For more festive patterns, check out the following resources: festive free Christmas crochet patterns and free crochet Christmas ornament patterns. Happy crocheting!