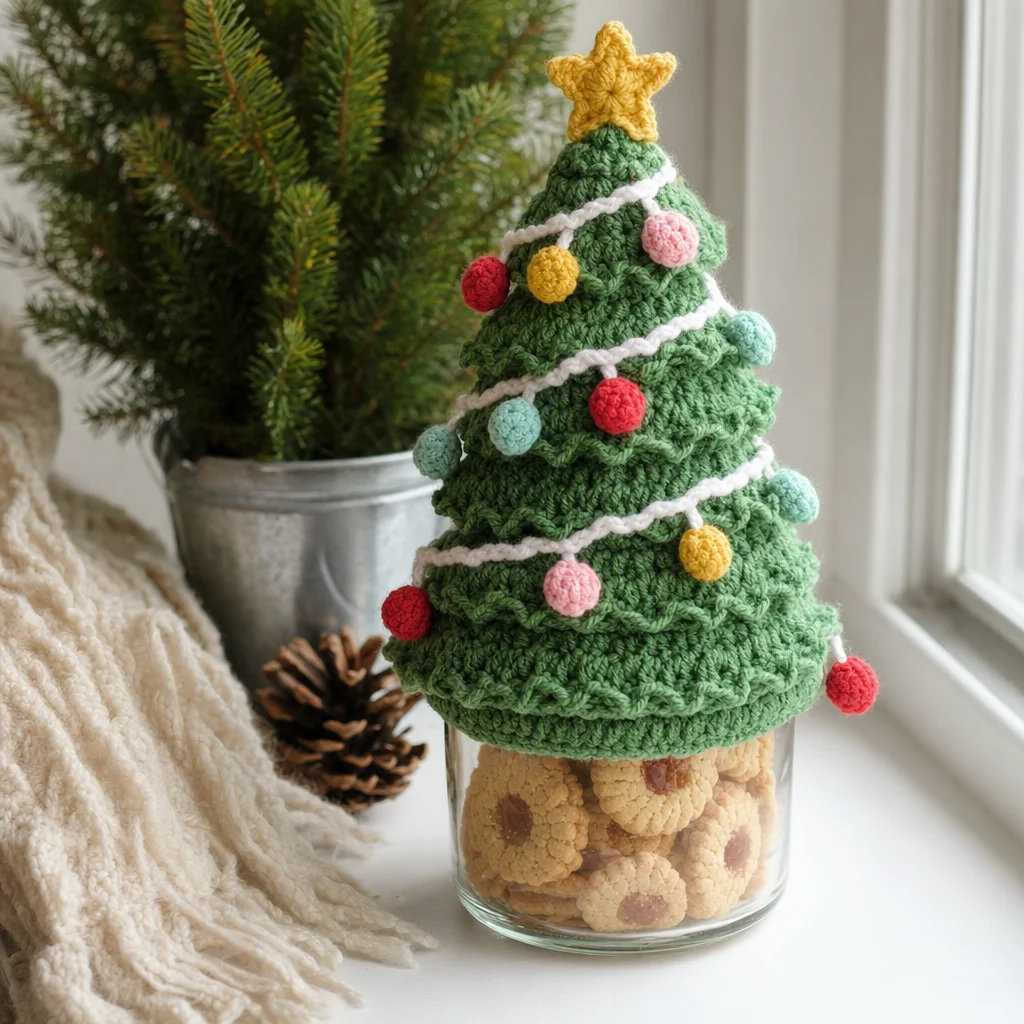
Crochet Christmas Tree Jar Topper Pattern
Creating a festive atmosphere during the holiday season can be simple and fun with the Crochet Christmas Tree Jar Topper! This delightful project combines the joys of crochet with seasonal charm, making it a perfect addition to your holiday decorations. Plus, it’s a wonderful gift idea that shows your love and creativity. In this article, you will find all the information you need to make this adorable jar topper, from materials to step-by-step instructions. You may also find 10 Festive Free Christmas Crochet Patterns To Make Your Holidays Merry useful.

About This Crochet Project
The Crochet Christmas Tree Jar Topper is not only a decorative item but also a practical one, as it can cap off a variety of jars filled with treats or holiday decorations. The design features a lovely tree base topped with a charming star and adorned with a garland and ornaments. This project involves various crochet techniques, including working in rounds and using special stitches such as the Picot Stitch.
Materials
To ensure your project comes out perfectly, gather the following materials:
Yarn
- RED HEART® Super Saver®
- 1 skein each of:
- 368 Paddy Green (Color A)
- 316 Soft White (Color B)
- 235 Lemon (Color C)
- 319 Cherry Red (Color D)
- 706 Perfect Pink (Color E)
- 520 Minty F
- 1 skein each of:
Tools
- Crochet Hook: Susan Bates® Crochet Hook 5.5mm [US I-9]
- Yarn Needle
- Jar: for topper use
Crochet Abbreviations
- sc: single crochet
- dc: double crochet
- hdc: half double crochet
- ch: chain
- st: stitch
- sl st: slip stitch
- Picot Stitch: ch 3, slip stitch into first chain
Construction Notes / Technical Notes
- Tree Base Note: To substitute the adjustable ring, ch 3 and join to first ch.
- Outer Layer of Tree Note: “You will now be working into all the front loops left behind.”
- Garland / Finishing: Use long yarn tail(s) as specified.
Christmas Tree Jar Topper (Make 1 Tree)
Tree Base
-
With A, make an adjustable ring as follows:
- Wrap yarn around your finger with the yarn tail to the left and under the working yarn.
- Insert hook through the circle from front to back.
- Yarn over using the working yarn and pull through loop.
-
Round 1:
Ch 1, 6 sc in adjustable ring, join to first sc
Pull starting end tight to close the circle — 6 sc -
Rounds 2 & 3:
Sc in each of next 6 sts -
Round 4:
Working in back loops only,
(hdc, dc) in next st
1 dc in next st
*2 dc in next st, 1 dc in next st; repeat from * once more
→ 9 sts -
Round 5:
Working in back loops only,
*2 dc in next st, 1 dc in each of next 2 sts; repeat from * 2 more times
→ 12 dc -
Round 6:
Working in back loops only,
*2 dc in next st, 1 dc in each of next 3 sts; repeat from * 2 more times
→ 15 dc -
Round 7:
Working in back loops only,
*2 dc in next st, 1 dc in each of next 4 sts; repeat from * 2 more times
→ 18 dc -
Round 8:
Working in back loops only,
*2 dc in next st, 1 dc in each of next 5 sts; repeat from * 2 more times
→ 21 dc -
Round 9:
Working in back loops only,
*2 dc in next st, 1 dc in each of next 6 sts; repeat from * 2 more times
→ 24 dc -
Round 10:
Working in back loops only,
*2 dc in next st, 1 dc in each of next 7 sts; repeat from * 2 more times
→ 27 dc -
Round 11:
Working in back loops only,
*2 dc in next st, 1 dc in each of next 8 sts; repeat from * 2 more times
→ 30 dc -
Round 12:
Working in back loops only,
*2 dc in next st, 1 dc in each of next 9 sts; repeat from * 2 more times
→ 33 dc -
Round 13:
Working in back loops only,
*2 dc in next st, 1 dc in each of next 10 sts; repeat from * 2 more times
→ 36 dc -
Round 14:
Working in back loops only,
*2 dc in next st, 1 dc in each of next 11 sts; repeat from * 2 more times
→ 39 dc -
Round 15:
Working in back loops only,
*2 dc in next st, 1 dc in each of next 12 sts; repeat from * 2 more times
→ 42 dc -
Round 16:
Working in back loops only,
*2 dc in next st, 1 dc in each of next 13 sts; repeat from * 2 more times
then 1 hdc in next st, 1 sc in next st, slip st in next st
→ 48 sts
Do not fasten off.
Outer Layer of Tree
Note: You will now be working into all the front loops left behind.
-
Round 1 (Outer Layer):
Turn, *ch 3, skip 2 sts, slip st into next front loop; repeat from * around.
Repeat this round until you have reached the top of the tree and worked the last front loop. -
Next Round (Outer Layer):
Turn, 3 sc in first ch space, sc into slip st,
*(2 dc, Picot Stitch, 2 dc) in next ch space, sc in next slip st; repeat from * around.
Repeat this round until you have reached the bottom of the tree; sc in st after the last ch space.
Fasten off.
Star Tree Topper (Make 2)
-
With C, make an adjustable ring.
-
Round 1:
Ch 1, 5 sc in adjustable ring, join to first sc
Pull starting end tight to close the circle — 5 sc -
Round 2:
*Ch 3, turn; skip 1 ch, 1 sc in each of next 2 ch, slip st into next sc; repeat from * 4 more times.
Fasten off, leaving a 24” (61 cm) tail.
Garland
-
With B, ch 200.
-
Row 1:
Slip st into 2nd ch from hook and in each ch across – 199 slip sts.
Fasten off, leaving a 60” (152.5 cm) tail.
Christmas Ornaments (Make 3 each using C, D, E, and F)
-
Make an adjustable ring.
-
Round 1:
Ch 1, 6 sc in adjustable ring, join to first sc
Pull starting end tight to close the circle.
Fasten off, leaving a 12” (30.5 cm) tail.
Finishing / Assembly
- With a yarn needle and long tail, join the front and back of the star together and attach to the top of the tree.
- Using a long yarn tail, attach the garland around the tree, sliding the needle and yarn through the garland between branches.
- Using long yarn tails, attach ornaments to the tree.
- Weave in all loose ends.
- Place the lid cover on top of the jar.
Frequently Asked Questions
What yarn is used for this project?
The project uses RED HEART® Super Saver® yarn, specifically colors 368 Paddy Green, 316 Soft White, 235 Lemon, 319 Cherry Red, 706 Perfect Pink, and 520 Minty F.
What is the size of the crochet hook needed?
You will need a Susan Bates® Crochet Hook 5.5mm [US I-9] for this project.
Does this crochet project require assembly?
Yes, the project includes some assembly, particularly when attaching the star, garland, and ornaments to the tree.
How many ornaments are included in this pattern?
The pattern suggests making 3 ornaments using colors C, D, E, and F.
Is this project worked in rows or rounds?
This project is worked primarily in rounds, particularly for the tree base and other components.
Embark on your holiday crafting journey and add a touch of handmade charm to your festive decor with the Crochet Christmas Tree Jar Topper! If you’re looking for more cheerful crochet projects, consider checking out some additional patterns like 10 Free Crochet Christmas Ornament Patterns that complement this festive decoration beautifully. Enjoy crafting!