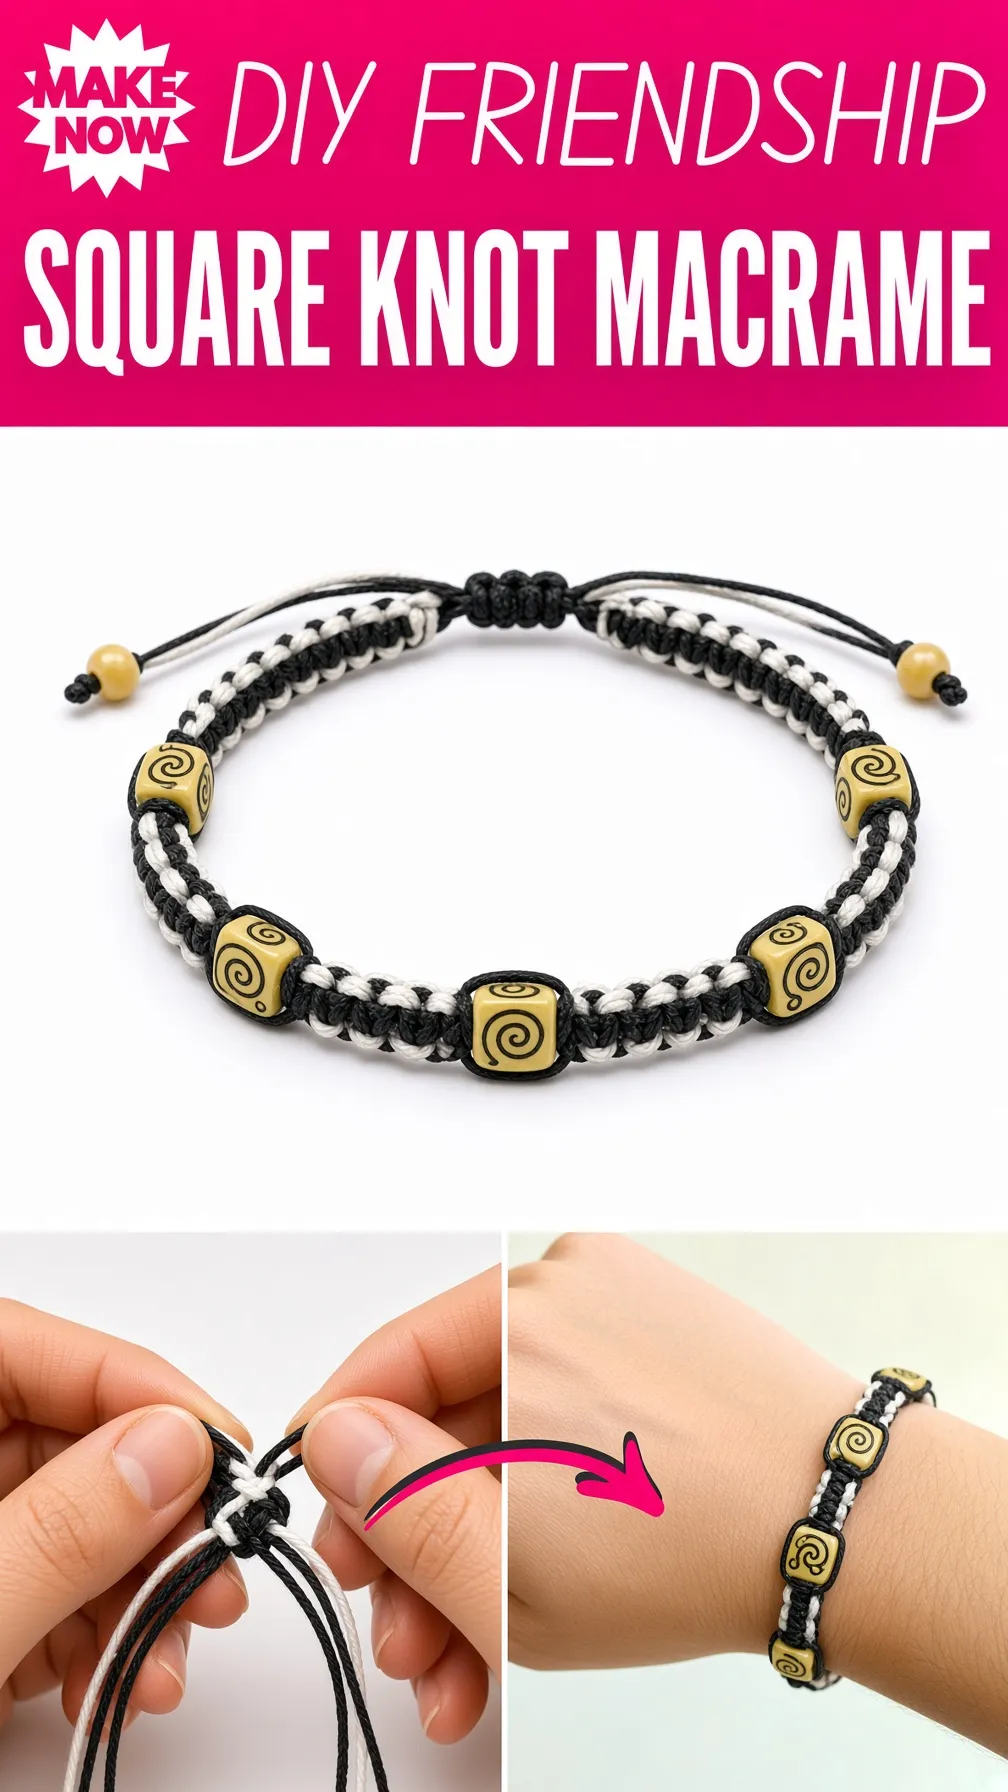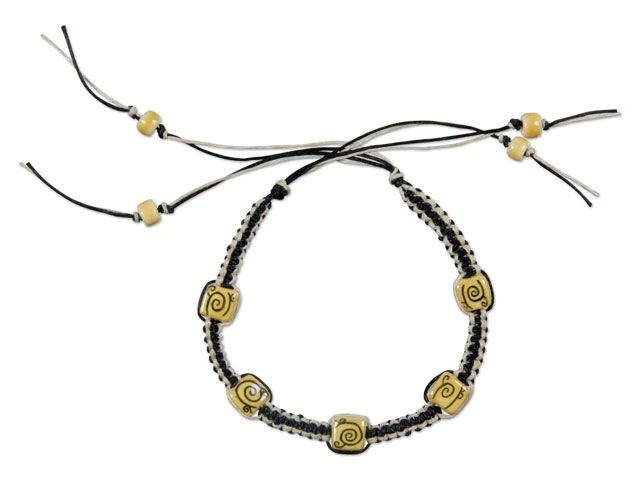
If you are looking for an easy macrame bracelet pattern to start with, the square knot bracelet is one of the best projects to try. The square knot is a basic macrame knot that looks neat, works well with different cord colors, and can be repeated to create a simple handmade bracelet.
This beginner-friendly tutorial uses four strands arranged as two center cords and two working cords. You first create one half of the knot from the left side, then complete the second half from the right side. Once you understand that rhythm, you simply repeat the square knot until your bracelet reaches the length you want.
The attached tutorial identifies this as a beginner-level knotting and macrame technique and shows the square knot being used specifically for jewelry such as bracelets.
What Is a Square Knot Bracelet?
A square knot bracelet is a macrame-style bracelet made by repeatedly tying square knots around one or more center cords.
For this design, there are four strands:
- Two center strands stay mostly straight.
- The left working strand moves around the center cords.
- The right working strand moves around the center cords.
- The two working strands alternate sides to form complete square knots.
The result is a flat, decorative band that works well as a friendship bracelet, casual accessory, or simple handmade gift.
One of the advantages of learning this knot is that the same basic technique can also be adapted for other jewelry projects.
Why This Macrame Bracelet Is Great for Beginners
This is a good first project because you only need to learn one repeating knot.
Once the cords are arranged correctly, the process follows the same pattern:
left side → tighten → right side → tighten → repeat
You do not need complicated tools or advanced macrame experience.
It is also easy to customize. You can experiment with different cord colors once you understand how the knot is formed.
Square Knot Bracelet Supplies
The step-by-step instructions in the supplied pattern use:
- 0.5 mm, 10-lb test hemp cord in a natural color
- 0.5 mm, 10-lb test hemp cord in black
- Scissors
- Tape
- A flat work surface
Prepare:
- One 2-yard piece of natural-colored cord
- One 2-yard piece of black cord
The source tutorial also shows several jewelry cords in its supplies section, but the actual bracelet instructions specifically call for 0.5 mm hemp cord in natural and black.
Optional Supplies
You may also find these useful:
- Clipboard
- Macrame board
- Measuring tape
- Small binder clip
These are optional. The original tutorial simply secures the cords to the work surface with tape.
How to Make a Square Knot Macrame Bracelet
Step 1: Prepare the Cord

Cut one 2-yard length of natural hemp cord and one 2-yard length of black hemp cord.
For each piece, measure about 18 inches from one end and fold it at that point.
When the two folded cords are placed together, you will have two shorter strands and two longer working strands.
Gather all four strands together.
Tie a knot approximately 4 inches below the folded section.
Secure the knotted area to your work surface with tape so the strands cannot move while you work. This setup follows the first stage shown in the supplied bracelet tutorial.
Step 2: Arrange the Four Strands
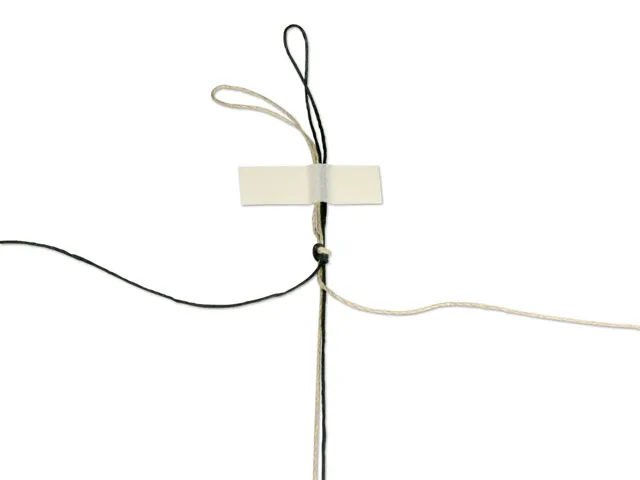
Separate your cords so that the two shorter strands are positioned in the center.
Place:
- one short natural strand in the center
- one short black strand in the center
The two longer strands should sit on either side.
You should now have:
working cord — center cords — working cord
These longer outside cords will create the knots around the two middle strands.
Keeping this arrangement consistent is important because the center strands act as the foundation of the bracelet.
Making the First Half of the Square Knot
Step 3: Cross the Left Working Cord
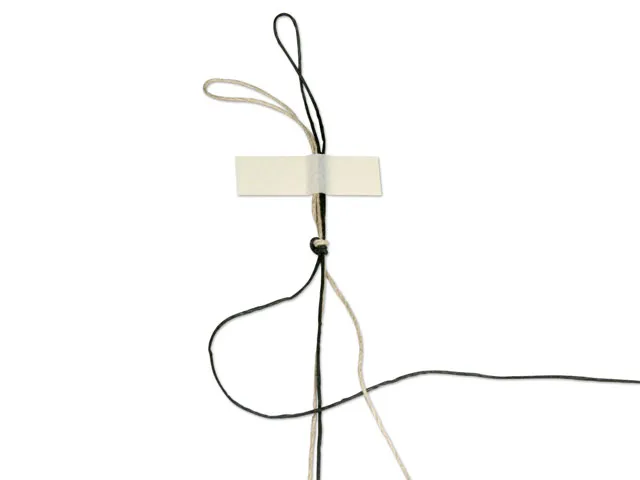
Take the long strand on the far left.
Bring it over the two center strands.
Then pass it under the working strand on the far right.
At this stage, the left cord should form a loop beside the center strands, matching the setup illustrated on page 4 of the supplied instructions.
Don’t tighten anything yet.
Step 4: Bring the Right Cord Through the Loop
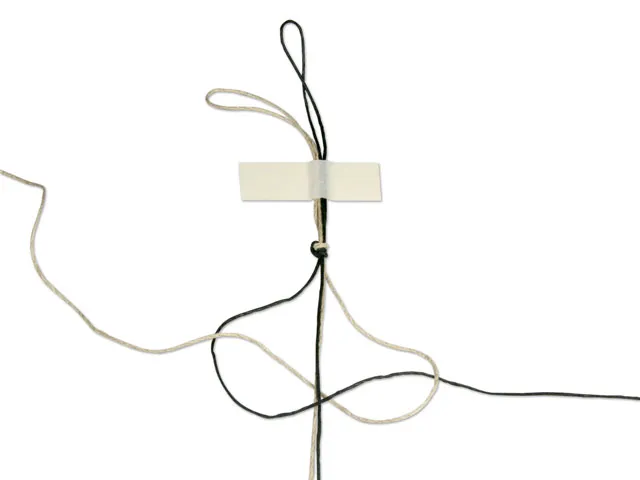
Take the working strand on the far right.
Move it:
- behind the two center strands
- toward the left side
- through the loop created by the left working strand
The two working cords should now be interlocked around the center strands.
Step 5: Tighten the First Half Knot
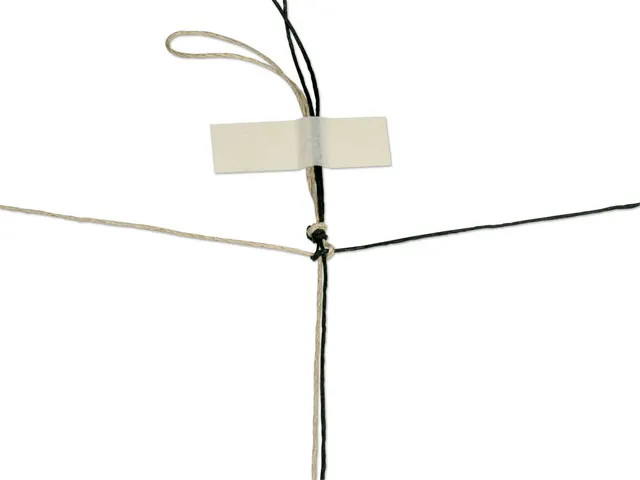
Hold both center strands straight.
Gently pull the two outside working cords in opposite directions.
Slide the knot upward until it sits firmly against the previous knot.
You have now completed the first half of the square knot.
Try to use similar tension on both working cords. Consistent tension will make the finished bracelet look much cleaner.
Completing the Square Knot
The second half is essentially the mirror image of the first.
Instead of starting with the left working cord, you now begin with the right working cord.
This alternating action is what keeps the macrame band flat.
Step 6: Cross the Right Working Cord
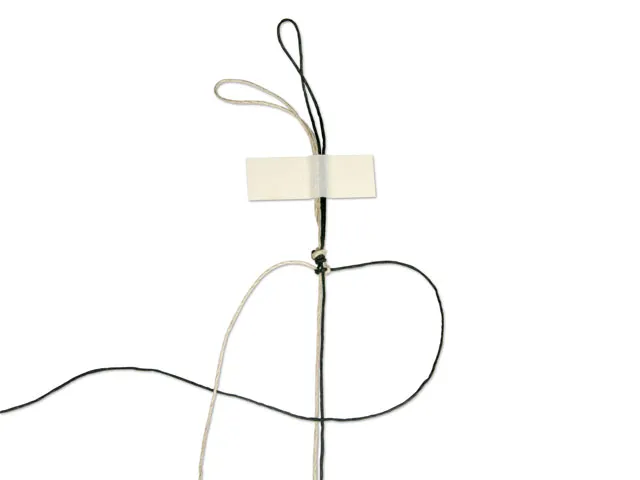
Take the long strand on the far right.
Bring it:
- over the two center strands
- underneath the working strand on the far left
This creates a loop on the right side.
Step 7: Bring the Left Cord Through
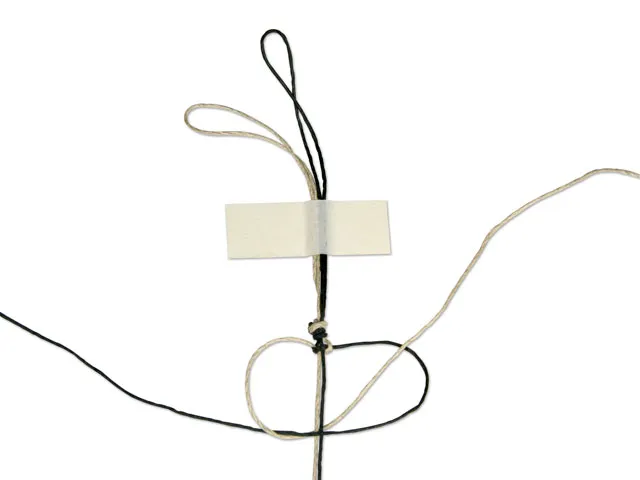
Take the long working strand on the far left.
Pass it:
- behind the center strands
- toward the right
- through the loop created by the right working strand
The second half should look like a reversed version of the first half.
Step 8: Tighten the Square Knot
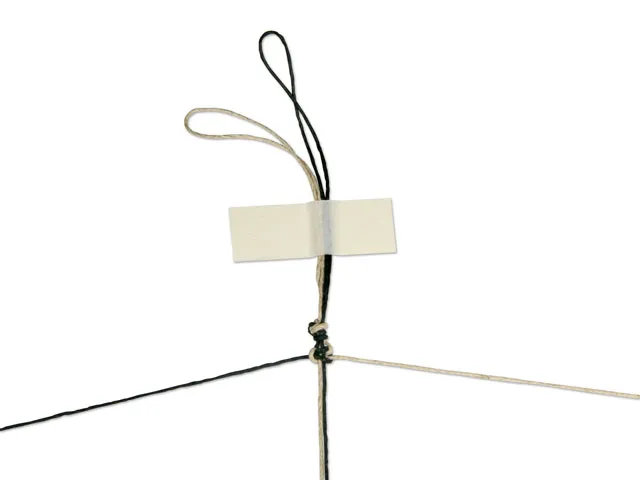
Pull both working strands outward.
Keep the two middle strands straight while you tighten.
Push the knot gently upward.
You have now completed one full square knot.
The pattern should begin to look like a small flat woven section around the center cords.
Step 9: Continue Making Square Knots
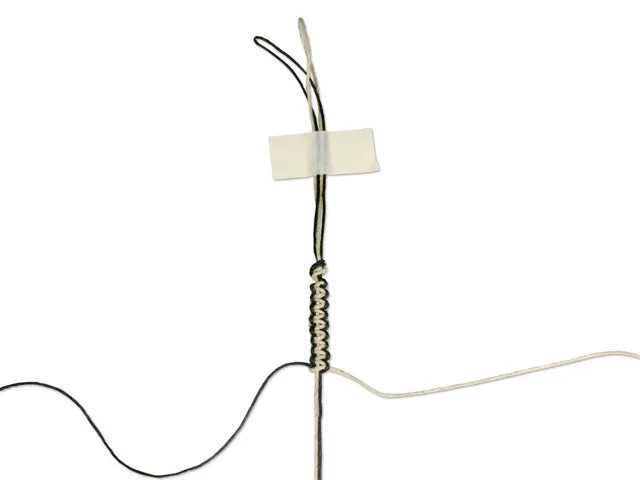
Repeat the same process:
Left working cord first → tighten.
Then:
Right working cord first → tighten.
Continue alternating these two halves to create full square knots.
The supplied tutorial instructs you to repeat the knotting sequence until the bracelet reaches your desired length.
Check the bracelet against your wrist occasionally as you work.
Remember that you will need some extra cord at the ends for tying and securing the bracelet.
Step 10: Finish the Bracelet
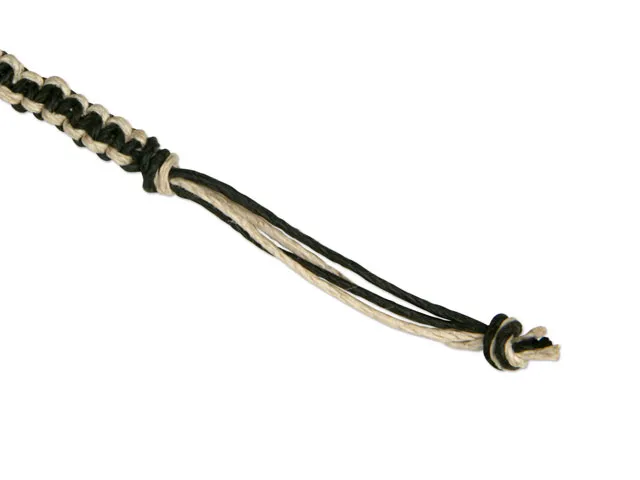
Once your knotted section reaches the desired length, gather all four strands together.
Tie them into a secure knot.
Trim the excess cord as needed.
The original tutorial also recommends knotting the trimmed ends to help reduce fraying.
You should now have a simple handmade square knot bracelet with loose cord sections that can be used to tie the bracelet around the wrist.
How the Square Knot Works
It is easier to remember the technique when you think of one complete square knot as having two halves.
First half
Start with the left cord.
Left goes over the center cords, while the right cord travels behind them and comes through the loop.
Second half
Start with the right cord.
Right goes over the center cords, while the left cord travels behind them and comes through the loop.
Together, these two movements create one square knot.
A simple way to remember it is:
Left → Right = 1 square knot
Then repeat.
Tips for Making a Neat Square Knot Bracelet
Keep the Center Cords Straight
Your two middle strands should remain fairly straight while you tie the knots.
Avoid letting them twist around the working cords.
Use Even Tension
Do not make one knot extremely tight and the next knot loose.
Try to pull the working cords with approximately the same amount of pressure each time.
This creates a more uniform bracelet.
Tighten Each Half Before Continuing
After making the first half, tighten it before starting the second half.
Then tighten the completed square knot again.
Working slowly is usually better when you are learning.
Secure Your Work
If the bracelet keeps moving while you are knotting, use stronger tape or attach it to a clipboard.
Keeping the top stationary makes controlling the working cords much easier.
Watch Which Side You Start From
A complete square knot alternates sides.
If you repeatedly start from the same side instead of alternating, your work may begin forming a spiral rather than the flat square-knot design shown in this tutorial.
Square Knot Bracelet Color Ideas
The tutorial uses natural and black cords, which makes it easy to see how the strands move during knotting.
Once you understand the technique, you can try combinations such as:
- black and white
- cream and brown
- pink and white
- blue and cream
- green and beige
- black and red
- pastel colors
- two shades of the same color
Using contrasting colors is especially useful for your first bracelet because it helps you identify which working strand should move next.
How Long Should a Macrame Bracelet Be?
There is no single bracelet length that works for everyone.
The best approach is to periodically wrap the knotted portion around the intended wrist while you work.
Remember to leave room for the ends and closure.
For a gift, measuring another bracelet that fits the recipient can help you estimate the finished size.
Can You Add Beads to a Square Knot Bracelet?
Yes. Once you are comfortable making basic square knots, beads can be incorporated into many macrame bracelet designs.
You can add beads along the center cords and continue knotting around them.
However, if this is your first macrame project, I recommend completing the simple version first. It will help you understand cord placement and tension before introducing additional elements.
What Happens If My Bracelet Starts Twisting?
Check your knot sequence.
A standard square knot alternates which side begins each half:
- Start one half from the left.
- Start the second half from the right.
If you continuously make the same half-knot from one side, the knots naturally begin to twist into a spiral.
For this bracelet, alternate sides to keep the design flat.
Frequently Asked Questions
Is the square knot easy for beginners?
Yes. The square knot is a beginner-friendly macrame technique because it uses a short repeating sequence. After practicing several knots, the hand movements usually become much easier to remember.
How many cords do I need for a square knot bracelet?
This tutorial works with four strands after two pieces of cord are folded and arranged. Two strands form the center while the other two become the working cords.
What knot is used in this bracelet?
The main technique is the macrame square knot. Each full square knot consists of two mirrored half-knots.
Why does my square knot bracelet look uneven?
Uneven tension is one of the most common causes. Keep the center cords straight and try to pull both working strands with similar pressure after each half-knot.
Can I make this bracelet in one color?
Yes. Using two colors makes learning easier because you can see the individual cords more clearly, but the same square knot technique can be used with a single color.
Can I use different cord?
The supplied instructions specifically use 0.5 mm hemp cord, but the general square knot technique can be practiced with other suitable jewelry or macrame cords. If you change the cord thickness, the appearance and amount of cord required may also change.
More Free Macrame Bracelet Patterns
Once you have learned the square knot, you already have one of the most useful basic techniques for making macrame jewelry.
This easy square knot macrame bracelet is a great starting point before moving on to patterns featuring beads, decorative shapes, multiple colors, sliding closures, and more advanced knot combinations.
If you are working through our bracelet collection, continue exploring our 21 Free Macrame Bracelet Patterns to find your next project.
The square knot may be simple, but learning it gives you a strong foundation for many more macrame bracelet designs.
Photo Credit: The step-by-step bracelet images shown in this tutorial are sourced from Artbeads.com.