
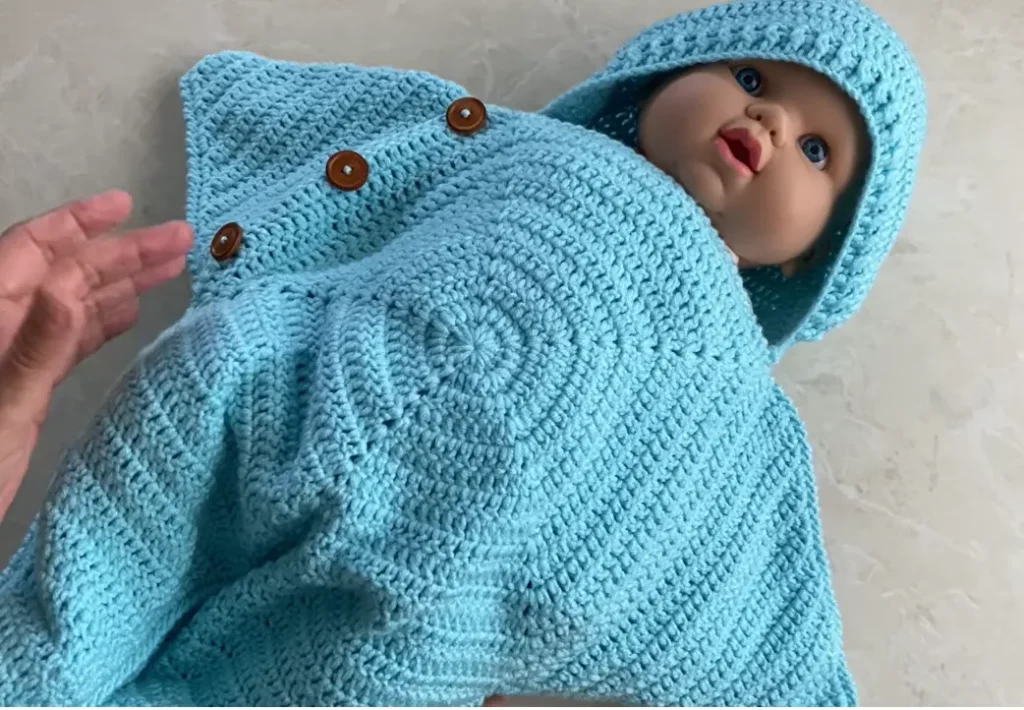
Looking for a sweet and cozy crochet project for a little one? This free crochet star baby romper pattern is a fun handmade project featuring a beautiful star design, a comfortable hood, side button closures, and a soft fit for babies.
The romper is designed for approximately 0–3 months, but the construction can be adjusted for larger sizes by adding additional increase rows. It can be made with your favorite yarn colors, making it a lovely handmade baby shower gift or a cozy addition to a baby’s wardrobe.
The star design gives this baby romper a unique look, while the hood and button opening make it practical and easy to put on.
If you enjoy crocheting baby clothes, you may also want to explore this collection of beginner-friendly crochet clothing projects.
About This Crochet Baby Romper
This crochet baby romper is constructed around a five-point star motif. The upper section is worked with increases at five points, creating the star shape. Individual star sections are then shaped with decreases before the front and back are assembled.
The finished romper includes:
- A five-star back section
- A three-star front section
- Separate sleeves
- A wide hood
- Three buttonholes
- Three buttons
- Single crochet edging
- Reverse single crochet around the collar
The original tutorial makes the sample for a 0–3 month baby and measures approximately 28 cm wide at the increase section.
Why You’ll Love This Crochet Star Baby Romper
There are plenty of reasons to add this project to your crochet list.
Unique star design
Instead of a traditional plain baby cardigan or romper, this design uses five star-shaped sections to create a striking geometric look.
Cozy hood
The hood is deliberately made wider than the sleeve sections so that it has enough room for a baby’s head.
Button opening
Three buttonholes make the romper easier to put on and take off.
Customizable
You can use different yarn colors, change the size, or use a different yarn texture. The original tutorial notes that the design also works nicely with velvet yarn.
Great handmade gift
A handmade baby romper can make a thoughtful baby shower gift, newborn gift, or special keepsake.

Materials You’ll Need
For the 0–3 month size, gather the following:
- Approximately 3 × 100 g balls of yarn
- 3 mm crochet hook
- 3 buttons
- Yarn needle
- Scissors
- Stitch markers, optional
The yarn used in the original tutorial is approximately 240 meters per 100 grams, with about three balls used for the romper.
Crochet Hook Size
The original sample was made with a 3 mm crochet hook.
If you crochet tightly, a 3.5–4 mm hook may give you a softer fabric and more comfortable drape.
Crochet Abbreviations
This pattern uses standard US crochet terminology.
| Abbreviation | Meaning |
|---|---|
| ch | Chain |
| sl st | Slip stitch |
| sc | Single crochet |
| hdc | Half double crochet |
| dc | Double crochet |
| tr | Treble crochet |
| st | Stitch |
| sk | Skip |
| dec | Decrease |
Finished Size
The sample shown in the tutorial is approximately:
Size: 0–3 months
Width: approximately 28 cm
The tutorial suggests adding increase rows to make a larger romper:
- 14 increase rows — approximately 0–3 months
- 15 increase rows — approximately 3–6 months
- 16 increase rows — approximately 6–12 months
These are approximate size suggestions rather than tested standard measurements. The tutorial explains that adding rows increases the number of stitches in each star section.
How to Crochet the Star Baby Romper
Step 1: Begin the Star Motif
Start with a magic ring.
Round 1
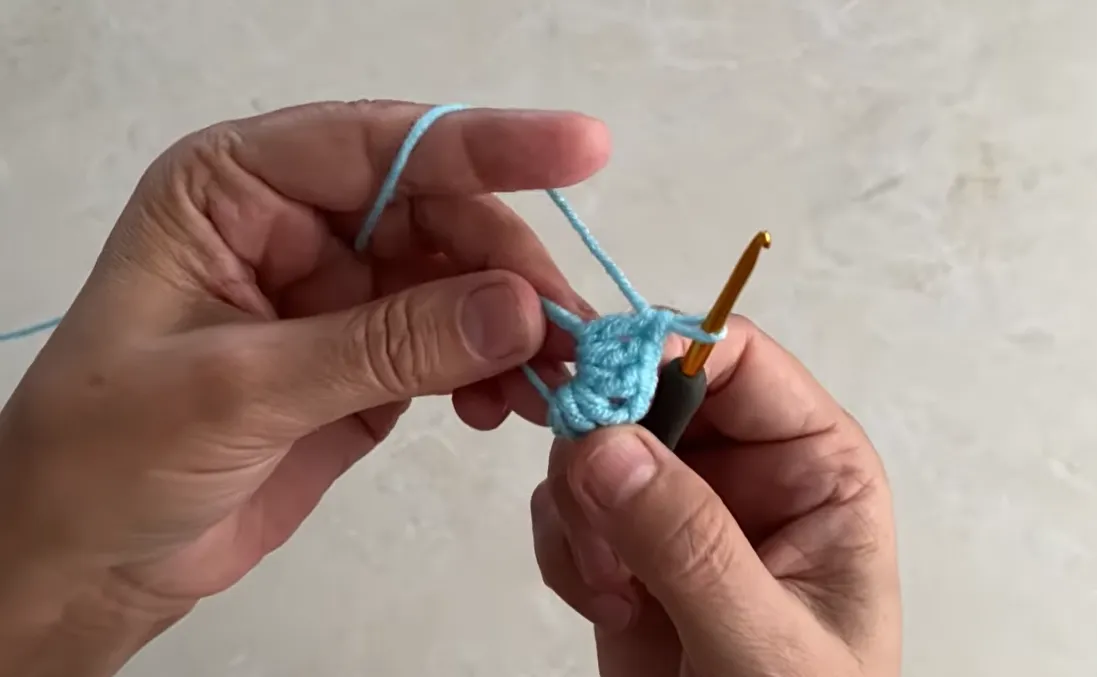
Make a magic ring.
Ch 3. The beginning chain counts as the first dc.
Work 2 dc into the magic ring.
Ch 1.
Work 3 dc into the ring.
Ch 1.
Repeat the following sequence until you have five groups:
3 dc, ch 1
You should have 5 groups of 3 dc, separated by chain-1 spaces.
Pull the magic ring closed.
Join to the top of the beginning ch-3 with a sl st.
You now have five sections around the center of the star.
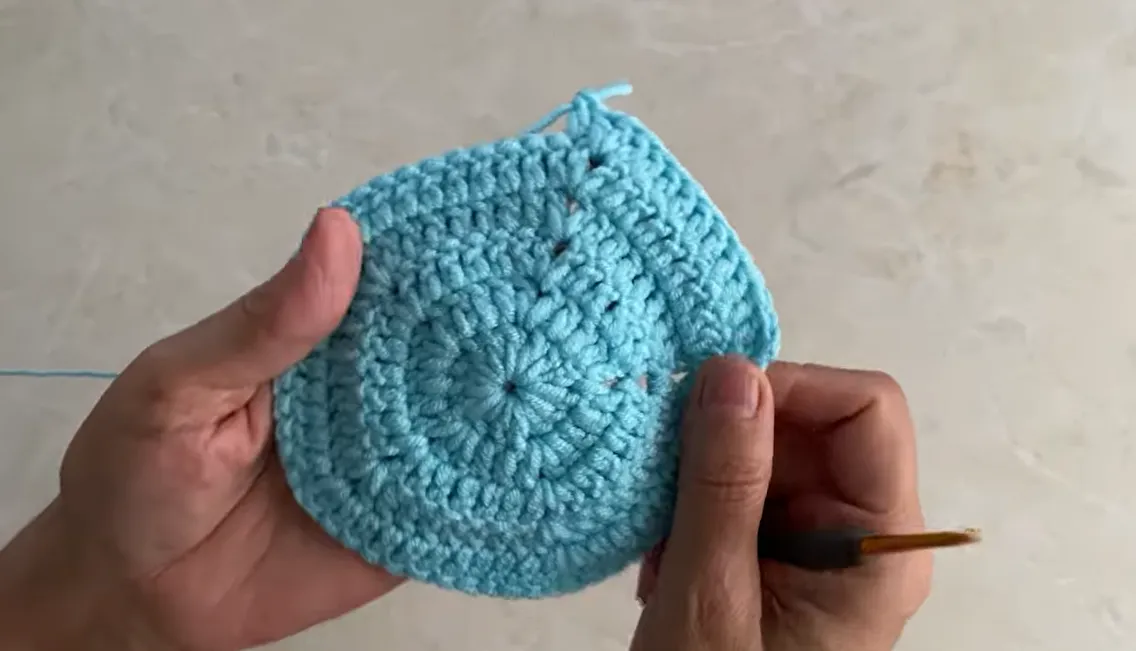
Step 2: Work the Increase Section
The star grows by adding stitches at each of the five chain spaces.
At each increase point, work:
1 dc, ch 1, 1 dc
This increase is repeated at all five points.
At the beginning of each row, use the turning chain specified in the tutorial and turn the work.
Continue working across each section and make an increase at every chain-space increase point.
As the rows progress, the star becomes wider.
For the sample size, continue until you have completed 14 increase rows.
The final width of the sample is approximately 28 cm.
For a visual guide, follow along with the video tutorial below as you work through the written pattern. It’s particularly useful for visualizing how the star sections, shaping, buttonholes, sleeves, and hood all come together.
Making a Larger Size
If you want a larger romper, continue the increase pattern for additional rows.
The original tutorial suggests approximately:
- One extra increase row for 3–6 months
- Two extra increase rows for 6–12 months
Because babies vary considerably in size, use the baby’s measurements whenever possible rather than relying only on age ranges.
Step 3: Separate the Five Star Sections
Once the increase section is complete, begin working the individual star points.
The tutorial works the sections using 31 stitches at the widest point.
For each star section, work three rows without decreases.
Star Row 1
Ch 3 and turn.
Work 1 dc in each stitch across.
31 dc
Star Row 2
Ch 1 and turn.
Work 1 dc in each stitch across.
31 dc
Star Row 3
Ch 1 and turn.
Work 1 dc in each stitch across.
31 dc
At this point, the star section is ready for shaping.
Need a little extra help? I highly recommend following along with the original video tutorial below as you crochet! Seeing the process in action is incredibly helpful, especially when it comes to tackling the star sections, shaping, buttonholes, sleeves, and hood.
Step 4: Shape the Star Point
Beginning with the next row, decrease at both ends of every row.
Decrease Row
Ch 1 and turn.
Skip the first stitch.
Work 1 dc into the second stitch.
Continue working dc across until 2 stitches remain.
Work the final 2 stitches together as a dc decrease.
You have now decreased by 2 stitches.
The stitch counts progress like this:
| Row | Stitch Count |
|---|---|
| Starting row | 31 |
| Decrease 1 | 29 |
| Decrease 2 | 27 |
| Decrease 3 | 25 |
| Decrease 4 | 23 |
| Continue | Decrease by 2 each row |
Continue decreasing at both ends until only 3 stitches remain.
This creates the pointed end of the star.
Step 5: Complete the Five Stars for the Back
Repeat the same star-point construction to create the five sections needed for the back.
Each star is worked to the same height.
The tutorial makes:
- 5 star sections
- 3 straight rows at the widest part
- Decreases at both ends
- A pointed top ending with 3 stitches
Keeping each star the same height is important so the finished back joins neatly.
Pair this written pattern with the original video tutorial below to see exactly how your project comes to life! The video is a fantastic companion, making it super easy to visualize the star sections, shaping, buttonholes, sleeves, and hood.
Step 6: Add a Single Crochet Edge to the Back
Work single crochet around the outer edge of the completed five-star back.
Along the long shaped edges, work approximately 2 sc per row.
At the corners and star points, add stitches as needed to keep the edge smooth and flat.
The original tutorial emphasizes keeping the stitch count consistent on corresponding sides of the piece.
When you reach the beginning:
Join with a sl st.
Fasten off.
Step 7: Crochet the Front
The front is constructed using the same star technique.
For the front, the tutorial makes three completed star sections and leaves the remaining area open for the front opening and hood.
Work the star sections using the same increase and decrease construction as the back.
For the sample, the front is worked to approximately the same height before the opening is formed.
Step 8: Add the Buttonholes
The front opening is finished with a buttonhole band.
Attach your yarn at the designated increase chain.
Ch 3.
Work dc stitches across the edge.
The tutorial uses three buttonholes.
To Make Each Buttonhole
At the marked location:
- Ch 1.
- Skip 1 stitch.
- Work 1 dc in the next stitch.
- Continue working dc across.
Repeat this process at the remaining marked locations.
Make sure the buttonholes are large enough for the buttons you selected.
The original tutorial positions three buttonholes along the front edge.
Step 9: Finish the Front Edge
After completing the buttonholes, work a row of hdc along the front edge.
Ch 1 and turn.
Work 1 hdc into each stitch and chain space across.
Fasten off.
Then add the same neat single crochet edging around the star sections as you did on the back.
Step 10: Crochet the Sleeves
The sleeves are made separately and then attached to the body.
For each sleeve:
Ch 34
Skip the first 3 chains and work a dc into the fourth chain from the hook.
Continue working dc across.
You should have:
31 dc
The original tutorial uses four rows of 31 dc before beginning the sleeve decreases.
Sleeve Rows 2–4
Ch 1 and turn.
Work 1 dc in each stitch across.
Repeat until you have completed four rows.
Step 11: Shape the Sleeve
Beginning with the next row, decrease at both ends.
Ch 1 and turn.
Skip the first stitch.
Dc in the second stitch.
Continue working dc until 2 stitches remain.
Work the final 2 stitches together.
Repeat this decrease on every row.
The sleeve section is approximately 18 rows total in the sample, including the four initial rows.
Step 12: Edge the Sleeve
Work sc around the entire sleeve section.
As with the body edging, work approximately 2 sc per row along the shaped edges.
Keep the edging consistent so the sleeve can be joined smoothly to the body.
Fasten off.
Repeat for the second sleeve.
Step 13: Crochet the Hood
The hood begins with a larger foundation chain than the sleeves.
This gives the hood enough room for a baby’s head.
Foundation Chain
Ch 62
The tutorial uses 62 chains for the hood.
Hood Row 1
Dc in the fourth chain from the hook.
Dc across.
You should have:
59 dc
Step 14: Add Texture to the Hood
The next row uses alternating front- and back-positioned stitches to create a knit-and-purl-like texture.
Ch 1 and turn.
Work the alternating textured dc stitches across the row.
The tutorial uses this textured row to give the hood a slightly ribbed appearance.
For babies under one year, the tutorial suggests that one textured row is sufficient. For an older child, additional textured rows can be considered.
Step 15: Shape the Hood
Work one row of treble crochet across the hood.
You should have:
59 tr
From the following row onward, begin decreasing.
Unlike the star sections, the hood decreases by two stitches at each side of the row.
That means four stitches are removed from the total stitch count per decrease row.
Continue the decreases until the hood reaches the desired shape.
The original tutorial works the hood for approximately 17 rows.
Step 16: Edge the Hood
Work single crochet around the outside edge of the hood.
Along the shaped rows, use approximately:
2 sc per row
Continue around the hood.
Do not fasten off if you want to use the attached yarn directly for joining.
Step 17: Join the Hood
Place the hood pieces together with the correct sides positioned as shown in the tutorial.
Join the corresponding stitches along the hood seam.
The original tutorial uses a crochet joining technique in which the hook passes through corresponding stitches on both sides.
Pull the yarn through both stitches to create the seam.
If you prefer a simpler method, you can join the hood with single crochet stitches.
Step 18: Join the Front and Back
Place the front and back sections together.
Make sure the right sides are facing correctly.
Match the star sections.
Join the corresponding stitches along the body.
Continue until you reach the armhole opening.
The tutorial uses the same stitch-to-stitch joining method used for the hood.
Reference the original video tutorial below to complement the written instructions. This visual guide is especially beneficial for walking you step-by-step through the construction of the star sections, shaping, buttonholes, sleeves, and hood.
Step 19: Attach the Sleeves
Position the sleeve inside the armhole opening.
Make sure the right side of the sleeve is facing outward.
Match the stitches carefully.
The tutorial leaves a small section unjoined at the beginning and end of the armhole to accommodate the construction.
Join the sleeve around the armhole, matching the stitches one by one.
Continue until the sleeve is securely attached.
Repeat for the second sleeve.
Step 20: Sew on the Buttons
Once the romper is assembled, sew the three buttons opposite the buttonholes.
Before sewing them permanently, close the buttonholes and check that the placement is correct.
The original tutorial uses three buttons but notes that two buttons can also be used if preferred.
Make sure every button is securely attached.
Step 21: Finish the Collar
For the final neckline finish, work reverse single crochet around the collar.
Attach the yarn to the collar edge.
Work reverse single crochet around the entire neckline.
This creates a neat decorative border and gives the collar a finished appearance.
Join with a sl st.
Fasten off and weave in the ends.
The tutorial uses reverse single crochet around the collar as its final edging.
Finishing Your Crochet Baby Romper
Before using your finished romper:
- Weave in all loose ends.
- Check every seam.
- Make sure the buttons are securely sewn.
- Check the buttonholes.
- Gently shape the romper.
- Check the finished measurements.
- Wash and dry according to your yarn manufacturer’s instructions.
If you’re making other handmade pieces for a baby, a coordinating crochet hat can make a lovely set. You can pair this romper with a free crochet hat pattern or explore this easy crochet hat pattern.
Tips for Making the Crochet Star Baby Romper
Choose a soft yarn
Since this romper is intended for a baby, choose a yarn that feels comfortable against delicate skin.
A soft baby yarn is a good choice, while velvet yarn can create an especially plush result.
Don’t crochet too tightly
The original sample was intentionally crocheted with a relatively relaxed tension so the finished fabric would remain soft.
If your stitches are very tight, try going up to a 3.5 or 4 mm hook.
Keep your star sections consistent
When making multiple stars, count your rows carefully.
All five back stars should have the same height, and the front sections should be worked consistently.
Check the fit as you go
Age-based sizing is only an estimate.
If you are making the romper for a particular baby, compare the project against the baby’s actual measurements whenever possible.
Mark the buttonholes
Use stitch markers to mark your buttonhole positions before beginning the buttonhole row.
This makes it much easier to keep the three openings evenly spaced.
Can I Make This Crochet Romper in a Larger Size?
Yes. The tutorial specifically explains that the romper can be enlarged by adding more increase rows before beginning the star sections.
The more increase rows you add, the more stitches you’ll have in each star section.
The hood may also need adjustment because the head opening needs to remain wide enough for the intended size.
For additional crochet clothing inspiration, take a look at these beginner crochet wearable projects.
Frequently Asked Questions
What size is this crochet baby romper?
The sample is designed for approximately 0–3 months and has an approximate width of 28 cm at the increase section.
How much yarn do I need?
The original sample uses approximately three 100 g balls, with yarn measuring around 240 meters per 100 g.
Your actual yarn usage will vary depending on yarn thickness, hook size, tension, and size of the romper.
What crochet hook size should I use?
A 3 mm crochet hook was used for the sample.
If you crochet tightly, a 3.5–4 mm hook may produce a softer fabric.
Can I use a different yarn?
Yes. The original tutorial says that different yarn brands and colors can be used, and specifically mentions that velvet yarn can also work well for this design.
How many buttons does the romper use?
The sample uses three buttons and three buttonholes. Two buttons can also be used if you prefer.
Can I make the romper bigger?
Yes. Add additional increase rows before beginning the star sections. The tutorial suggests approximately one additional row for 3–6 months and two additional rows for 6–12 months.
More Crochet Patterns to Try
If you enjoyed making this star baby romper, there are plenty of other crochet projects to add to your handmade wardrobe and gift list.
For another cozy baby project, try this easy textured crochet baby blanket.
If you’re interested in expanding your crochet wardrobe, explore this collection of cozy crochet accessories.
You can also browse these easy crochet clothing projects for more wearable ideas.
Final Thoughts
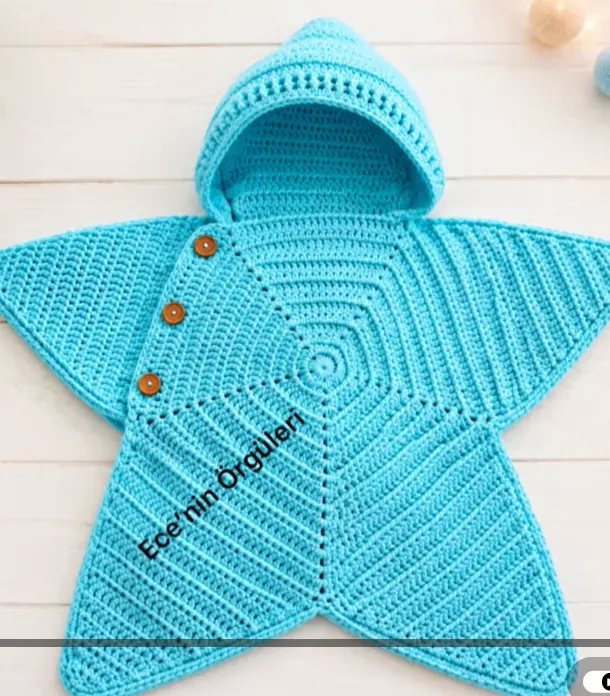
This free crochet star baby romper pattern is a beautiful project for crocheters who want to make something special for a little one. The five-point star construction creates a distinctive design, while the hood, button closure, and soft crochet fabric make it practical as well as decorative.
The pattern is also flexible. Once you understand how the five increase points work, you can experiment with different yarn colors, textures, and sizes.
For a coordinated handmade baby gift, pair the romper with a crochet hat or a soft baby blanket. Handmade pieces like these are wonderful projects to make ahead of a baby shower or to welcome a new baby into the family.
Happy crocheting!
