
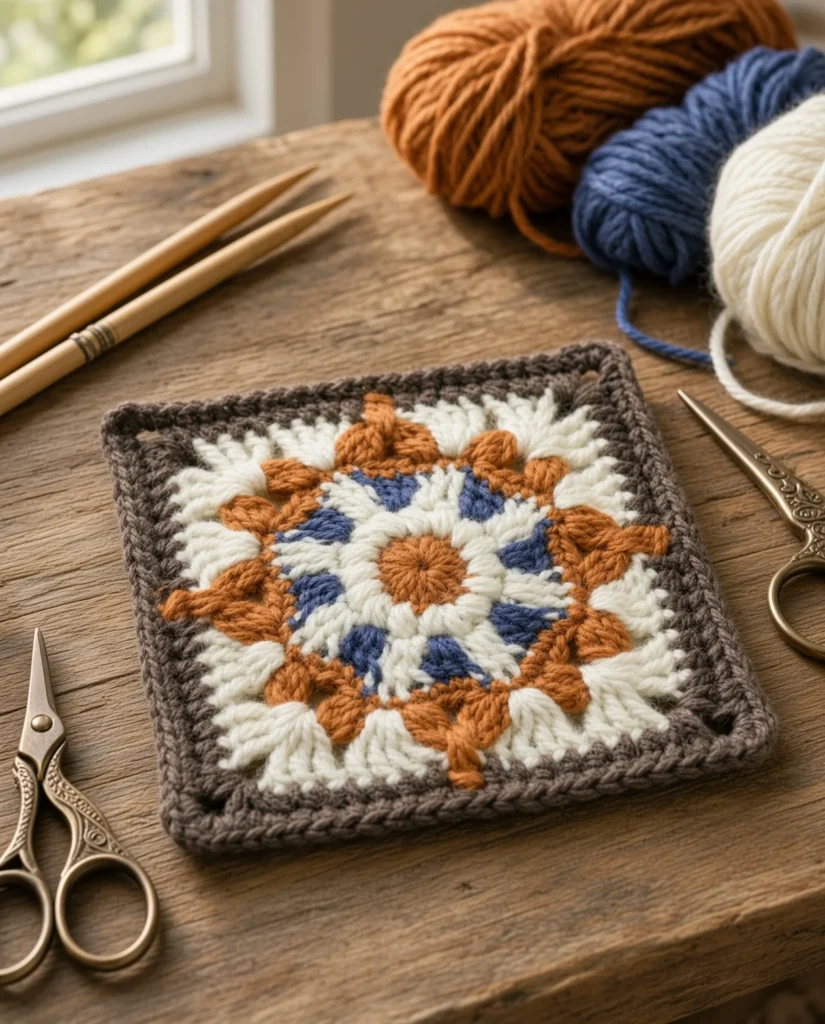
There is something undeniably enchanting about rustic crochet designs. They bring to mind cozy cabin retreats, flannel blankets, and crisp autumn evenings by the fire. If you are looking to capture that same warm, inviting aesthetic in your next project, this Rustic Star Granny Square is the perfect pattern for you.
This pattern stands out from traditional flat granny squares by utilizing a brilliant combination of dimensional bobbles and multi-toned color changes. The result is a highly textured, raised star motif that practically pops right off the fabric. The unique construction—particularly the way the star points are formed by encasing chains—creates a thick, cozy fabric that feels as luxurious as it looks.
Because this pattern involves some non-traditional techniques like creating puffs with incomplete half double crochets and working stitches over chains, it is a fantastic project for intermediate crocheters looking to expand their skillset. If you are a visual learner, be sure to watch the step-by-step video tutorial to see exactly how these beautiful star points come to life before diving into the written instructions below!
Materials Needed
- Yarn of your choice- 4 colors; the sample is made with wool yarn.
- Crochet hook- we are using a 3.00mm hook
- Darning Needle
- Scissors
Pattern Notes
This pattern uses USA crochet terminology.
Working with multiple colors and dimensional stitches requires a bit of attention to detail. In this pattern, you will be creating “3-hdc-puff” stitches. Unlike a traditional puff stitch made with double crochets, this pattern creates dense, rustic-textured puffs by working 3 incomplete half double crochets into the same stitch, then yarn over and pulling through all the loops on your hook at once.
You will also encounter a unique technique in Round 6 where you are asked to work stitches “while encasing the chain above.” This means you will be pushing your hook through the stitches of the previous round and looping your working yarn over the loose chain from the prior round, trapping it inside your new stitches. This is the secret to getting that gorgeous, raised 3D effect on the star points!
Pattern Instructions
Creating the Center & Bobbles
Round 1 Magic ring, ch2(count as hdc), 15hdc, slst to the top of the first ch2, fasten off.
Round 2 Join new yarn to any st, ch1, 3 incomplete hdc in this st, yo and pull through all loops to form 3-hdc-puff. 3-hdc-puff in remaining sts, slst to the first puff.
Round 3 With white yarn, ch3(count as dc)+2dc. with blue yarn, 3dc in next st. [with white yarn, (3dc). with blue yarn, (3dc)] rep 7 times. slst to the top of the first ch3, fasten off.
Round 4 Join new yarn to any st, ch1, 1sc in each st, slst to the first sc.
Forming the Star Points
Round 5 ch2(count as incomplete dc)+2 incomplete dc to form an incomplete 3-dc-bo. sk3. make an incomplete 3-dc-bo in next st, yo and pull through all loops to complete a 3-dc-bo2tog, ch7. sk1, make a 3-dc-bo2tog over the next and 5th st (skipping 3 sts between). ch7 rep 7 times, slst to the first dec, fasten off.
Round 6 Pull new yarn up from the gap under a dec, ch4(count as tr)+2tr. Work into the skipped st under next chain: make 4tr while encasing the chain above. ch1, sk next dec, 4tr in next skipped st while encasing the chain above, 3tr+ch2 in the gap under next dec. [3tr in the current gap, 4tr in next skipped st while encasing the chain above. ch1, sk next dec, 4tr in next skipped st while encasing the chain above, 3tr+ch2 in the gap under next dec] rep 3 times, slst to the top of the first ch4, fasten off.
The Rustic Border
Round 7 Join brown yarn to any corner, ch2(count as hdc)+1hdc. 7hdc. Work into the gap under the skipped dec with orange yarn: 3-dc-bo while encasing the chain above. with brown yarn, 7hdc, 2hdc+ch2. [still in brown yarn, 2hdc in the current corner, 7hdc. Work into the gap under the skipped dec with orange yarn: 3-dc-bo while encasing the chain above. with brown yarn, 7hdc, 2hdc+ch2]rep 3 times, slst to the top of the first ch2.
Round 8 ch1, sc in each st, 2sc+ch1+2sc in each corner. slst to the first sc, fasten off.

Design & Texture Tips
To truly get that “rustic” feel, the type of yarn you choose makes a massive difference. As suggested in the materials list, wool yarn is the perfect choice for this specific pattern. Wool has a natural fuzziness (often called a “halo”) that softens the harsh lines of the color changes and makes the dimensional bobbles look incredibly plush and cozy. If you are sensitive to wool or prefer a vegan alternative, a high-quality tweed or roving-style acrylic yarn will give you a similar textured, rustic appearance.
Blocking is also highly recommended for this square. Because you are working treble crochets and bobbles on one side, and single crochets on the other, the square may want to curl or pucker slightly. Gently wet-blocking or steam-blocking the square and pinning it out to perfect right angles will make joining your squares together infinitely easier later on.
More Fun Granny Square Patterns
If you loved the 3D, textured element of this rustic star, you will absolutely adore our 3D Christmas tree granny square pattern, which uses a similar layered puff stitch technique to create a raised holiday tree.
For more seasonal motifs, we have plenty of options! You can crochet a beautiful Christmas star granny square featuring a stunning lacy 5-pointed star. And if you like to get a little spooky when the weather cools down, be sure to check out our spooky ghost granny square and the edgy, highly detailed skull and flower granny square.
Conclusion
Congratulations on completing your Rustic Star Granny Square! This highly textured, multi-toned star design is a true showstopper that will bring warmth and dimension to any crochet project. Share your cozy creations in the comments below!
