
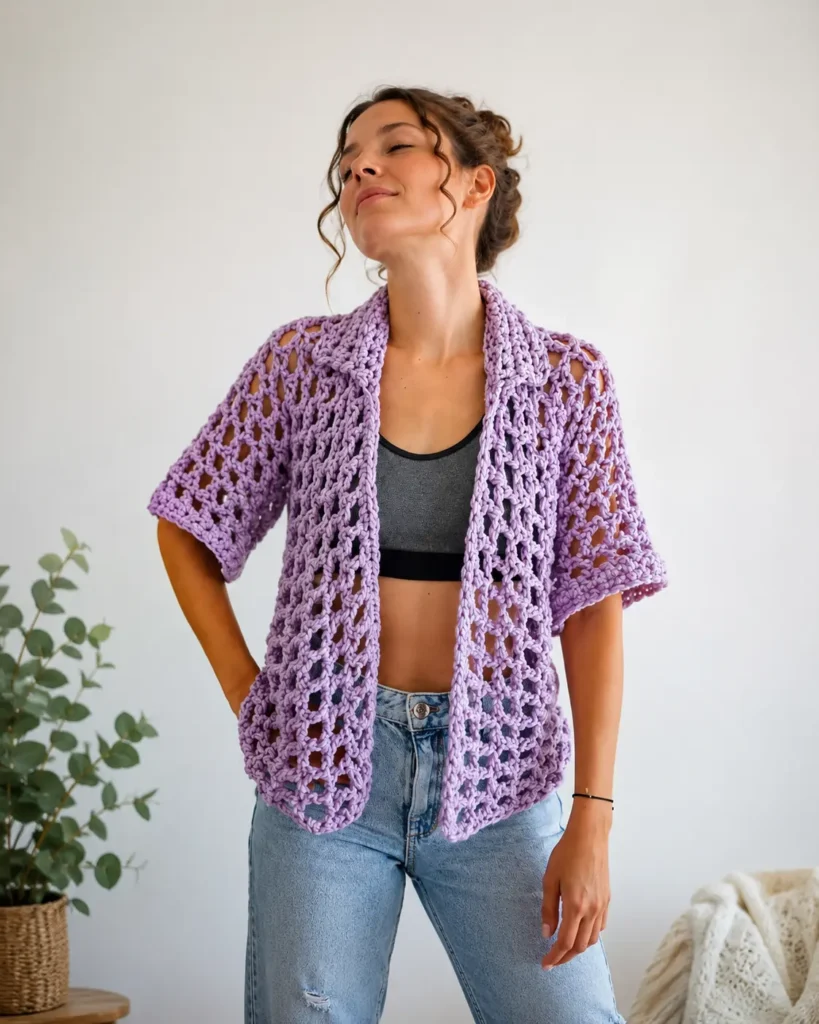
If you’ve been searching for a stylish, wearable crochet garment that works for every skill level beyond the basics, the Chunky Mesh Overshirt is exactly what your hook has been waiting for. This open-front cardigan-style top is worked in a beautiful dc-chain mesh stitch using super bulky cotton yarn, making it crochety up fast while looking absolutely stunning. Whether you’re layering it over a crop top in summer or throwing it on over a tee on a breezy evening, this overshirt delivers on both style and comfort.
In this complete guide, you’ll find everything you need to successfully complete this project — from materials and gauge to a full stitch-by-stitch breakdown, finishing tips, and answers to the most common questions beginners ask.
What Is a Chunky Mesh Overshirt?
A chunky mesh overshirt is an open-front, cardigan-style top crocheted in a repetitive double crochet and chain-1 mesh pattern. The “mesh” refers to the lacy, open structure created by alternating double crochets with single chain spaces, resulting in a lightweight fabric full of beautiful holes and texture.
The “chunky” part comes from the super bulky yarn weight used — typically a thick cotton rope or similar fiber — worked on a 10mm hook. This combination means the project crochets up quickly and produces a garment with visible, bold stitch definition that reads beautifully even from a distance.
This design is worked sleeve to sleeve — a construction method that may feel unfamiliar at first but is actually very logical once you understand the flow. You begin at one sleeve cuff, work upward, then expand outward to form the body panels before finishing with the second sleeve. The whole piece is then folded, seamed, and finished with a collar.
Materials Needed
Before you cast on a single chain, make sure you have the following on hand:
- Yarn: 300–400 yards (275–360 meters) of super bulky (weight 6) cotton yarn. A thick, single-ply cotton rope or macramé-style yarn works beautifully for this project. Cotton is ideal because it gives the mesh structure without draping too loosely, and it’s breathable for warm-weather wear.
- Hook: 10mm crochet hook
- Scissors and yarn needle for weaving in ends and seaming
- Stitch markers (optional but helpful for tracking row counts during the body panel section)
- Measuring tape to check gauge
Yarn quantity tip: The smaller sizes (S/M) will likely use closer to 300 yards, while larger sizes (2X/3X) will need closer to 400 yards. Always buy a little extra if you’re unsure — running out of a dye lot mid-project is frustrating.
Gauge
Getting your gauge right is especially important for garment projects like this one.
Target gauge: 16 stitches by 7 rows = 8 x 8 inches (20 x 20 cm) in the dc, ch-1 mesh pattern used throughout the pattern.
Before starting your overshirt, crochet a gauge swatch of at least 20 stitches wide and 8–9 rows tall, then measure the central 8×8 inch section. If your swatch is too large (too few stitches per inch), go down a hook size. If your swatch is too small (too many stitches per inch), go up a hook size.
Don’t skip the gauge swatch. A difference of even half a stitch per inch across a garment can result in a finished piece that’s several inches off in the bust — especially in larger sizes.
Sizing
The overshirt is available in three sizes:
| Size | Fits Up to Bust |
|---|---|
| S/M | 36 in (90 cm) |
| L/XL | 42 in (105 cm) |
| 2X/3X | 52 in (135 cm) |
Instructions throughout the pattern are written as S/M (L/XL, 2X/3X). Whenever you see numbers in parentheses, the first number is for S/M, the second for L/XL, and the third for 2X/3X.
Choosing your size: This overshirt is designed to be worn open-front with a relaxed, slightly oversized fit. If you’re between sizes or prefer a more generous drape, consider sizing up.
Crochet Abbreviations Used
- ch – chain
- sc – single crochet
- dc – double crochet
- st(s) – stitch(es)
- rep – repeat
- rem – remaining
- * or ** – repeat instructions between markers
Construction Overview: How This Garment Is Built
Understanding the construction before you begin will save you confusion as you work. Here’s the big picture:
- First sleeve — worked flat from cuff upward
- Body expansion — chains are added to both sides of the sleeve to create foundation rows for the back panel and both front panels
- Body panels — worked in mesh; the front is split into two halves to create the cardigan-style opening
- Second sleeve — mirrored from the first
- Seaming — the flat piece is folded in half and seamed along the underarms and sides
- Collar — a simple single crochet collar is worked around the neckline opening
- Optional edging — a single crochet border along the front opening gives a clean, polished finish
This sleeve-to-sleeve construction produces a T-shaped flat piece before seaming — a classic technique used in many wearable garment patterns.
Step-by-Step Pattern Instructions
First Sleeve
Foundation chain: Chain 30 (34, 38).
Row 1: Skip the first chain, then work 1 sc in each remaining chain. You will have 29 (33, 37) stitches.
Row 2: Ch 1, turn. Work 1 sc in each stitch across.
Row 3 (mesh row): Ch 4 (counts as 1 dc and ch 1). Skip the next stitch, make 1 dc in the following stitch. Ch 1, skip the next stitch, make 1 dc in the next stitch. Repeat from * to end of row.
Continue: Repeat Row 3 for a total of 5 rows of dc mesh. This forms your first sleeve.
Tip: The ch-4 turning chain at the start of every mesh row counts as your first dc plus ch-1 space. When you work back across on the next row, treat the top of that ch-4 as a dc stitch.

Expanding to the Body: Adding the Front Panel
With working yarn still attached to your first sleeve, chain 29 for the front panel foundation.
Front Panel Row 1: Skip the first 5 chains (this counts as 1 dc, ch 1, and the skipped chain), then work 1 dc into the 6th chain. Ch 1, skip 1 chain, 1 dc in next chain. Repeat from * until you reach the sleeve edge. Ch 1, then work 1 dc into the first dc of your sleeve, and continue working in the established dc mesh pattern all the way across the sleeve.
Expanding to the Body: Adding the Back Panel
Repeat the exact same instructions as the front panel. When you work across the new back panel chains and all the way across the sleeve, continue the mesh pattern across the front panel stitches as well.
You are now working all three sections — front panel, sleeve, and back panel — in a single connected row.
Growing the Panels
Continue working in the dc mesh pattern across all stitches (front panel + sleeve + back panel) until:
- Front panel has 7 (9, 11) rows
- Back panel has 6 (8, 10) rows
Why do the front and back have different row counts? This slight difference accounts for the neckline shaping, creating a more natural fit when the garment is worn.
Adding the Second Front Panel
On the next row, continue working in the dc mesh pattern until you have completed a total of 23 (24, 25) dc stitches. Then, chain 39 (41, 43).
Skip the first 5 chains and work 1 dc into the 6th chain, then continue in dc mesh along the entire piece.
Keep working until your second front panel has 6 (8, 10) rows.
Creating the Front Panel Opening
On the 7th (9th, 10th) front panel row, work only the first 28 (30, 32) dc stitches. This is where the cardigan opening is formed — you stop mid-row and turn back.
Ch 4, turn, and work back in the other direction for 15 (17, 19) dc stitches (including your turning chain).
Second Sleeve
Ch 4, turn, and continue working in dc mesh for 5 sleeve rows — mirroring the construction of the first sleeve. Finish with 2 rows of single crochet at the cuff edge.
Seaming the Garment
Once your flat piece is complete, it’s time to transform it into a wearable top:
- Fold the piece in half along the center sleeve line (widthwise), right sides together.
- Seam along the underside of each sleeve — this closes the sleeve tubes.
- Seam along the sides of the body panels — this closes the sides of the body, leaving a gap at the top for the armholes.
- Optional: Work 1 sc for each chain and dc stitch all along both front opening edges for a neat, even finish. This also adds slight structure to the front opening so it lies flat.
Seaming tip: For a seamless, invisible join, use a whip stitch or mattress stitch with a yarn needle and a length of your working yarn. Match up your mesh stitches carefully on both sides for the cleanest result.
Adding the Collar
The collar is a simple, flat single crochet rectangle that folds over to create a classic collar silhouette:
- Fasten on new yarn at the neck opening, 13 dc stitches up from the bottom edge of one front panel.
- Work in single crochet up and around the entire neck opening, stopping at the stitch 13 dc from the bottom on the other front panel.
- Work a total of 6 rows of single crochet.
- Fasten off and weave in all ends.
Collar tip: Keep your single crochet rows even and consistent in tension. The collar should lie flat and not curl. If it curls, your tension is too tight — try going up half a hook size for the collar section only.
Tips for Success
Use a stitch marker to track panel row counts. Since the front and back panels grow at different rates, it’s easy to lose count. A simple locking stitch marker at the start of each panel section saves confusion.
Count your stitches often. In a mesh pattern, it’s easy to accidentally crochet into a chain space instead of a dc stitch (or vice versa). Quick stitch counts every few rows keep you on track.
Block before seaming. Wet blocking your finished flat piece before folding and seaming helps the mesh open up beautifully and makes the piece much easier to seam evenly.
Weave ends as you go. Super bulky cotton yarn has thick ends that can be bulky if left all to the end. Weaving them in as you complete each section keeps things manageable.
Tension matters for drape. Cotton yarn has little to no stretch. If you crochet tightly, the mesh won’t have as much open, airy drape. Aim for a relaxed, even tension throughout.
Yarn Substitution Tips
While a thick, single-ply cotton rope yarn is recommended for this pattern, you can substitute any super bulky (weight 6) yarn provided you hit gauge. Here are a few considerations:
- Cotton vs. acrylic: Cotton will give you structure and breathability, making it ideal for warmer months. An acrylic or cotton-acrylic blend will be softer and have a bit more stretch, which can be forgiving for fit.
- Single-ply vs. plied: Single-ply cotton rope yarns tend to show the mesh stitch beautifully. Plied yarns will work but may give a slightly different texture.
- Avoid fuzzy or textured yarns: Bouclé, mohair, or highly textured yarns will obscure the mesh pattern. Smooth yarns work best here.
Frequently Asked Questions
Can beginners make this overshirt? This pattern is best suited for intermediate crocheters who are comfortable with double crochet, chain spaces, and basic garment construction. If you’ve crocheted granny squares or simple accessories and want to tackle your first garment, this is an excellent next step. If you’re new to granny-style mesh patterns, check out the beginner guide to granny square patterns to get comfortable with dc-mesh construction first.
How long does this project take? With super bulky yarn and a 10mm hook, most crocheters complete this overshirt in a single weekend — roughly 8–12 hours depending on size and experience level.
Can I make this longer to turn it into a duster or maxi length? Yes! Simply add additional rows to the body panel section before creating the second front panel opening. Keep in mind you’ll need significantly more yarn — plan for an extra 100–150 yards per additional 3–4 inches of length.
What can I wear this with? This overshirt layers beautifully over cropped tops, bralettes, bandeau tops, or fitted tees. Pair it with high-waisted jeans, shorts, or — for a full crochet look — try it over the crochet granny square pants or crochet granny square shorts for a coordinated boho set.
Can I sell finished items made from this pattern? Yes — you are welcome to sell handmade garments created using this pattern.
Styling Ideas for Your Chunky Mesh Overshirt
Once your overshirt is finished, there are endless ways to wear it:
- Beach cover-up: Throw it over a swimsuit for an effortlessly chic poolside or beach look.
- Festival style: Pair with high-waisted shorts and boots for a boho festival vibe.
- Layered casual: Wear over a graphic tee and jeans for everyday laid-back cool.
- Crochet-on-crochet: Go all in on the crochet trend by pairing with crochet bottoms — a coordinated full-crochet outfit is having a major fashion moment.
- Office casual (in the right setting!): Over a fitted blazer or structured top, the mesh overshirt adds unexpected texture to a business-casual look.
Final Thoughts
The Chunky Mesh Overshirt is one of those satisfying crochet garment projects that works up quickly, looks impressively intricate, and rewards you with a genuinely wearable piece you’ll reach for again and again. The sleeve-to-sleeve construction may feel new, but once you get started you’ll appreciate how logical and intuitive it is — and how flat the seaming becomes as a result.
Whether you’re a longtime garment crocheter or attempting your very first wearable project, this overshirt is an accessible, stylish choice that punches well above its difficulty level in terms of finished impact.
Happy stitching — and don’t forget to share your finished make!
Looking for more crochet inspiration? Explore the full crochet collection including the granny square shorts, granny square pants, and the complete granny square pattern guide.
