
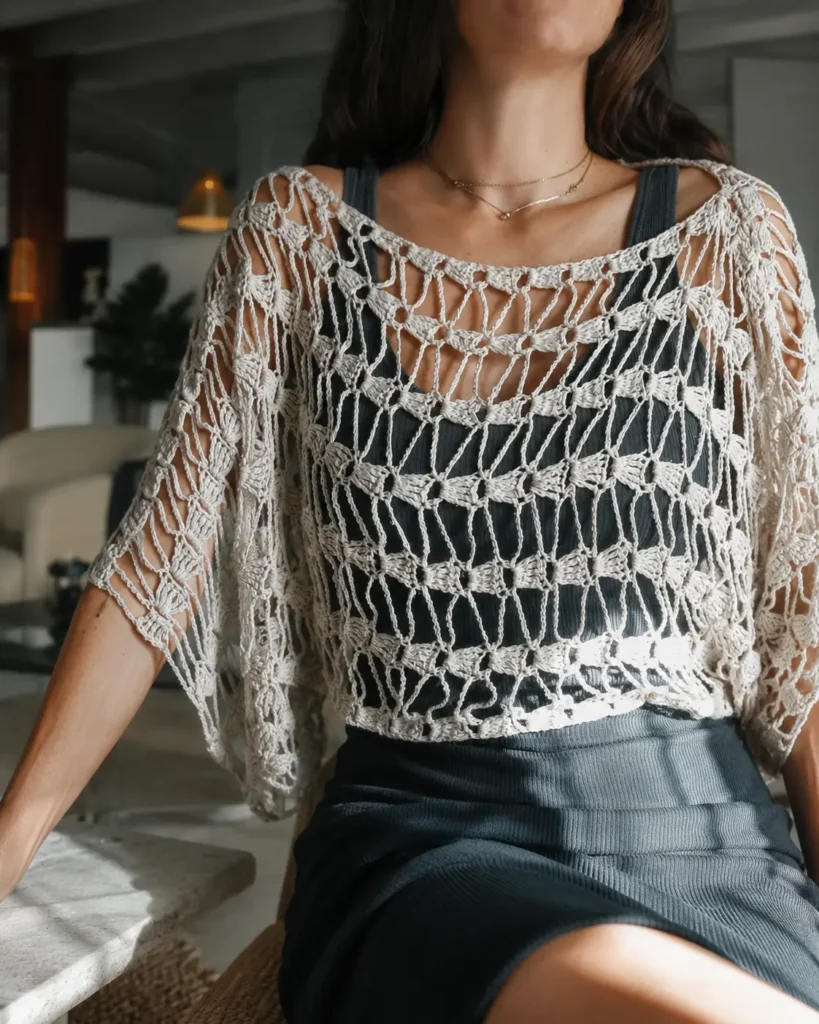
If you’ve been searching for a stunning crochet top that’s as versatile as it is beautiful, the Flaminia top is exactly what your summer wardrobe needs. This breathtaking lace crochet top features an airy, open-stitch design with romantic bell sleeves and a wide boat neckline — the kind of piece that looks equally gorgeous over a bikini on the beach or layered over a slip dress for a night out. Best of all, it’s a made-to-measure pattern, which means you can customize every dimension to fit your unique body perfectly.
In this detailed guide, we’ll walk you through every step of creating the Flaminia top, from calculating your gauge to the final seam. Whether you’re an intermediate crocheter looking for a new challenge or an advanced maker wanting a quick, wearable project, this pattern delivers stunning results without overwhelming complexity.
What Is the Flaminia Top?
The Flaminia top is a crop-top-style crochet garment constructed from two identical rectangular panels worked flat in rows. Once both panels are complete, they are blocked and seamed together along specific sections of the long edges to create the neckline and sleeve openings. The result is a flowing, draped top with a wide sleeveless or sleeved silhouette depending on how much seaming you do.
What makes this design special is its lace stitch pattern — a rhythmic combination of single crochets, long chain arches, and clusters of triple crochets that create a gorgeous diamond-like mesh with sculptural texture. When worn, the fabric drapes softly and catches the light beautifully, making it feel elevated and intentional.
Materials You’ll Need
Before you pick up your hook, gather these essentials:
- Yarn: The pattern is designed for fingering weight / 4-ply super fine yarn. For a size M crop top, you’ll need approximately 150g (about 480 meters). Choose a smooth, mercerized cotton or cotton-blend for best stitch definition and drape — linen blends also work beautifully for a more structured result.
- Hook: A 3.5mm (US size E-4) crochet hook is recommended, though you should ultimately choose the hook that gives you the correct gauge with your chosen yarn.
- Tapestry needle: For weaving in ends and seaming the panels.
- Blocking mats and pins: Blocking is essential for this pattern — it opens up the lace and dramatically improves the final appearance.
- Scissors, stitch markers (optional but helpful).
A note on yarn substitution: Because this is a made-to-measure pattern, you can use virtually any yarn weight you prefer, as long as you take the time to swatch and calculate your gauge properly. Heavier yarns will produce a chunkier, cozier version; lighter yarns will give you something more delicate and sheer.
Understanding the Stitch Pattern
The Flaminia top uses a 3-row repeating lace stitch that creates a striking open-work fabric. Before beginning the actual top, you must work a gauge swatch using this exact stitch sequence.
Abbreviations (US terms):
- ch = chain(s)
- st = stitch(es)
- sc = single crochet
- trc = triple crochet
- ch 3 sp = space of 3 chains
- rep = repeat
The Stitch Pattern Rows:
Foundation: Chain 29 + 1, or any number that is a multiple of 24 + 5 + 1.
Row 1 (Setup Row): Starting from the 6th chain from the hook, work 1 sc. 9 ch, skip 8 sts, 2 trc in the same stitch, 1 trc, 2 trc in the same stitch, 9 ch, skip 8 sts, 1 sc, 3 ch, skip 3 sts, 1 sc. Repeat from * to * across the row.
Row 2: Ch 4 (counts as 1st trc), 4 trc in the ch-3 space. 9 ch, 1 sc in the 1st trc below, 3 ch, skip 3 trc, 1 sc in the last trc, 9 ch, 5 trc in the ch-3 space. Repeat from * to * across.
Row 3: Ch 4 (counts as 1 sc and 3 ch), 1 sc in the last trc below. 9 ch, 5 trc in the ch-3 space, 9 ch, 1 sc in the 1st trc, 3 ch, skip 3 trc, 1 sc in the last trc. Repeat from * to * across. End with 1 sc in the turning chain from the previous row.
Repeat Rows 2 and 3 for the body of the fabric. Turn your work at the end of every row.
This stitch creates a rhythmic alternating pattern: the fan-like clusters of triple crochets shift from side to side between rows, connected by long looping chains that give the fabric its characteristic open, net-like quality.
How to Calculate Your Gauge
This step is non-negotiable and is the secret to a perfectly fitting garment. Do not skip it!
- Work your foundation chain of 29 + 1 stitches.
- Work Row 1 through 5 rows of the repeat (Rows 2 and 3).
- Block your swatch by wetting it, pinning it flat to your measurements, and allowing it to dry completely before measuring.
- Measure the blocked swatch. The designer’s gauge is 15 cm wide × 7 cm tall after blocking.
Your gauge will likely differ depending on your yarn, hook, and tension. This is completely normal — and it’s exactly why you take measurements from your own swatch.
Calculating Your Starting Chain
The Flaminia top is worked from sleeve edge to sleeve edge — the short side of the rectangle is the sleeve hem, and you work across to the opposite sleeve hem.
Step 1 — Decide your sleeve width: This measurement determines both the sleeve circumference and the shoulder-to-waist drop of the top, since the panel covers both. The designer used 40 cm (roughly 15.75 inches).
Step 2 — Calculate your stitch count:
Use this formula:
(Gauge stitches ÷ Gauge width in cm) × Desired sleeve width in cm = Starting stitches
For example: (29 ÷ 15) × 40 = 77.3 stitches
Step 3 — Adjust to pattern multiple: Your stitch count must be a multiple of 24, plus 5. To check: subtract 5 from your number, then divide by 24. Round up or down to the nearest whole multiple if needed.
Example: 77 − 5 = 72; 72 ÷ 24 = 3. ✓
Step 4 — Add the turning chain: Add 1 to your stitch count for the turning chain. Chain 78 total (77 + 1) to begin.
Working the First Panel
With your foundation chain calculated and worked, begin Row 1 as described in the stitch pattern above. Then repeat Rows 2 and 3 continuously until your panel reaches your desired sleeve-to-sleeve length.
This length spans from one sleeve opening to the other — essentially, the full width of the garment from cuff to cuff when worn. Some options to consider:
- Elbow-to-elbow (approx. 85–95 cm): Creates a cropped 3/4 sleeve — the designer’s choice at 90 cm.
- Shoulder-to-shoulder (approx. 45–55 cm): Creates a sleeveless or cap-sleeve version.
- Wrist-to-wrist (approx. 130–160 cm): Creates a full-length dramatic sleeve.
Measure your own body to determine the length that’s right for you. Once your panel reaches the desired length, fasten off and set it aside.
Then make a second panel, identical to the first.
Blocking: The Step That Makes the Difference
Once both panels are finished, block them individually and flat before sewing them together. This is crucial for lace crochet. Blocking:
- Opens up the stitch pattern and reveals the full beauty of the lace
- Evens out tension inconsistencies
- Sets the final dimensions so your seaming is accurate
- Prevents the finished top from looking bunched or uneven
To block: soak each panel in cool water for 10–15 minutes, gently squeeze out excess water (don’t wring), then pin flat to blocking mats using rust-proof pins. Stretch the panel to your target measurements, aligning the edges. Leave to dry completely — this can take 12–24 hours depending on your yarn fiber.
Assembly: Seaming the Top Together
With both panels blocked and dry, it’s time to seam them into a wearable garment. Place the two panels on top of each other with right sides facing outward (or however you prefer to work your seams).
You will be seaming along both long edges of the panels, leaving specific sections open for the neck and sleeve openings.
Step 1 — The Neckline
Sew along one long edge, leaving the center section open for the neck. The designer left approximately 38 cm open in the center (for a wide boat neck), achieved by sewing about 26 cm on each side.
For a narrower or deeper neckline, adjust these measurements. The key rule: always sew the same number of centimeters on each side so the opening is perfectly centered.
Step 2 — The Sleeves
Flip the panels over and sew along the other long edge, again leaving a section open — this time for the armhole/sleeve opening at each end. The designer sewed approximately 12 cm on each side of this edge.
More seaming here creates a deeper underarm and more fitted sleeve. Less seaming creates a wider, more open sleeve that falls loosely.
Once both long edges are seamed, the short edges at each end form the open sleeve hems naturally.
Sizing Tips and Customization Ideas
Because the Flaminia top is fully customizable, here are some ideas to make it your own:
- Go longer for a tunic: Simply increase your sleeve-to-sleeve length and reduce the amount of neckline seaming, leaving more of the center open.
- Adjust the crop length: The shoulder-to-waist drop is determined by your starting chain (sleeve width). A longer chain = more length from shoulder to hem.
- Try a different yarn weight: DK or worsted weight yarn with a larger hook creates a boho, chunky-lace version that works beautifully as a beach cover-up.
- Add fringe: The natural chain edges at the sleeve hems lend themselves perfectly to added fringe or tassel trim.
- Embellish the neckline: Work a simple single crochet edging or shell stitch border around the neckline and sleeve edges for a more finished look.
If you love working with the lace mesh and granny-style motifs used here, you might also enjoy exploring granny square pants or crochet granny square shorts — both use a similar open-stitch philosophy to create wearable, fashion-forward pieces. And if you want to deepen your understanding of the classic granny square construction that underpins so many modern crochet garments, this complete granny square pattern guide is a wonderful companion resource.

Frequently Asked Questions
What skill level is this pattern? The Flaminia top is best suited for intermediate to advanced crocheters. You should be comfortable working flat rows, counting stitch repeats, and reading a lace pattern. The stitch pattern itself is not technically difficult once you understand the rhythm, but accuracy in stitch placement matters for the lace to look clean.
Can I use acrylic yarn? Yes, though cotton or linen blends are strongly recommended for warm-weather tops. Acrylic will give a different drape and may not block as effectively. If you want the lace pattern to open up beautifully, natural fibers respond much better to wet blocking.
How do I know if I have the right number of stitches? At the end of Row 1, count your stitch groups. You should have a consistent pattern of 5-trc clusters alternating with sc pairs across the entire row. If your last repeat doesn’t complete cleanly, recheck your starting chain count.
What if my swatch gauge is different from the designer’s? That’s completely fine — just use your own measurements in the formula. If your gauge is 12 sts = 15 cm and you want 40 cm sleeves: (12 ÷ 15) × 40 = 32 sts. Adjust to the nearest multiple of 24 + 5.
Final Thoughts
The Flaminia top is one of those rare crochet patterns that manages to feel both approachable and truly special. The construction method — two identical flat rectangles seamed together — keeps things beautifully simple, while the lace stitch pattern provides all the visual drama you could want. The made-to-measure approach means anyone, regardless of size, can create a top that fits them perfectly.
Take your time with the gauge swatch, be patient with the blocking step, and approach the seaming thoughtfully — those three things will determine 90% of how your finished top looks. Get them right, and you’ll have a crochet garment you’ll reach for again and again all season long.
Happy crocheting!
