
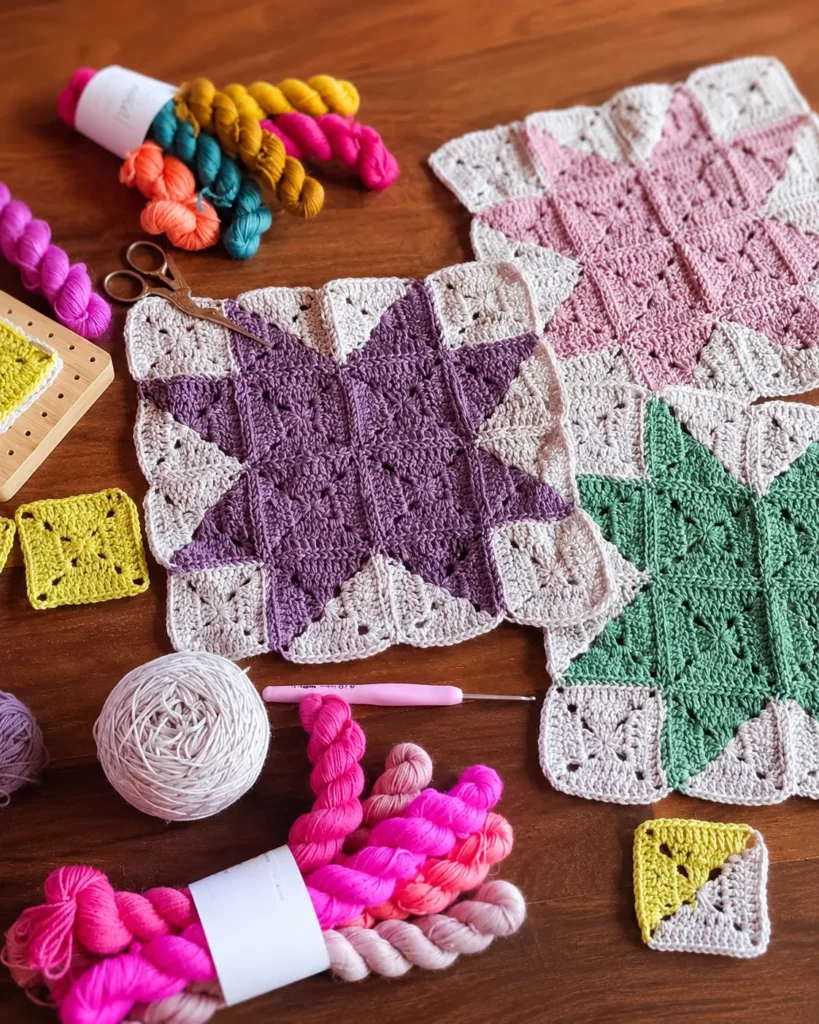
There is something deeply satisfying about taking a collection of simple crochet granny squares and piecing them together into a stunning, geometric masterpiece. The Star Patchwork blanket has become incredibly popular in the yarn community, and for good reason. It offers a beautiful balance of colorwork, texture, and classic crochet tradition.
Best of all, this is a fantastic stash-busting project. You can use leftover fingering weight or DK yarn from previous projects to create a truly personalized piece. Whether you are looking to make a cozy cushion cover, a statement lapghan, or a full-sized heirloom blanket, this step-by-step tutorial will guide you through the entire process.
If you are new to granny squares, you might want to brush up on the basics with our guide on mastering the basic granny square before diving in!
The Beauty of Slow Crochet
Before we begin, it is important to note that this is a “slow crochet” project. Piecing a patchwork blanket requires patience. Lay your squares out, arrange your colors, and sew them together mindfully. Rushing through the joining process can lead to misplaced motifs and uneven edges. Put on your favorite podcast or a good movie, and enjoy the meditative process of bringing these stars to life.
Materials & Sizing
Because this pattern is highly adaptable, your yarn choice will dictate your final size.
For a Cushion Cover (using Fingering Weight Yarn):
- Main Color: 400 meters of fingering weight yarn
- Contrasting Colors: 85 meters each of various fingering weight colors (a mini-skein set works perfectly)
- Crochet Hook: 2.5 mm
- Tapestry Needle
- Scissors
For a Larger Blanket (using DK Weight Yarn):
- Yarn: DK weight yarn in your chosen main and contrasting colors.
- Crochet Hook: 3.5 mm to 4.0 mm (adjust based on your personal tension)
Gauge (Fingering Weight): 28 stitches x 12 rows in Double Crochet over a 10 x 10 cm swatch. Finished Square Size (Fingering Weight): 5.5 cm x 5.5 cm.
Note: One full “Star Motif” requires 16 granny squares. A cushion cover requires 4 star motifs (64 squares total). A blanket is made by connecting multiple star motifs together.

Important Pattern Notes
- UK vs. US Terms: This pattern uses UK terminology. A Double Crochet (dc) here is a Single Crochet (sc) in US terms. A Chain (ch) remains the same.
- Turning: You will turn your work after every row. This creates a beautifully uniform texture on both the front and back of your squares.
- Weaving Ends: Save yourself a headache later—weave in your ends as you go.
- Joining Method: All motifs are sewn together using the back loops only. This creates an invisible seam on the front of your work and a lovely textured ridge on the back.
Stitch Abbreviations
- dc: Double Crochet (Yarn over, insert hook, yarn over, pull through two loops, yarn over, pull through remaining two loops).
- ch: Chain
- BL: Back Loop only
Part 1: How to Crochet a Standard Granny Square
You will need to make 4 of these in your Main Color and 4 in a Contrasting Color for each star motif you plan to create.
Row 1 (Right Side): Make a magic circle. Ch 3 (counts as 1 dc), work 2 dc into the magic circle. Ch 3, work 3 dc into the magic circle. Repeat from * to * two more times. Dc into the top of the first dc to close the round. Turn your work.
Row 2 (Wrong Side): Ch 3 (counts as 1 dc), work 1 dc into the first chain space. Work 3 dc into the next chain space, then (2 dc, ch 3, 2 dc) into the next chain space (this forms your corner). Repeat from * to * two more times. Work 3 dc into the next space, 2 dc into the final space, and join with a dc to the top of the first dc. Turn your work.
Row 3 (Right Side): Ch 3 (counts as 1 dc), work 1 dc into the first chain space. Work 5 dc into the next chain space, then (2 dc, ch 3, 2 dc) into the corner space. Repeat from * to * two more times. Work 5 dc, then 2 dc into the final space, ch 2. Fasten off, leaving a 15 cm tail.
The Perfect Corner Finish: Thread your tail onto a tapestry needle. Insert the needle into the top of the first dc of the row. Then, insert the needle into the final ch-2 you just made. This ensures your corner has a perfectly symmetrical 3-chain loop. Fasten off and weave in the end, being careful not to pull it so tight that the corner closes up.
Part 2: How to Crochet a Half-and-Half Granny Square
This two-toned square is what gives the star patchwork its optical illusion. You will need 8 of these squares per star motif.
Row 1 (Right Side): Using Color 1, make a magic circle. Ch 3 (counts as 1 dc), 2 dc into the circle. Ch 3, 3 dc into the circle. Ch 2, drop Color 1 and pick up Color 2. Work 3 dc into the circle. Ch 3, 3 dc into the circle. Dc into the top of the first dc. Turn your work.
Row 2 (Wrong Side): Using Color 2, Ch 3, 1 dc into the first space. Work 3 dc, (2 dc, ch 3, 2 dc) into the next space. Work 3 dc, 2 dc into the next space. Ch 2, drop Color 2 and pick up Color 1. Work 2 dc into the next space, 3 dc, (2 dc, ch 3, 2 dc) into the corner space. Work 3 dc, 2 dc into the final space. Dc into the top of the first dc. Turn your work.
Row 3 (Right Side): Using Color 1, Ch 3, 1 dc into the first space. Work 7 dc, (2 dc, ch 3, 2 dc) into the corner. Work 7 dc, 2 dc into the next space. Ch 2, drop Color 1 (leaving a 15-20 cm tail) and pick up Color 2. Work 2 dc into the space, 7 dc, (2 dc, ch 3, 2 dc) into the corner. Work 5 dc, 2 dc into the final space, ch 2. Fasten off, leaving a 20 cm tail. Use the tail to create the perfect corner finish as described in Part 1.
Part 3: Joining Your Motifs Vertically
To build the star, you must first sew your squares into vertical strips of four. Refer to a patchwork star diagram to see how your solid squares and half-and-half squares align.
Tip: Cut a length of joining yarn that is double the length of the strips you are joining to ensure you don’t run out mid-seam.
Step 1: Align two squares right-side up, with their back loops facing you. Step 2: Starting at the middle chain of any corner, insert your tapestry needle through the back loop of the stitch on the first square, and then the back loop of the parallel stitch on the second square. Step 3: Continue whip-stitching through the back loops of both squares simultaneously down the side. (You can sew over your starting tail to secure it). Step 4: When you reach the bottom corner, align the next two squares below your current pair. Sew through the back loops of all four squares meeting at the corner point. Pull tight to close the intersection neatly. Step 5: Continue sewing down the next pair of squares. Repeat until your vertical strip of four is complete. Fasten off and weave in ends.
Part 4: Joining Your Motifs Horizontally
Once your vertical strips of four are made, you need to join them side-by-side to reveal the star.
Step 1: Thread your needle with a long length of yarn. Step 2: Align two vertical strips right-side up. Start at the middle chain of the top corner and insert your needle through the back loops of both strips. Step 3: Sew down the side using the same back-loop whip stitch. Step 4: When you reach a point where four squares already intersect (from your vertical seams), do not sew into that thick bump. Instead, simply slide your needle behind the existing join to skip over it, and resume sewing the back loops of the next stitches. Step 5: Continue until the strips are fully joined. Fasten off and weave in ends.
Expanding Your Patchwork Blanket
The true magic of this pattern is its scalability. To turn a single star motif into a blanket, simply make multiple star motifs and join them together using the exact same horizontal back-loop sewing method described above.
You can play with color inversion—swapping your main color and contrasting colors on alternating star motifs—to create a dazzling, textured grid that looks incredibly complex but is just simple squares perfectly arranged.
Looking for more ways to use up your yarn stash? Check out our easy textured crochet baby blanket or try adding some whimsy to your home with this charming crochet decor patterns guide!
Embracing the Slow Craft
Creating a patchwork blanket is a labor of love. It’s a wonderful way to practice crochet mindfulness and find inner peace as you rhythmically stitch row after row. Enjoy the journey of selecting colors, watching your star motifs emerge, and finally wrapping yourself up in a blanket that tells the story of your crafting journey. Happy crocheting!
